How To Make Lines Darker In Photoshop?

When you are looking for a solution on how to make lines darker in Photoshop, check out the following article. It would help you get deep into the process with each step in Photoshop. Plus, our easy-to-understand explanation would provide you with a solid guideline on each tutorial.
Making darker lines is a lot easier in Photoshop. Further, you could customize the shade of the line and width as well. To be fair, it’s a non-destructive method that provides you total flexibility on line color and width. Make sure to check out the following tutorial set.

Table of Contents
Step By Step Process On How To Make Lines Darker In Photoshop
Making lines darker in Photoshop needs specific steps to follow. Today we are going to discover these steps in great detail. Let’s get started on the steps right now. It’s the easiest way you could follow Photoshop to make lines darker.
Step 1: Open the Image into Photoshop with File > Open and select the image location.

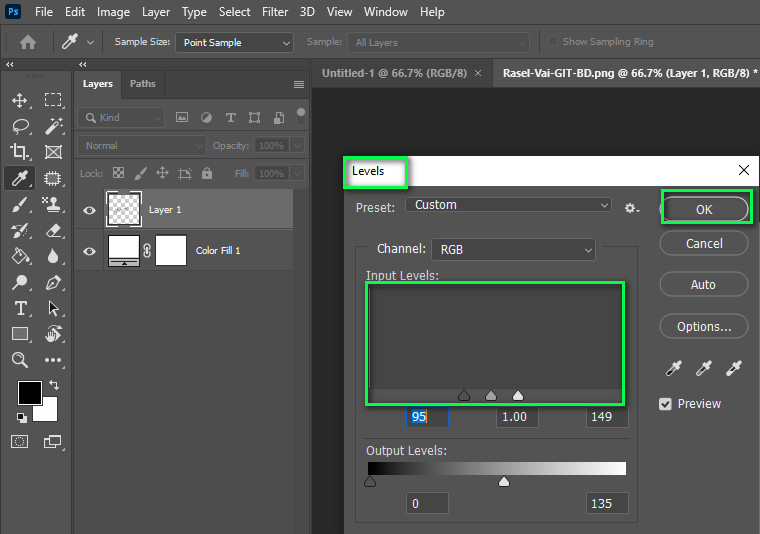
Step 2: Now go into the Image menu > Adjustment > Levels. It would open up a window with levels

Step 3: Afterward, adjust the input levels of the new dialog box. You need to slide the left part towards the right. Plus, it would help if you slid the right sidebar to the left as well.

The following steps would make the lines darker in images. Even if you face problems making the lines darker, you should follow the alternative tutorial as well.
Alternative Tutorial
You could duplicate single layers multiple times to make the lines darker. For instance, open the image file in Photoshop. Afterward, unlock the background image. Then, duplicate the Image with a right-click on the Image> selecting “Duplicate Layer .”Duplicate the same Image twice more times. Afterward, set the layers mode to “Multiply” mode. Later, you could export the Image to get the final image to use on several projects.

How To Darken Background In Photoshop
You have options to create a darker background in Photoshop. Let’s get deep into each of the steps to understand each of the steps better one by one. With the help of the following tutorial, photoshop darkens lines a lot faster. Let’s get into it.
Step 1: First, you need to insert the image into Photoshop.
Step 2: Check out the layers panel. Create a curve layer. Create a dot on the curve with a click. Afterward, drag it downwards to create a darker area on the Image. Keep in mind the following step lets you make the image darker.
Step 3: Afterward, click on the white thumbnail on the Adjustment curve layer. After that, click on the brush tool from the left toolbar. Make sure your foreground color is set to black. Start brushing over the subject to make it appear lighter. As a result, you could isolate the background from the subject.
Make sure you save the file and export the Image once you complete working on the Image. Further, you could come later and adjust the masking and other settings as well.
How To Thicken Lines In Photoshop
In case you want to thicken lines in Photoshop, follow the below-mentioned steps with close detail. It would provide you with thicker lines in Photoshop. Let’s get into it right now.
Step 1: To extract Lineart photoshop, open up the image in Photoshop.
Step 2: Select the “Magic Wand” tool to select the lines on your Image. The tool is located on the left side of the Photoshop interface.
Step 3: Afterword, click on the lines to select the area. Once you click on the lines, the area will show selected on display.
Step 4: Then check out the top bar of Photoshop. You will find the option “Add to selection” for the Magic Wand tool. Click on the following option right away.
Step 5: Check out the edit menu of Photoshop and Stroke. Enter the number of pixels into which you want to increase the thickness of your lines.
Step 6: Choose the location to center. Plus, make sure the bevel is set to normal mode as well. Click on the ok button and close the dialog box when everything is done.
The following technique will make your lines thicker using Photoshop. Plus, It would provide you with the colors you want to apply. As a result, changing the colors are a lot easier for you.
Check out it also-
How To Make Smooth Lines In Photoshop?
How To Make Lines Thinner in Photoshop
You could make the lines thinner in Photoshop the same way you make the lines thicker in Photoshop. But for now, you could set the pixel count to a lower number to let Photoshop make lines thinner.
How To Extract Lineart In Photoshop
Photoshop offers you great sets of tools to extract line art from an image. Using the below-mentioned tutorial, you could make line art transparent in a seamless way. Let’s get into the steps.
Step 1: First thing first, go to Image, then select Scale, and from the option that comes after, click on the Grayscale to select it.
Step 2: Now select all the images by pressing Ctrl + A. Afterwards, press ctrl + C to copy them.
Step 3: After step 2, go to the Channels panel in Photoshop and click on the “create new channel” button.
Step 4: In this step, we will paste the selection on the following Chanel layer we have created in step 3.
Step 5: Then deselect and click on the “load channel as selection” option.
Video source: Ten Hundred
Step 6: After that, we will Invert the selection and invert selection in photoshop press Command + Shift + I (Mac) Control + Shift + I (Win).
Step 7: We need to select the Gray Channel in this step.
Step 8: Now Create a new layer in photoshop by pressing Shift+Ctrl+N (Win) / Shift+Command+N (Mac).
Step 9: After that, fill out the Paint Bucket Tool‘s selection.
Step 10: Remove the middle channel which you have created.
Step 11: Now, use blending modes on the layer or use as you wish.
The following option would extract the lines out of your Image and isolate black lines in Photoshop.
Conclusion
Making darker lines takes a few steps in Photoshop. When you know how to make lines darker in photoshop, it would be a lot more rewarding in the sense of time. You could make your lines darker and look good without any hassle. So, make sure you follow our step-by-step guide and get excellent results.
Making thick lines becomes a necessity in many projects. This is why you must learn and practice the tutorial of making lines thicker in Photoshop. For your convenience, we have listed other sorts of tutorials as well. In short, once you learn these steps, they will be a lot easier to follow.


