How To Change Foreground Color In Photoshop?

Welcome folks! Today in this Photoshop tutorial, we are going to learn how to change the foreground color in Photoshop.
Well, we all know colors play a vital role in every photo and video. Without proper color, images and videos look dull and gloomy. Images and videos always have two main areas, where one is the background and the other is the foreground. With compelling colors in the background and foreground, any graphical content can create a jaw-dropping effect on its viewers. Changing the foreground color in photoshop is an easier task than you think.
You can make changes in the foreground color using the Color Picker or Eyedropper tool in photoshop. Below we will learn how we can change it, but first, let’s know a little more about foreground and background color in Photoshop.
Table of Contents
What Is Foreground / Background Color in Photoshop?
Foreground and background color are the basic tools of Photoshop. In Photoshop, foreground color allows painting, fill, and stroke selection. On the other hand, background color allows making gradients to fill. The foreground color is the closest part to the viewers. It identifies your primary color.
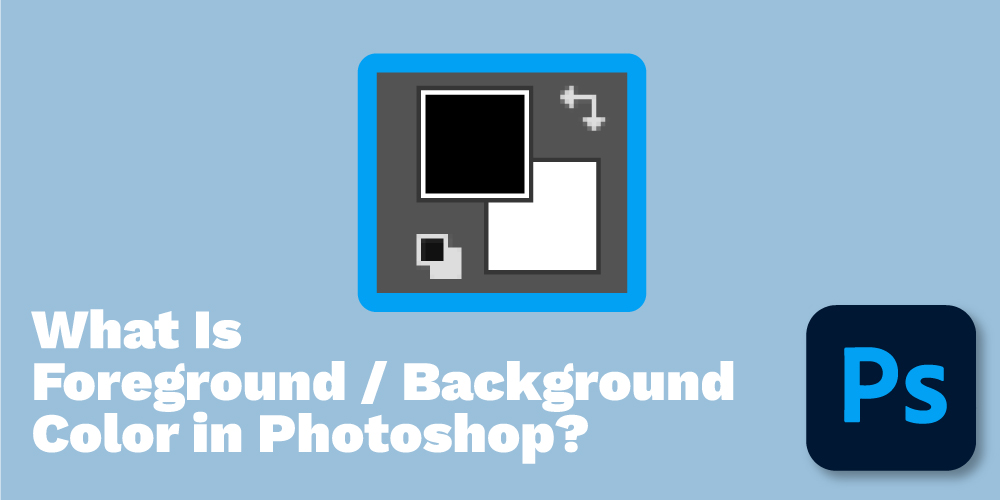
Photoshop uses it in conjunction with the background layer. The background layer is the bottom layer in the layer panel. It is always protected, which means it is locked. You have to convert it into a regular layer before applying any changes like stacking order, blending mode, or opacity. Both are located near the bottom of the toolbox.
Why Changing Foreground Color is Important?
In Photoshop, always set the default foreground and background colors like black and white. Most of the time, the foreground color is used to paint any design. So while you are working, you have to change those colors to the primary color.

Using a brush tool to apply color isn’t a good solution. Because the color of the brush tool can be cracked and cannot fill the corner of a design, erasing the unwanted part can be too frustrating. The foreground tool knows your design, so it can enhance the color greatly. With a few clicks, you can easily change the foreground color. It can save you a lot of time. Hence, these are the reasons you must learn how to change the foreground color in Photoshop.
Difference Between Foreground And Background Color In Photoshop
Knowing the difference between these two elements is essential for understanding how editing programs work. Though foreground and background colors are the same tools, both still have their unique features and work.

Foreground color is mainly used to fill drawings. Foreground color means the upper area of a design. So, your foreground is what people will be focusing on. It allows a designer to do paint, fills, strokes, etc. This layer is always open as others, so the color can change easily without doing extra work. You can choose any color you need to design your work.
On the other hand, background-color means the bottom part or backside of a design. It can create gradient fill, fill erased areas of any image. Background color steals a large amount of area in a canvas. It always helps a designer to create a different composition to separate two grounds. You must select the background color far different from the foreground color while removing the background and adding a new one.
The foreground and background colors enable designers and experts to transform their images and design creatively. This tool also makes it easy to work with a brush, eyedropper tool, color, and swatches to create a good photo.
How To Change Foreground Color In Photoshop with Color Picker
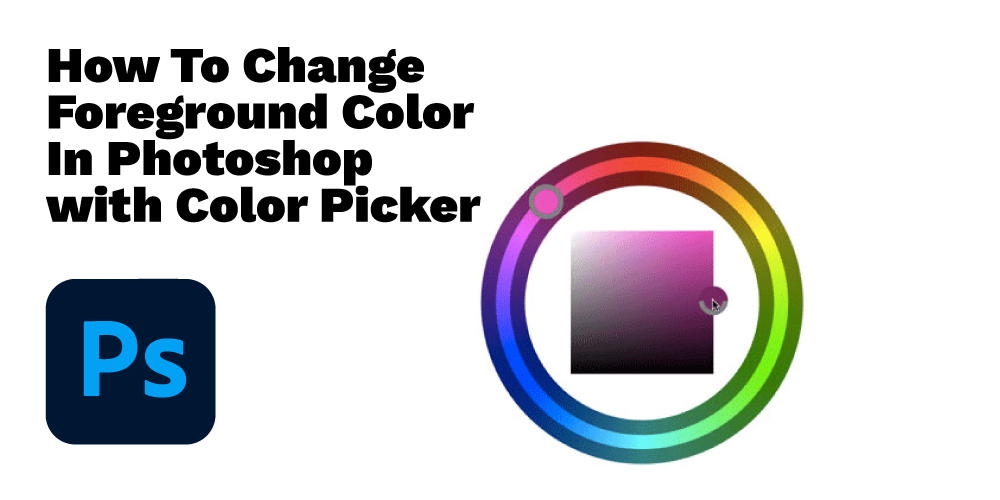
Well, we all know that there are many ways to change the foreground color. Color pickers are one of them. Let’s see a tutorial on color pickers.
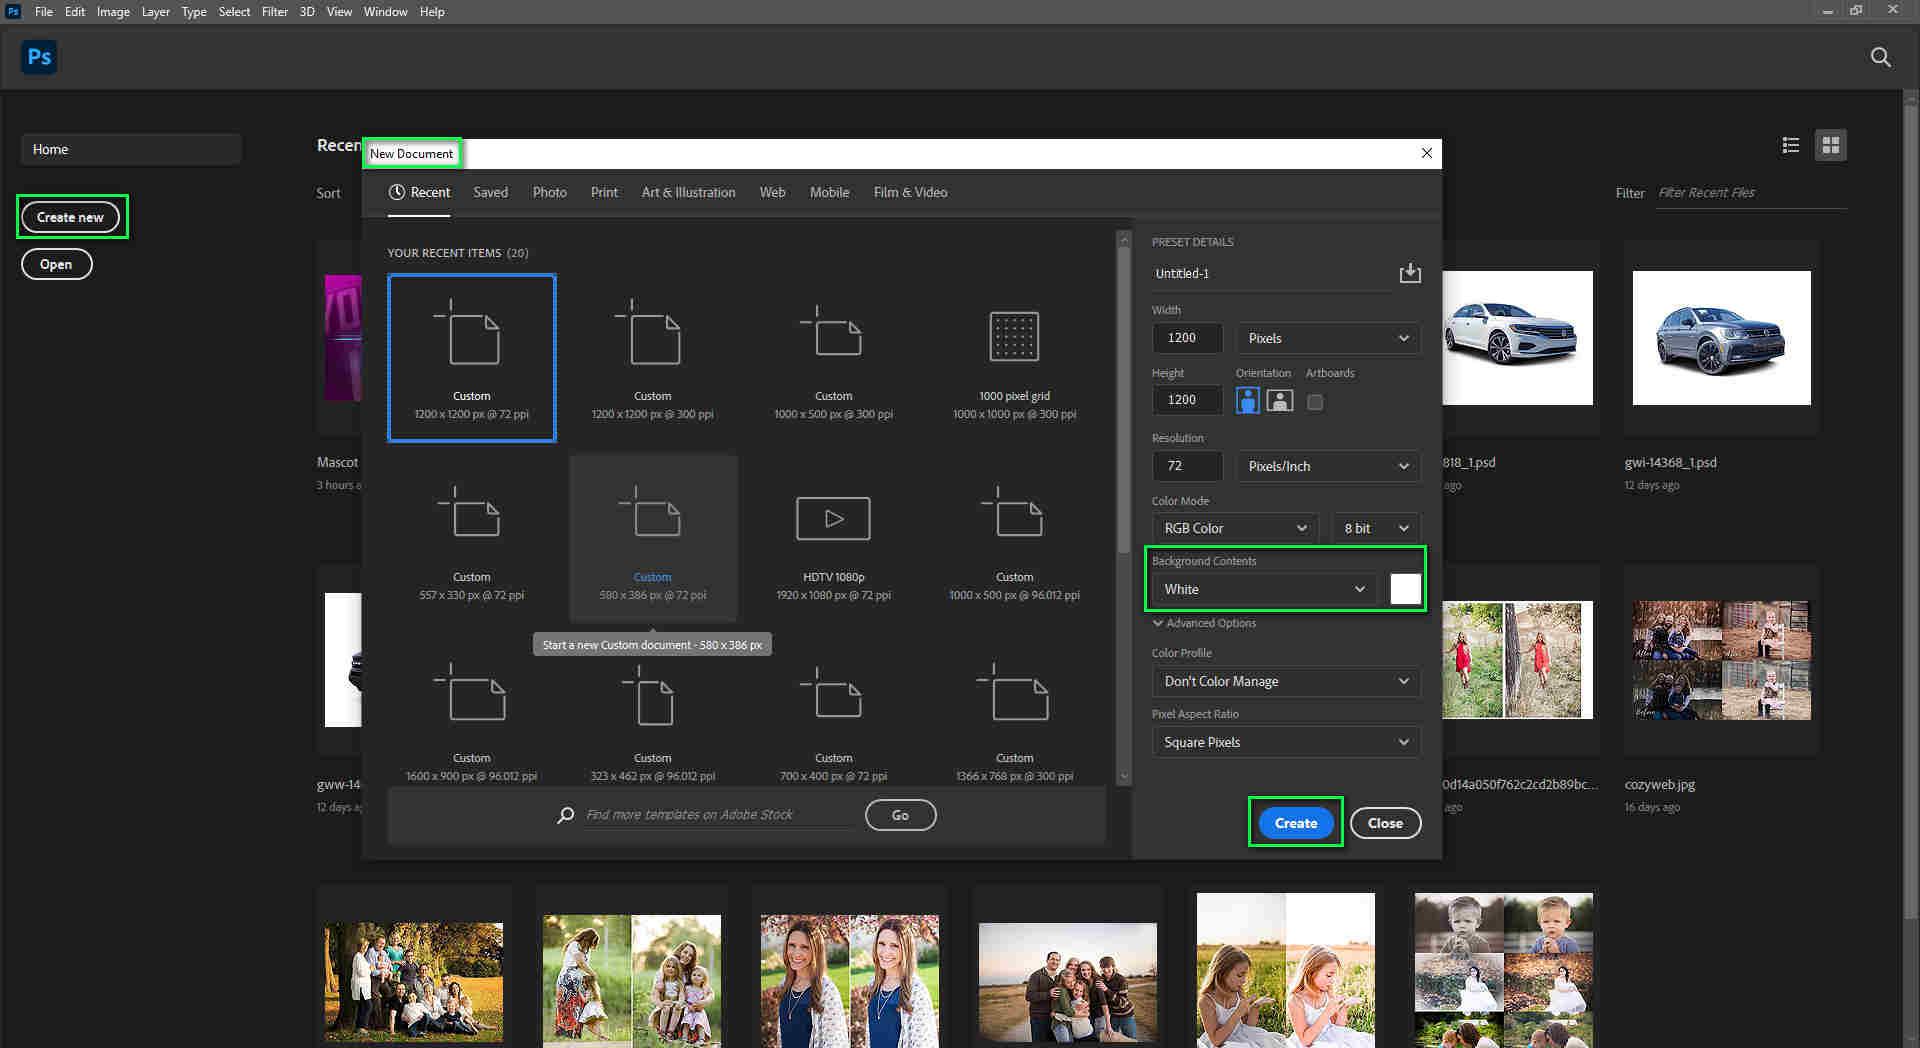
Step 1: First of all, open the Photoshop software on your device. Create a new document.
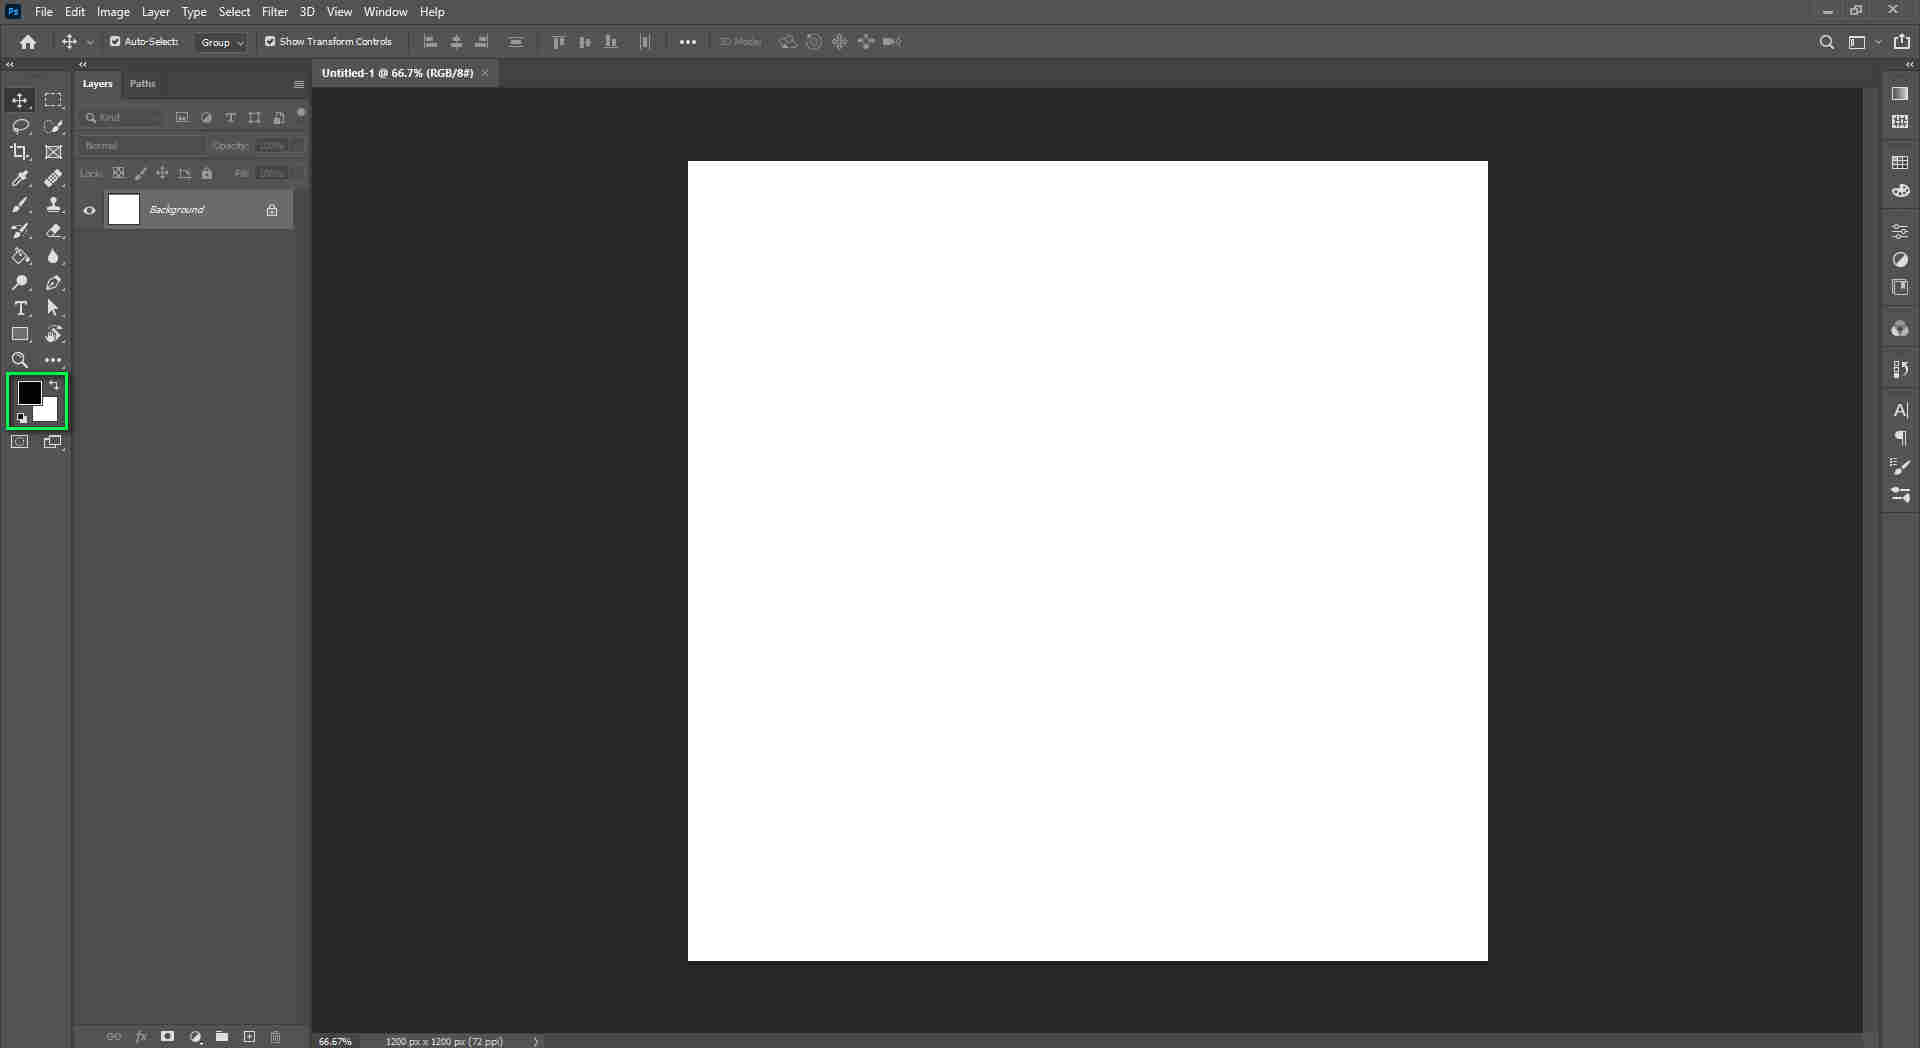
Step 2: On the toolbar’s left side, you can see two squares with colors. These two squares show foreground and background color. The square on top is the foreground color. Just click on it to open the color picker.
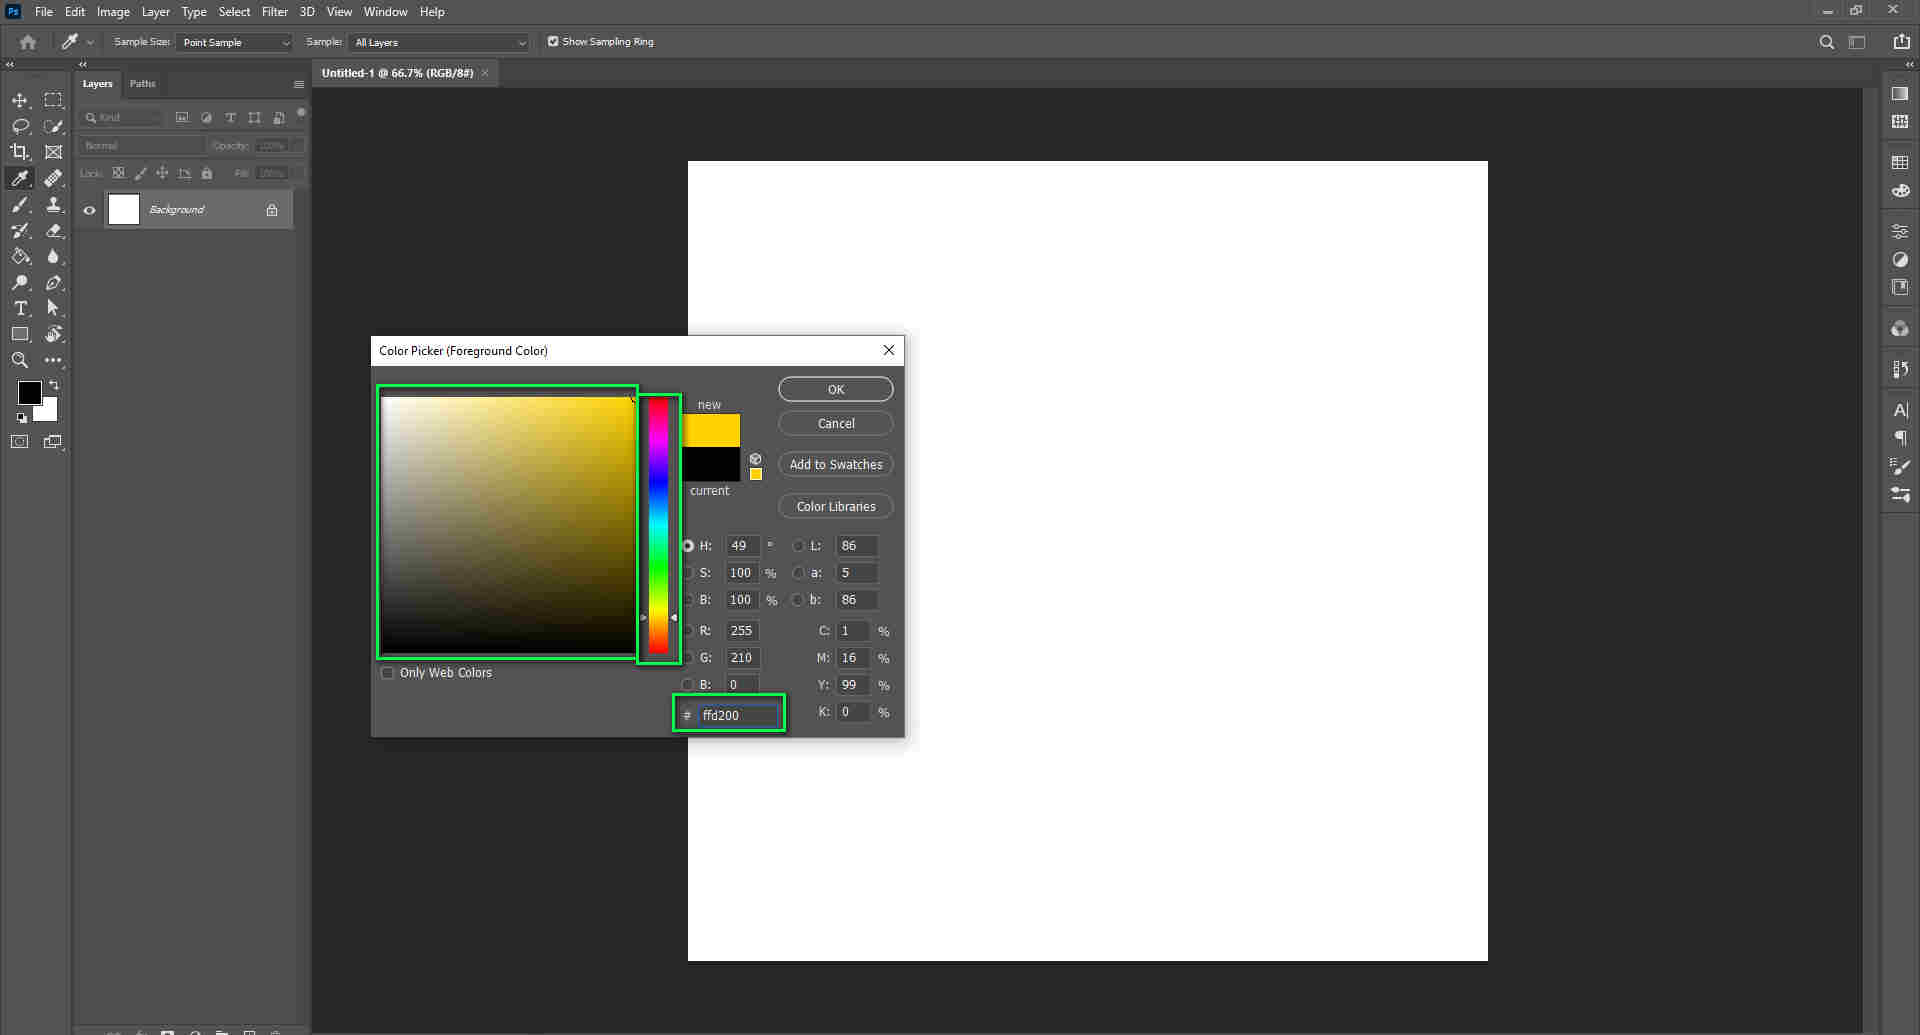
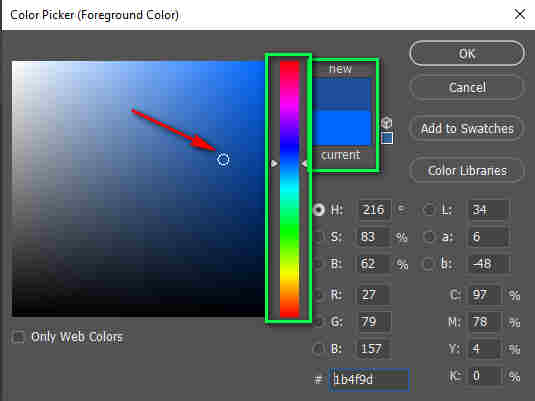
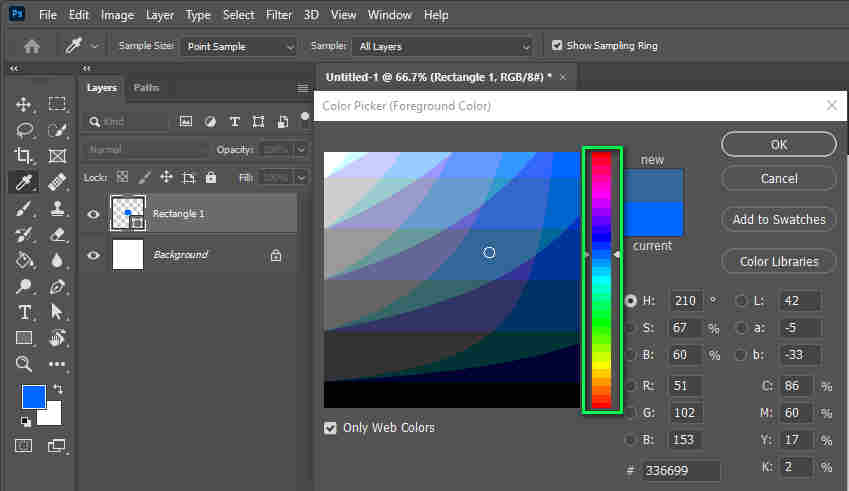
Step 3: There are lots of options in front of you. There is a vertical slider with various colors. It is near the center of the color picker window. Drag the slider to choose your desired color as you drag the slider, the color in the large left box changes along with its value and saturation variants.
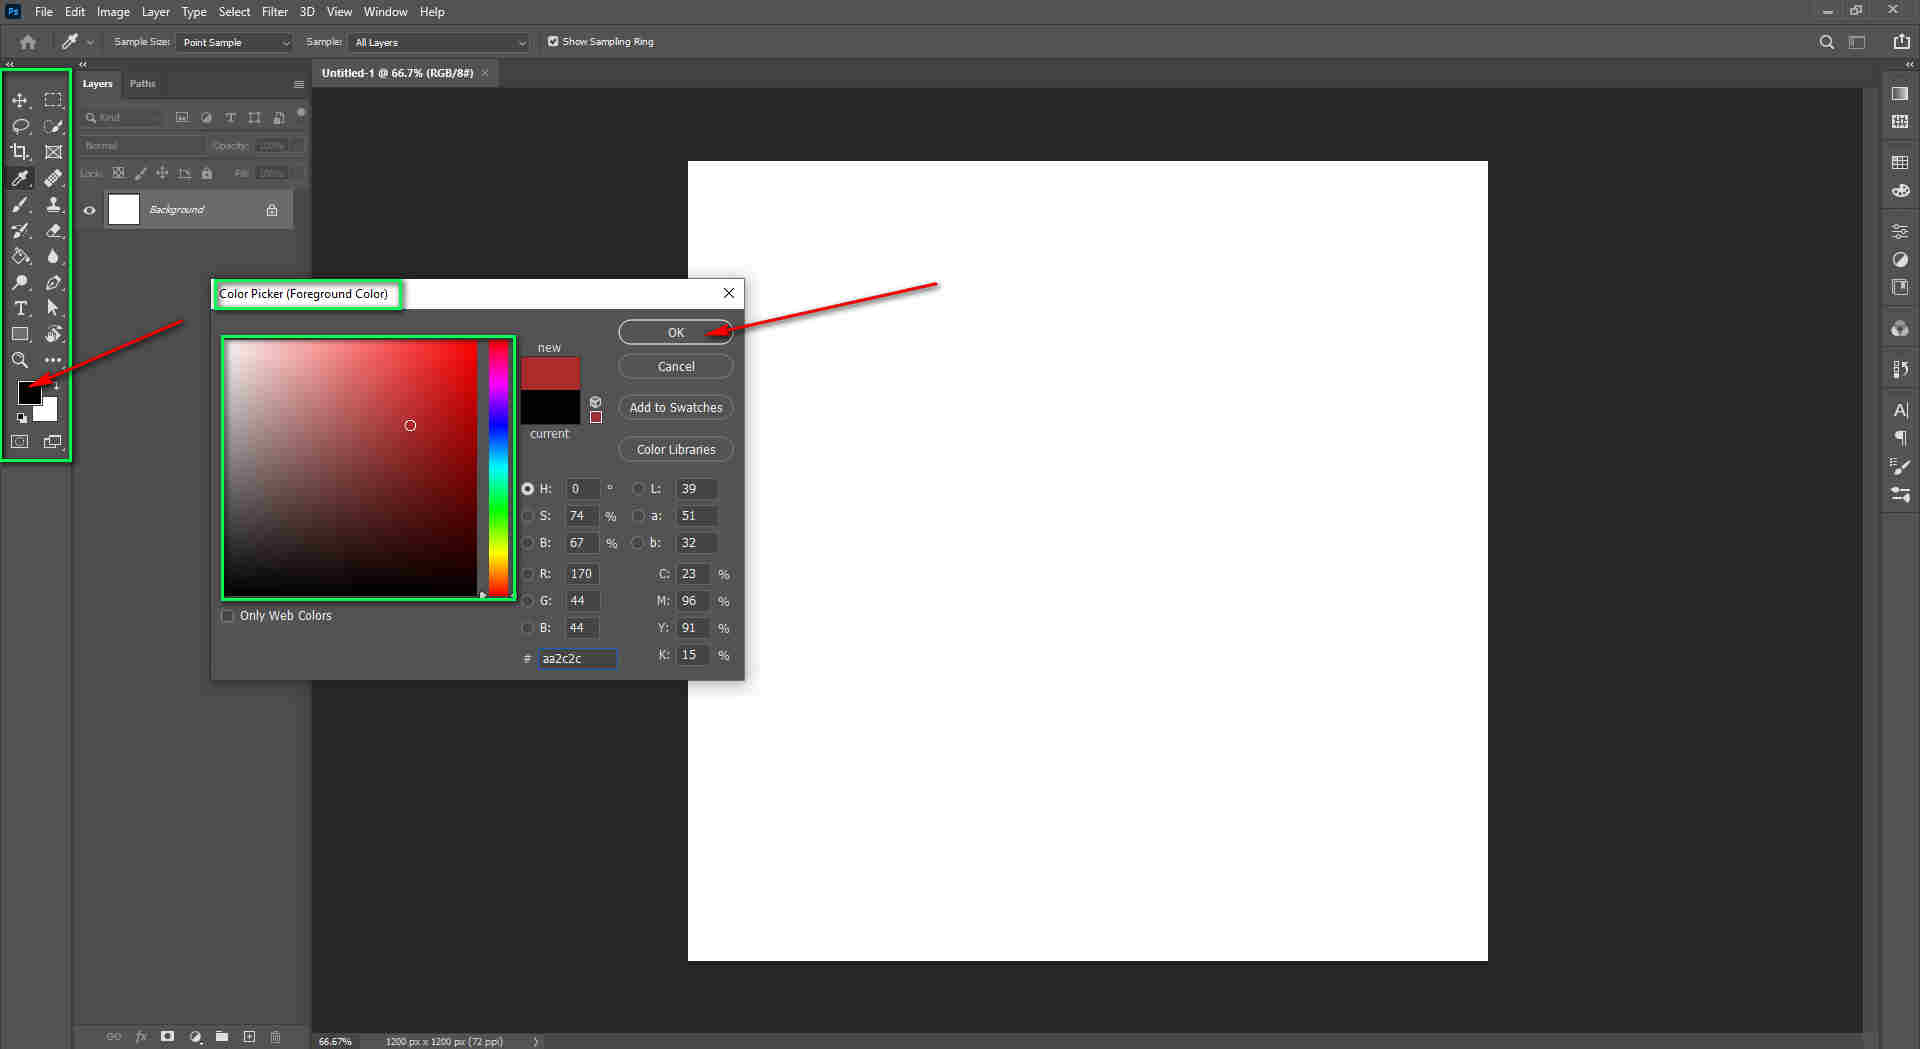
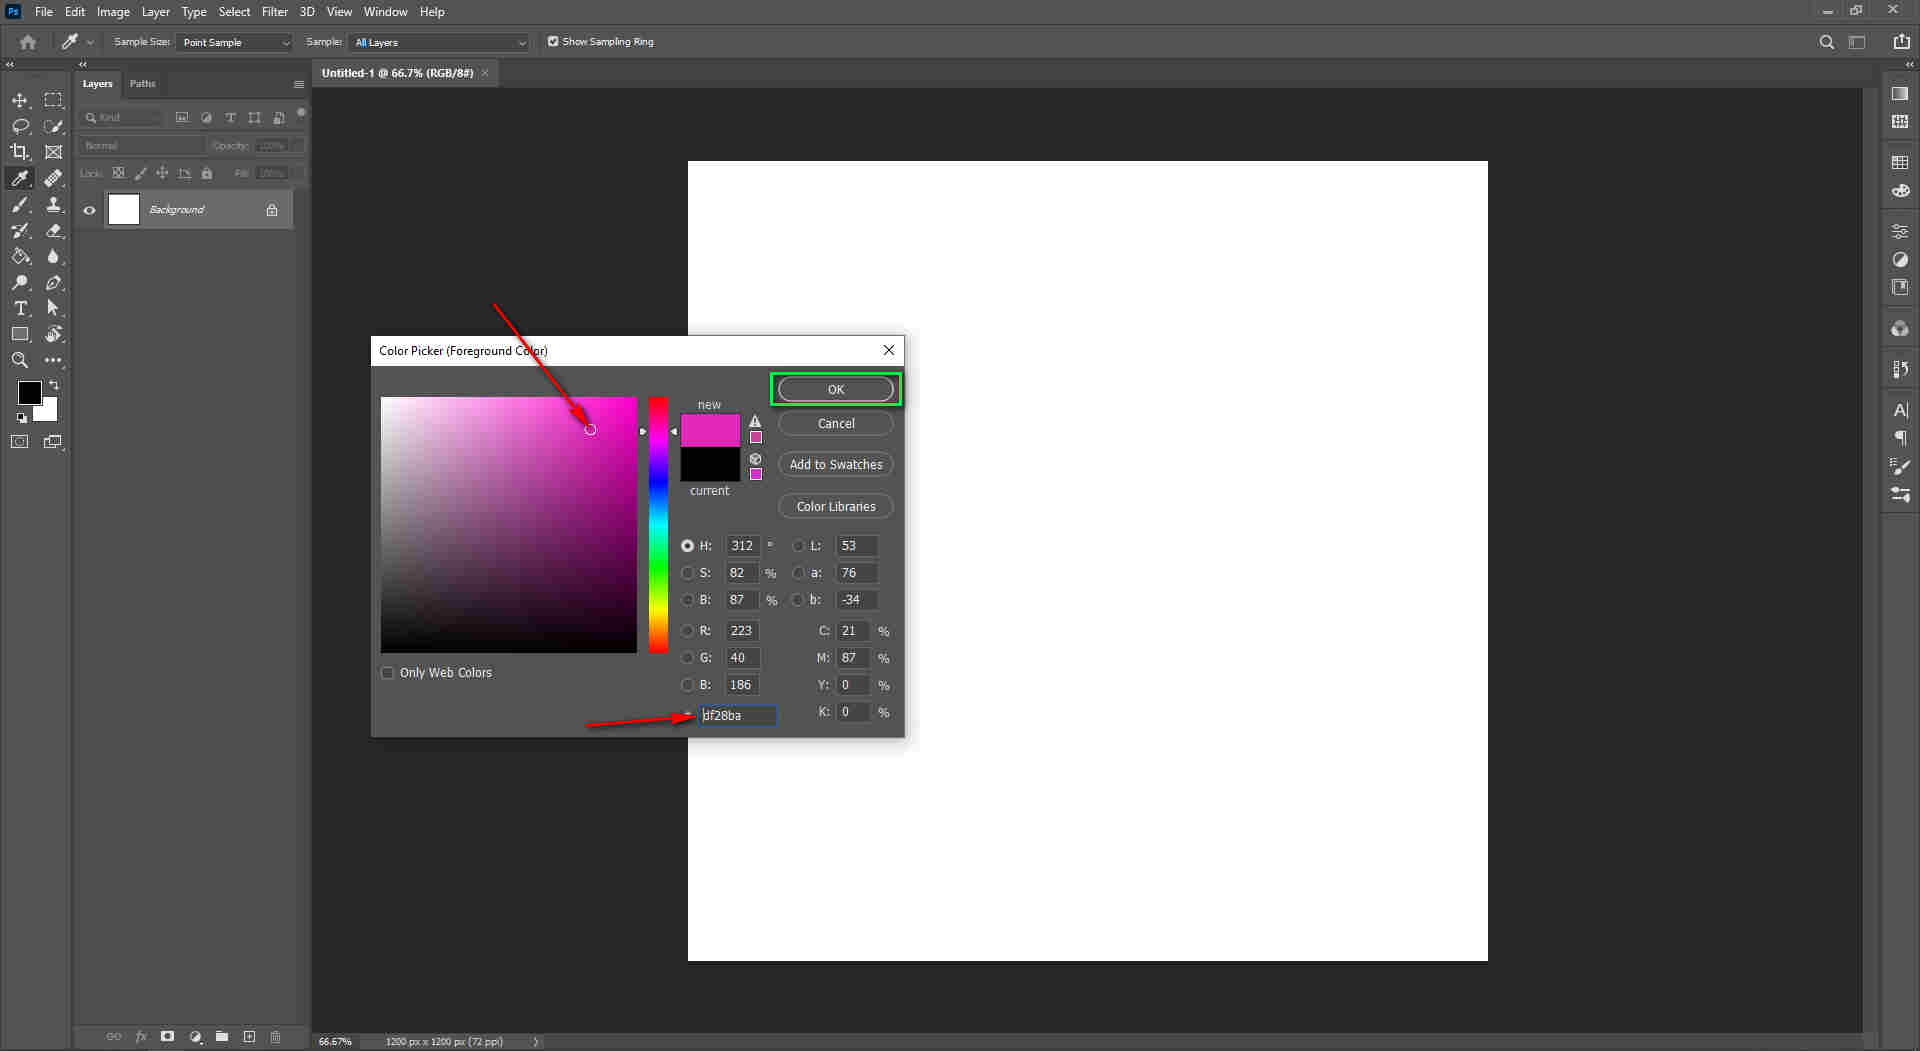
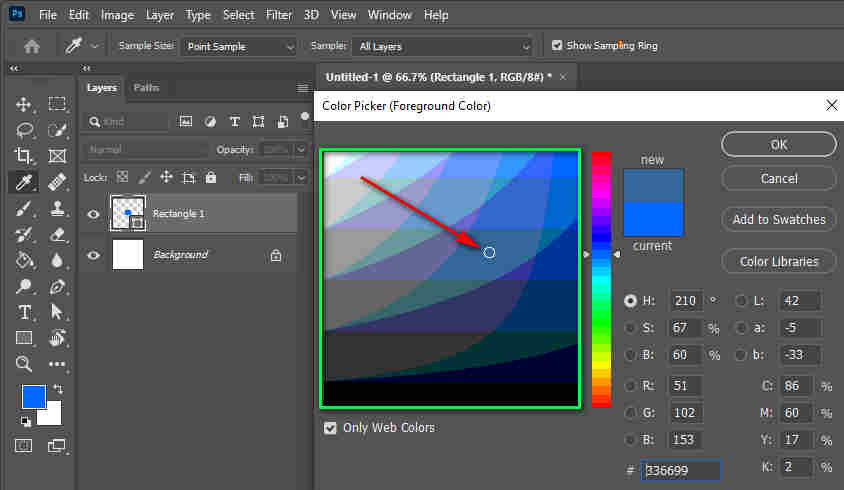
Step 4: On the left is a big square box displaying different shades of color; after clicking on a color, the new box updates and reflects the changes. Select an area in the box. Now you can have some numerical values. It is only used when you need to specify RGB, CMYK, Lab, etc.
Step 5: After adjusting your work, just select the ok top on the box.
The functionality of Adobe Photoshop Color Picker
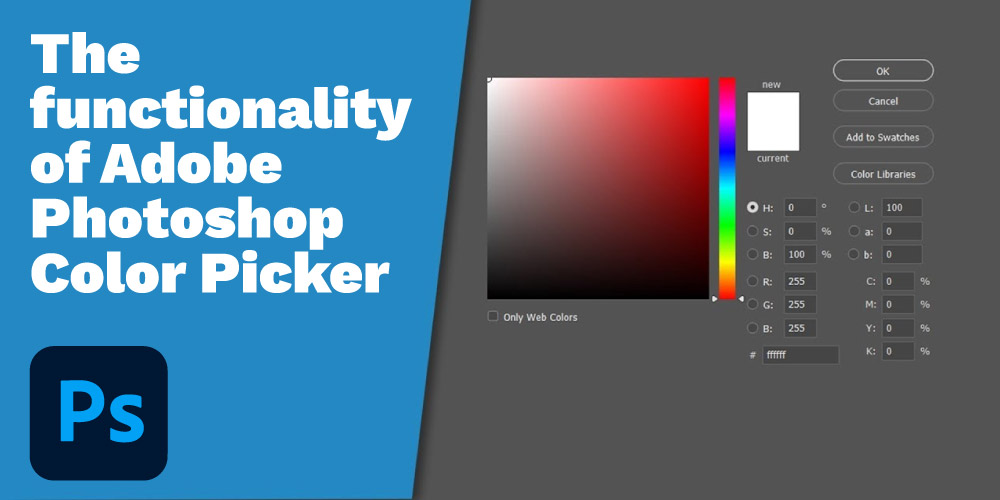
There are 4 types of color modes in the Adobe Color Picker: HSB, RGB, CMYK, and LAB. You can use a color picker to change the foreground and background colors. You can also use it in other tools and options. A color picker has various functions. Let’s describe these.
- Picked color: There is a round-shaped mouse that can help you select your desired shade. Just drag this round mouse.
2. Original color: In this box, it saves the main color you selected before updating the shade.
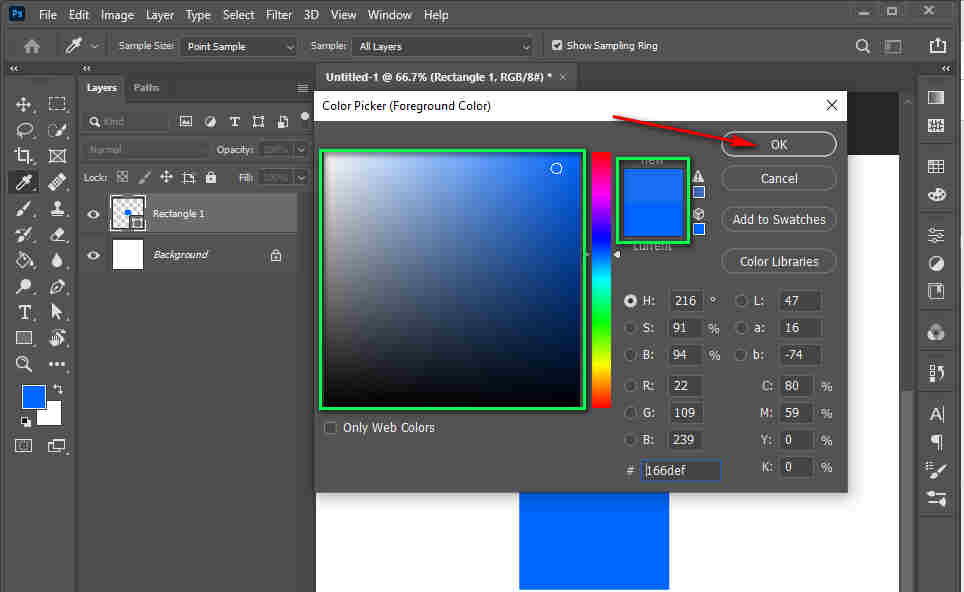
3. Adjust color: In this box, you can see your selected shade. When you drug the round in shades, it reflects your desired color.
4. Out-of-gamut alert icon: The currently selected color will be out of gamut if it converts to the current CMYK space.
![]()
5. The Alert icon for colors that are not web-safe warns us when the selected color is wrong.
![]()
6. Displays only web-safe colors: if you select this option, the color box will display only those colors that get displayed on any device.
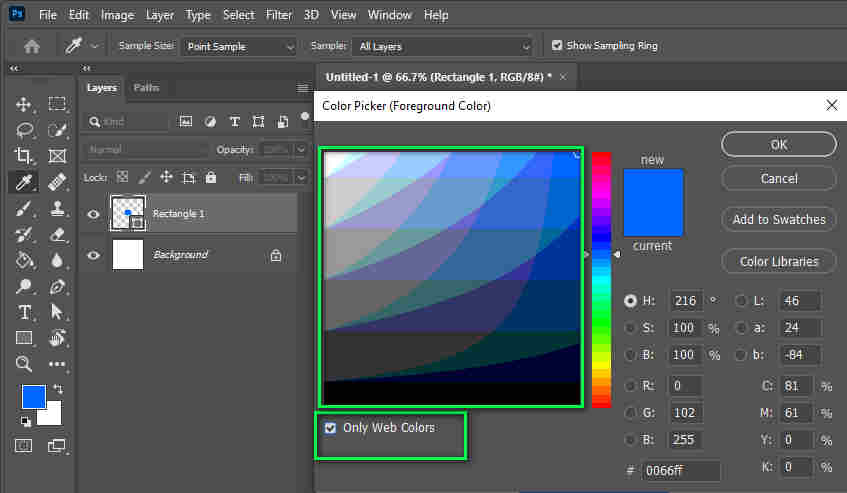
7. Color field: There is a big square box with various shades of color. You can select any shade you want. Just drag the round option in the box and select it.
8. Color Slider: You can find tons of different colors in this vertical box.
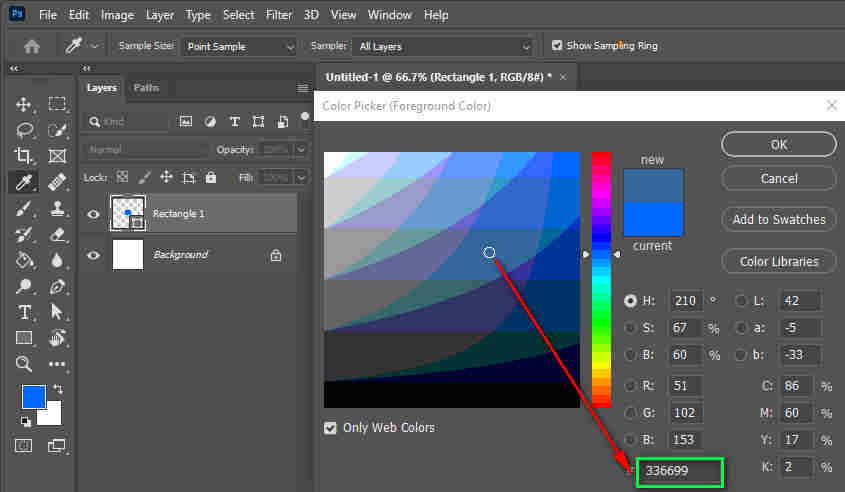
9. Color value: There, you can find a numeric number of colors. It is only used when you need to specify the color.
Change Foreground With Photoshop Eyedropper
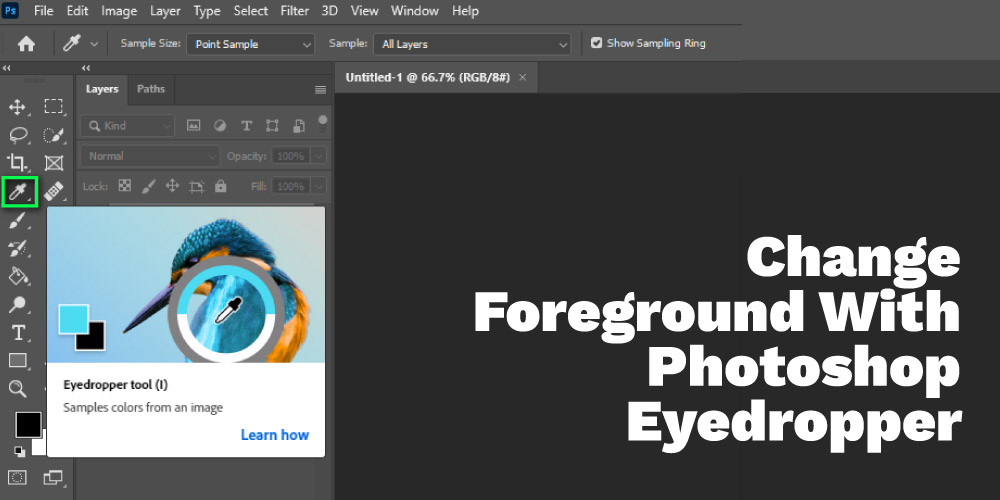
There is a tool in Adobe Photoshop called the eyedropper. Using this tool, you can select your desired color with one click. Want to know how to change the foreground color in Photoshop with an eyedropper tool? Let’s see how to do this tutorial.
Step 1: Open an image in Photoshop. If you want to select the exact color of an image, open the image with this color.
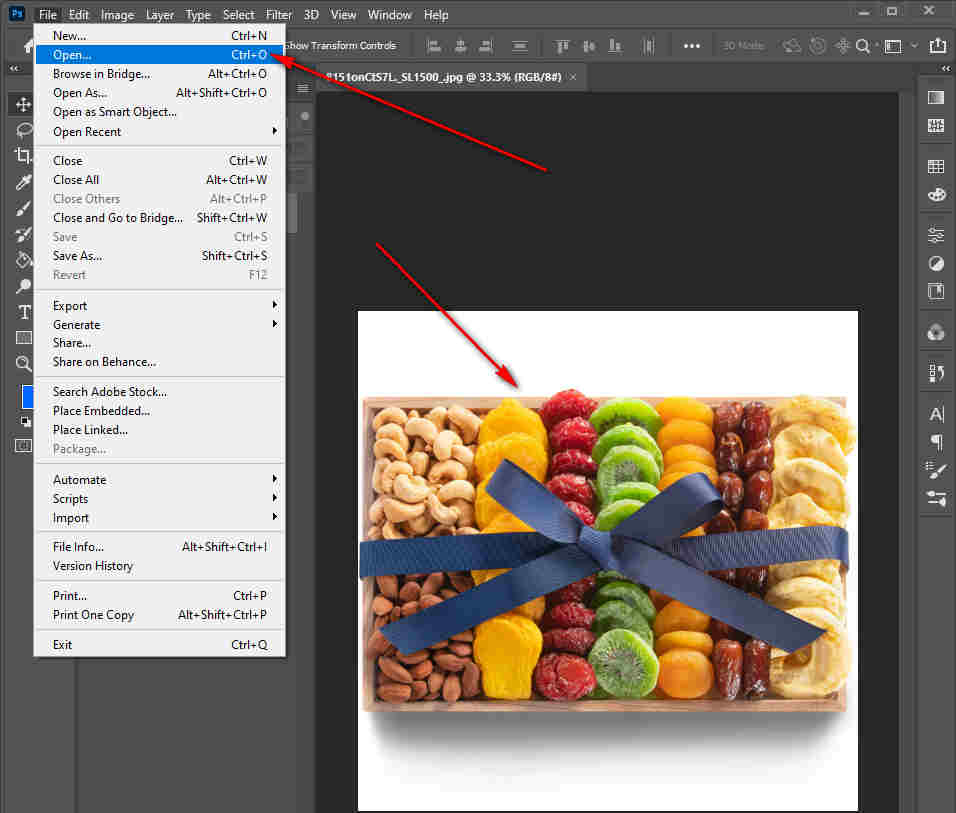
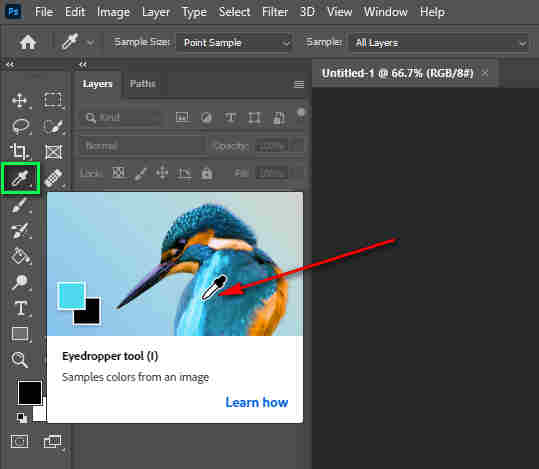
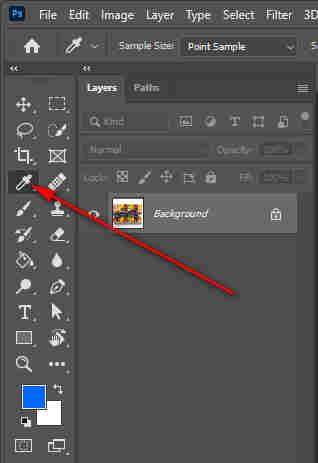
Step 2: Select their eyedropper tool on the toolbar’s left side.
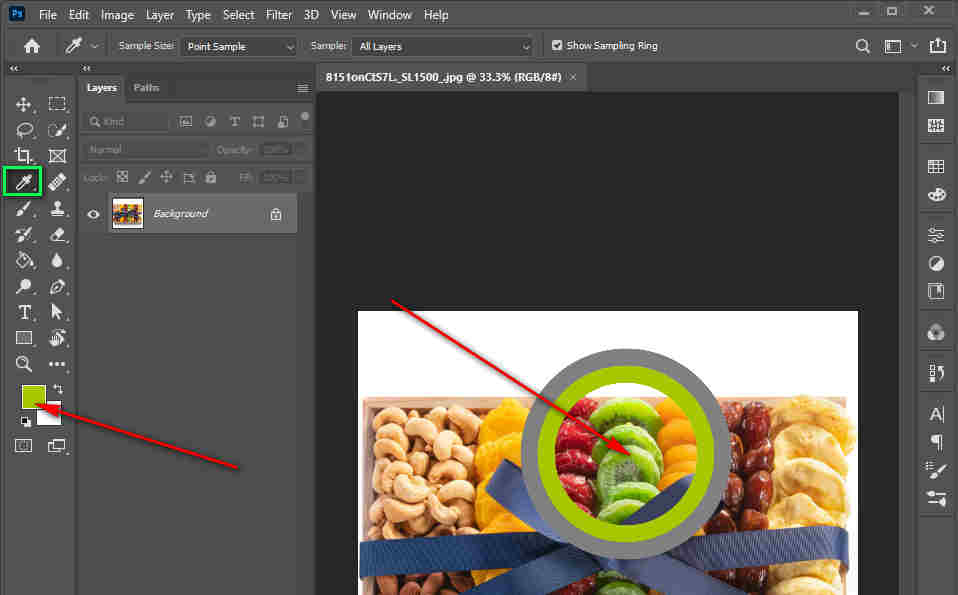
Step 3: Now, click on the area where you find your color. After clicking the area, the foreground area will automatically change.
Step 4: Now, apply the color where you want.
The functionality of Adobe Photoshop Color Eyedropper
The functionality of the Photoshop color eyedropper is one of the simplest ways to pick a specific color. What you do is first choose the eyedropper tool from the left toolbar. It contains an icon with a dropper which is easy to select. Once you select the tool, an eyedropper-like icon will be on your mouse cursor.

While you have the eyedropper tool selected, hover your mouse over the color you want to pick. Just click on the color, and it will get transferred into your color swatch. Further, you could adjust the eyedropper tool settings on the top bar of the photoshop.
Where Is The Eyedropper Tool In Photoshop?
Eyedropper tool is one of the useful tools in Photoshop. All designers and experts use it. This tool is mainly used when someone needs to select an exact color but make it work from a color picker. This eyedropper tool can help you select your desired color, make color corrections, etc. I simply work with just a simple click.

The eyedropper tool is found in the toolbar on the left side of photoshop. Just see on the toolbar an icon that looks like a dropper. Just simply click on it, and this tool will start to work. If you feel hesitant to find and click on the icon, simply press ‘I ‘on the keyboard.
Note: You could press Alt on the keyboard to turn your cursor into an eyedropper tool for a few seconds.
How to Reset Foreground Color In Photoshop
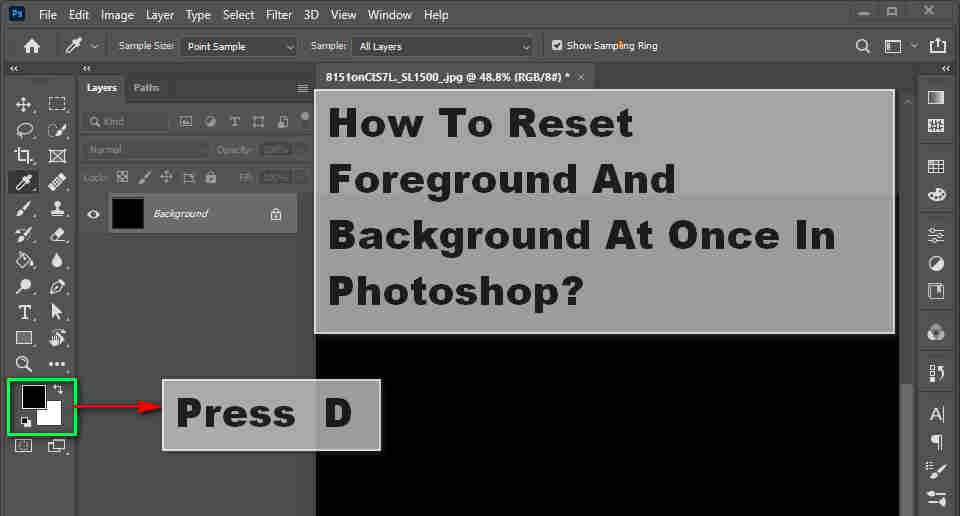
Sometimes you may need to reset the foreground color in Photoshop. But thankfully, you get an easter option in Photoshop to reset the foreground. You could reset both the foreground and background at once using the following trick. You only need to press D on the keyboard to reset the foreground and background.
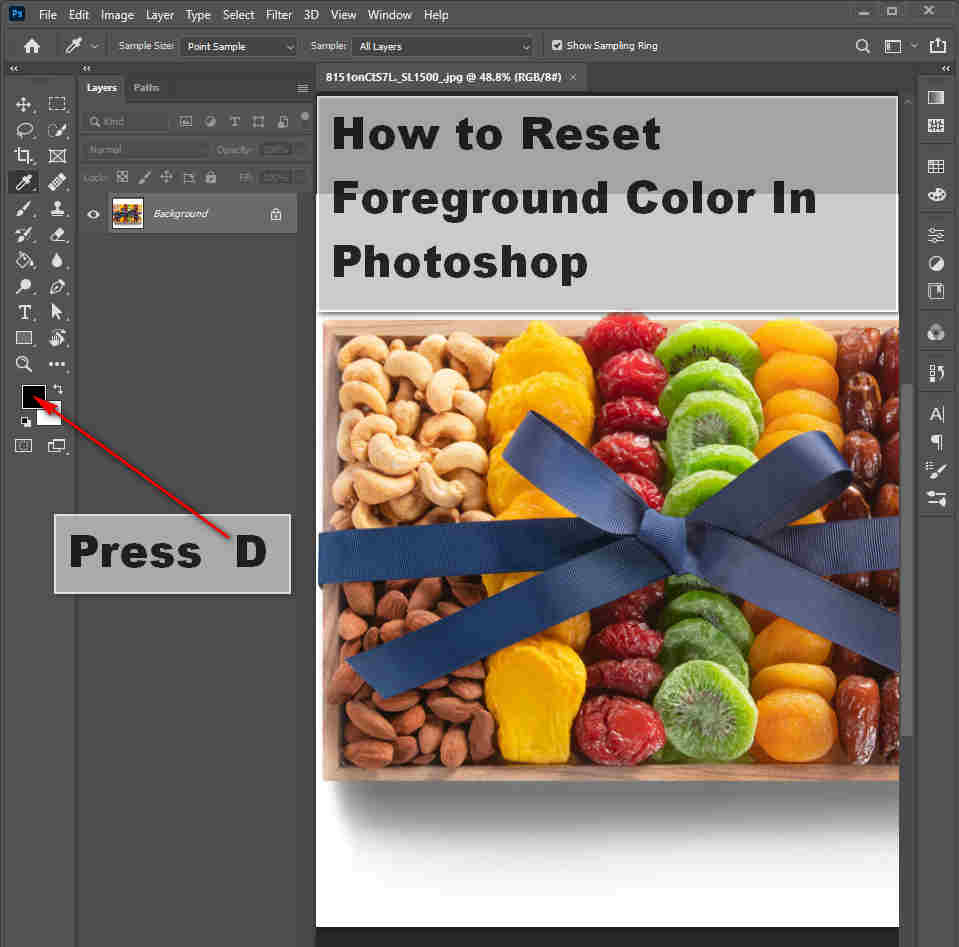
As a result of the resetting, the foreground color would be black, and the background color would turn white. Why is it important? Because it’s a lot easier to get confused when working on different types of projects. It’s a huge reflection for you to avoid confusion and get back to the beginning.
What Is The Shortcut For Photoshop Foreground?
In short, you only need to press Alt + Shift + Backspace on the keyboard for the foreground. The following shortcut would fill the selected pixels with the current foreground color, which is why you must select your preferred foreground color before activating the action.

Plus, it’s better to remember that the lock transparency option of Photoshop will get activated as well. In addition, the following command is helpful for working with shape and type layers as well. You could use the shortcut Alt + Backspace to apply a background color to your selected pixels in Photoshop. In a similar fashion.
How To Reset Foreground And Background At Once In Photoshop?
With the same keyboard shortcut, “D,” you could change the foreground and background at once in Photoshop. You get white when you press the swatch reset shortcut button by default. But if you are not happy with the white color, press “X,” and your swatch will be black.
You could perform the following action even when working with a brush. It’s a great option even when creating a custom clipping mask with the brush. You could double-click on the swatches and select custom colors afterward when you are done.
What Is The Shortcut To Flip Foreground And Background Colors?
You could press “X” on the keyboard to flip both the foreground and background colors at any time. Everything will get reset no matter what color you have on the swatches. Nonetheless, you could go back to the previous color from your swatch panel, so we recommend you save your important swatch palette.

It’s better to mention that you could flip your swatch at any moment. No matter what color you have on, the swatch will get switched. As we talked about before, it’s a crucial and easy shortcut for photo editors, drawing artists, and others. It works faster and has an easy keyboard shortcut to work with.
What Is The Option To Apply A Fill Color To A Specific Layer Or Selection in Photoshop
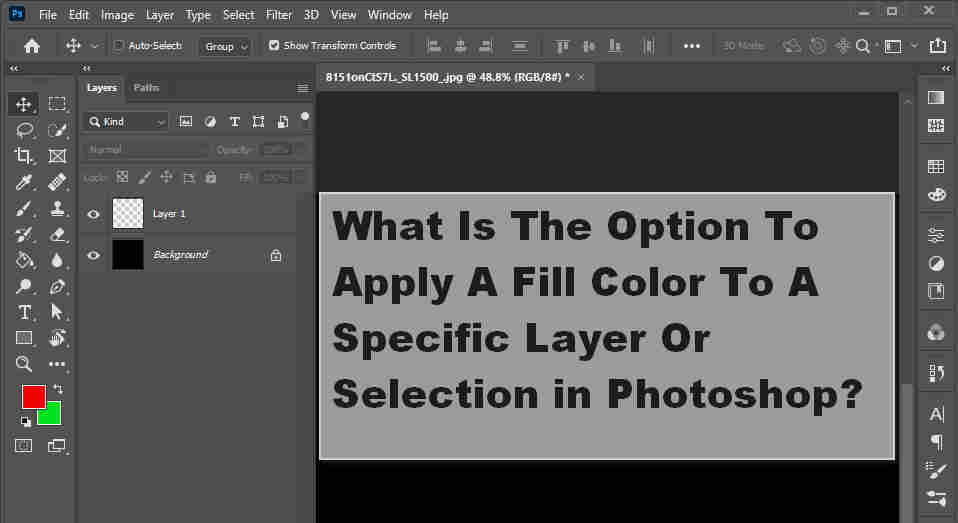
To apply the fill color, follow the mentioned steps. These would help you apply the fill color to the layer in the easiest way possible. Let’s start the steps:
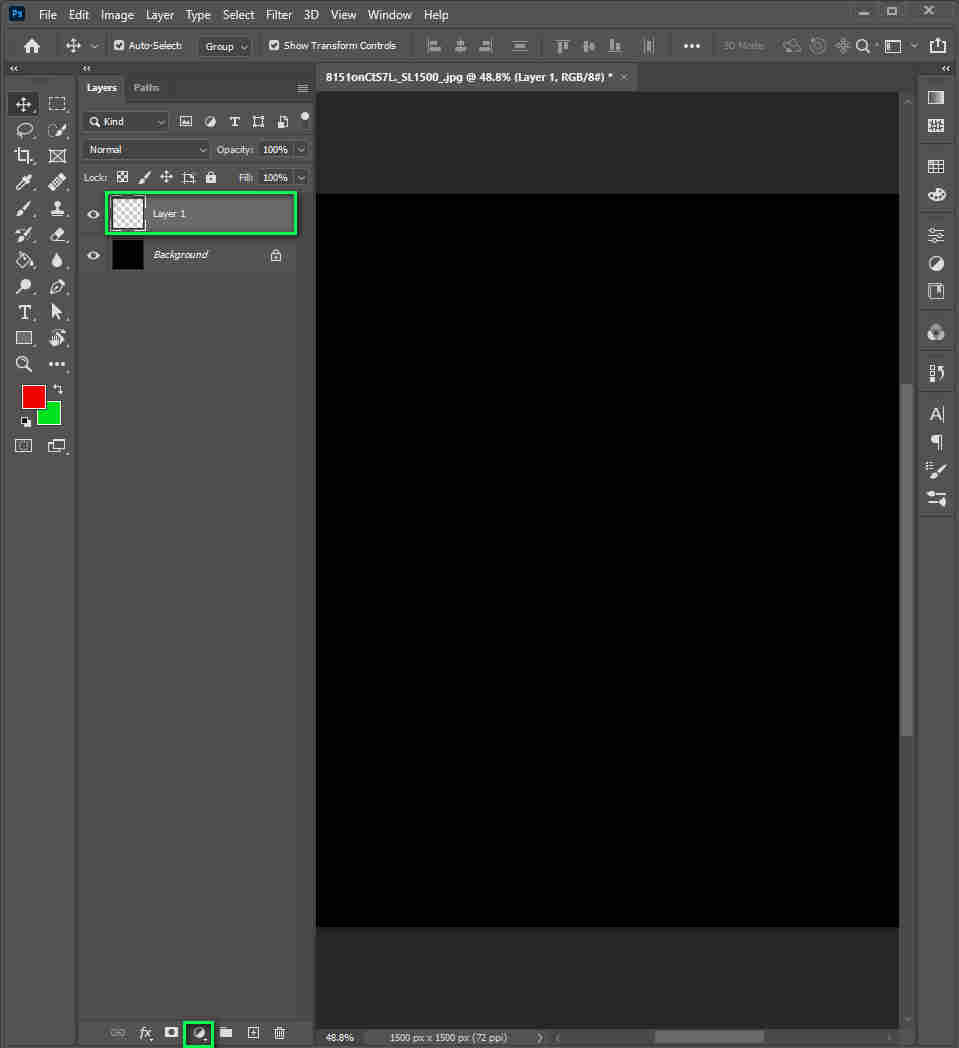
Step 1: Get your mouse into the Layers panel and click on the Fill/Adjustment layer icon at the bottom.
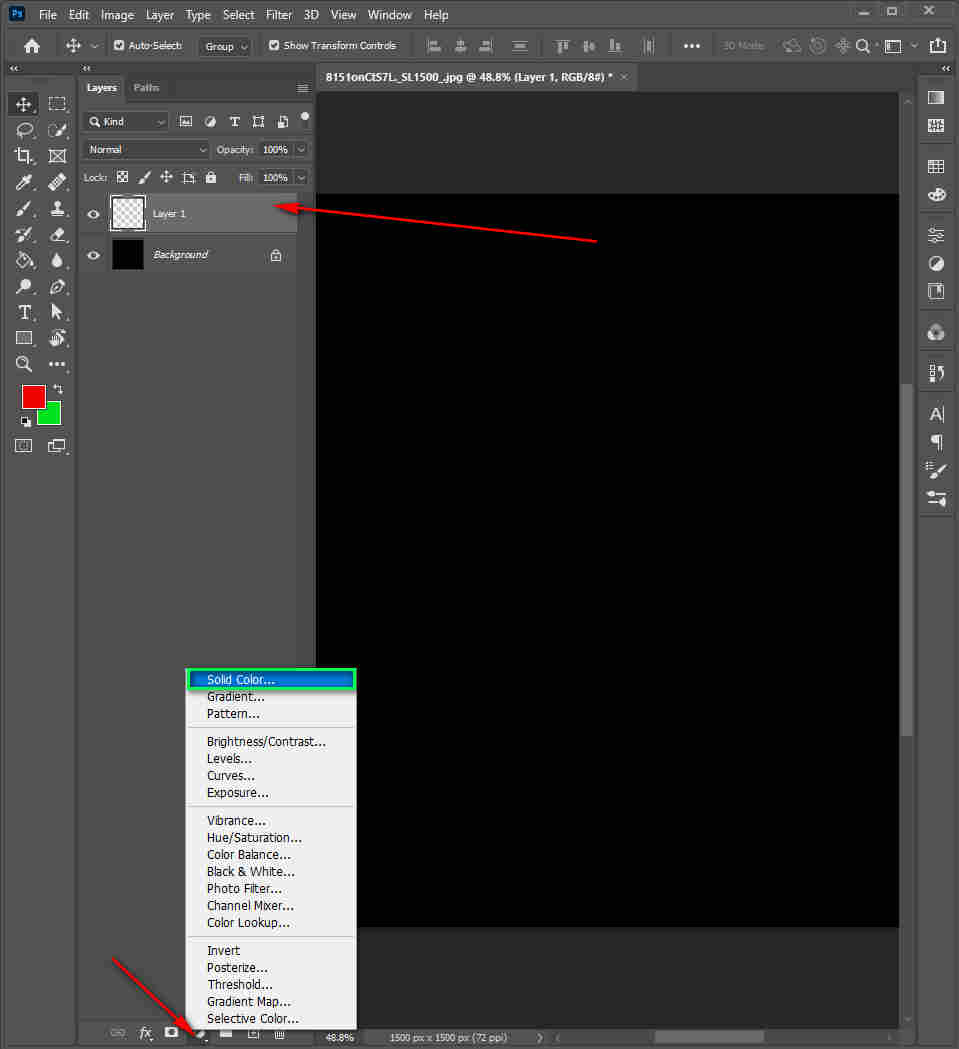
Step: 2:
Select the “Solid Color” option from the drop-down menu.
Step 3:
Now, a comprehensive color picker will appear. Select the color you want to apply to the layer. Once down, click on the “Ok” button.
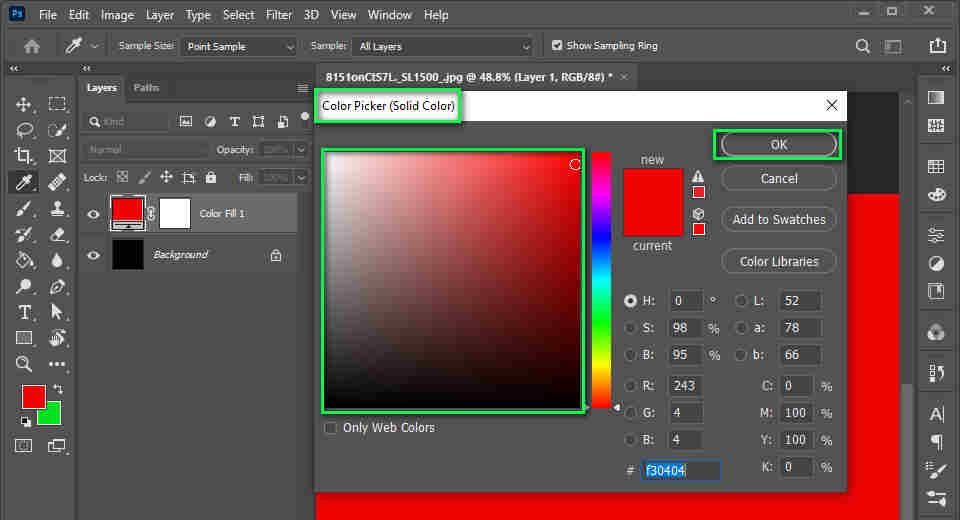
You have applied the color to the layer you have selected. You could further achieve other sorts of effects by changing the opacity and the blending modes of the solid fill color of the layer.
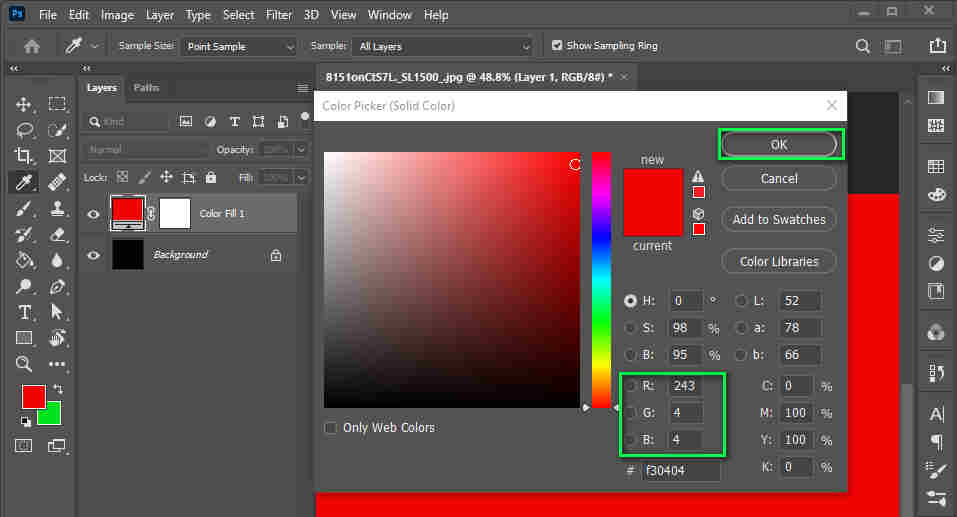
Note: If you want to customize the selected fill color of the layer, double-click on the solid layer fill color thumbnail on the layer. It provides the color picker interface to reselect the colors anytime you want.
What is the Default Color Mood You get in Photoshop?
The RGB color mood is the default color mood that you get in Photoshop. No matter which type of file you create in Photoshop, you get the default RGB color scheme to work with. Hence, you get the option to change the color mood from the built-in settings of Photoshop.
Hence, you could customize and change the RGB color from the color picker. You get a separate R, G, and B value, which stands for Red, Green, and Blue. You could insert custom values to play around with which color it brings on. In the same way, if you change the color mode to CMYK, you get separate color values to customize.
How to Apply Foreground Color to the Background of an Image in Photoshop

To apply your foreground color to the background of your image, follow the mentioned steps. It would provide you with the best results possible when changing the background color of an image.
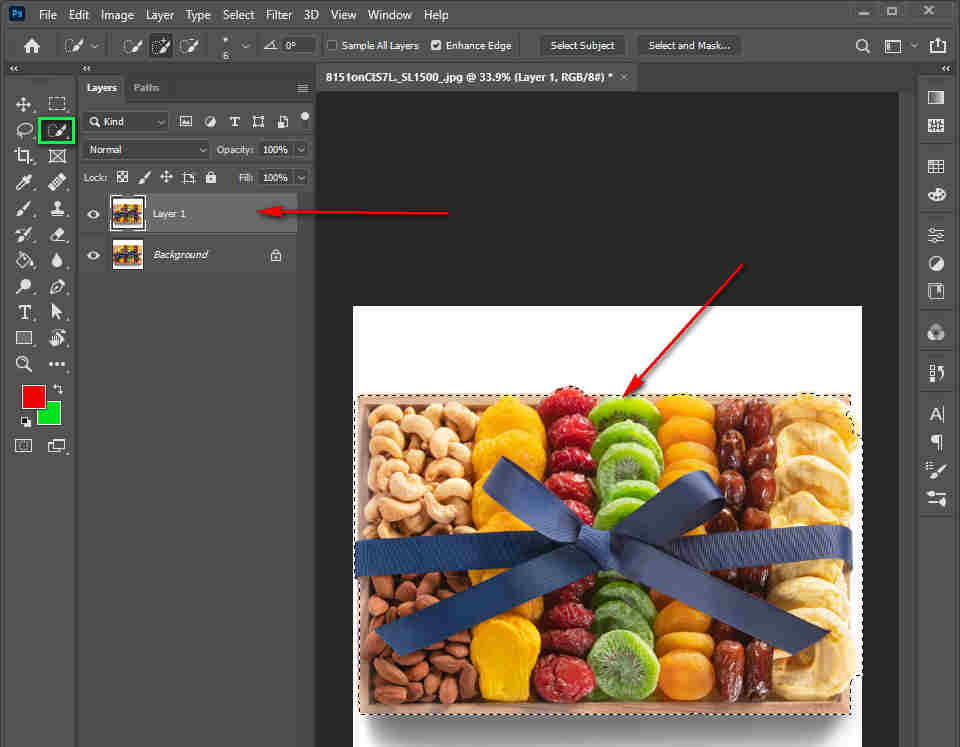
Step 1: First, you need to create a quick selection with the “Quick Selection” tool in Photoshop.
Step 2:
Now, enter Quick Mask mode with the “Q” keyboard shortcut. Press “B” on the keyboard and refine the edges with the brush tool. Once done, press the “Q” button on the keyboard again to get out of the next mood.
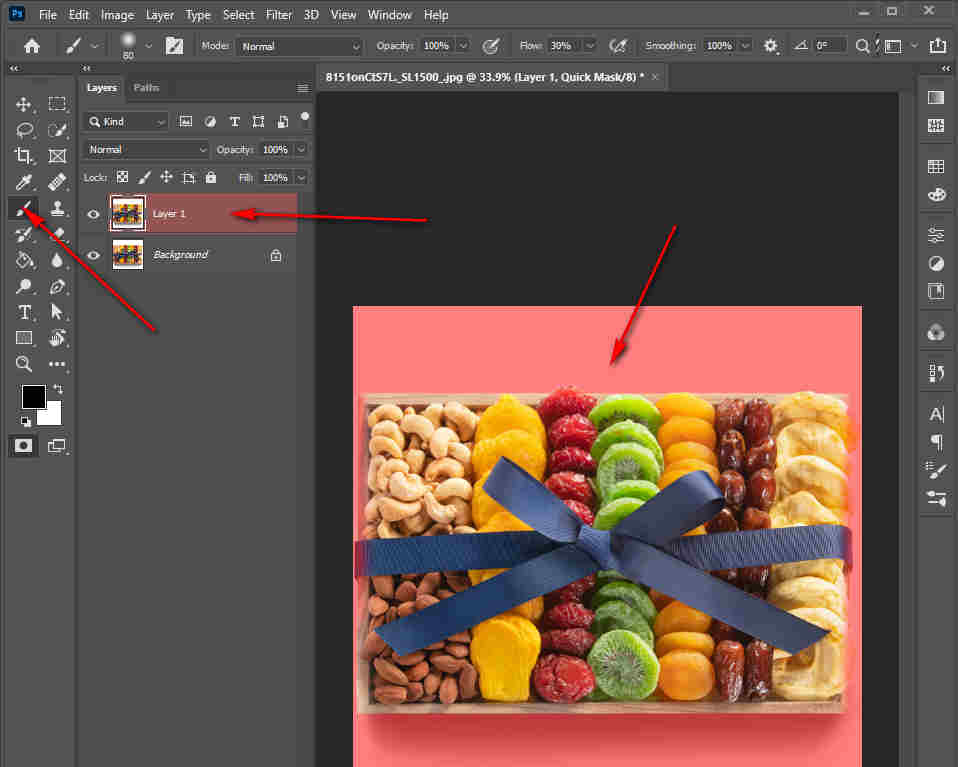
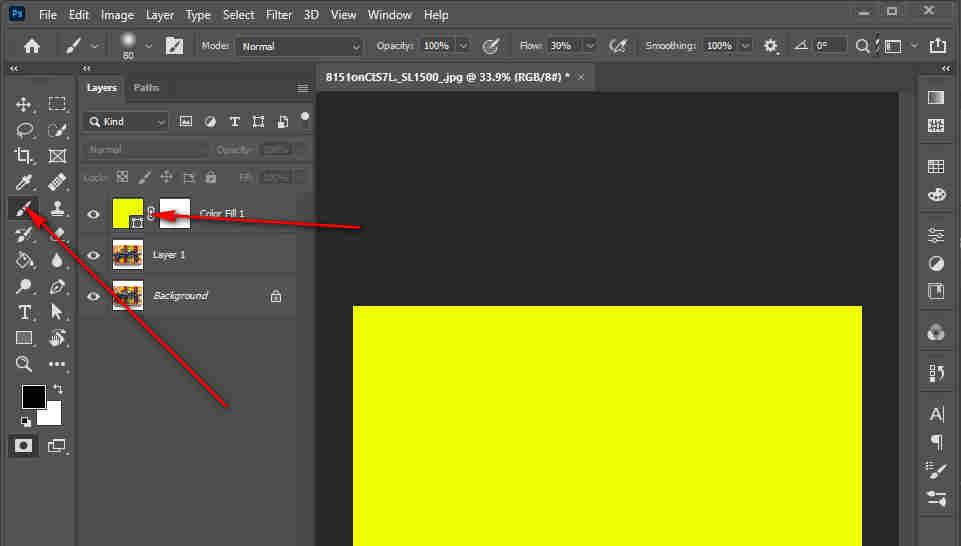
Step 3: Go to the Layers panel and click on the “New Adjustment Layer” icon at the bottom. Select “Solid Color.” Select the color you want.
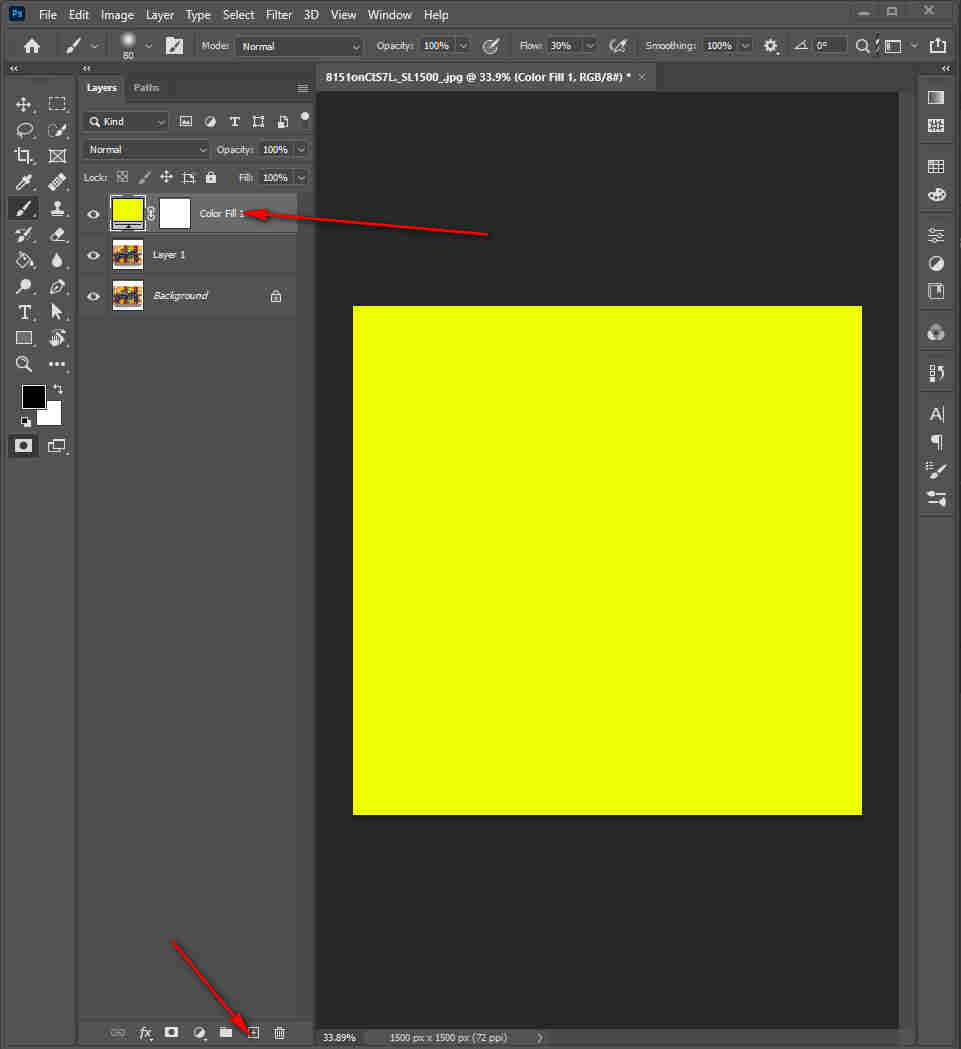
Step 4: Finally, click on the Layer Mask icon in the layers panel. Choose “Invert” to apply the selected color to the background of your image.
How to use RGB Sliders to change Foreground Color in Photoshop?

Go into Windows > Color to get the RGB slider in Photoshop. By default, it provides you with H, S, and B values options. But, you need to click on the top right corner option of the dialog box and choose the RGB Sliders option from the appearing drop-down menu. Instantly, you get sliders for R, G, and B values.
You could use the mouse to customize the slider with left or right movement or enter specific color values besides their respective sliders. Either way, you can change both the foreground and background colors using the RGB slider window. It’s a bit of a tricky tool, but it’s the perfect way to get your desired colors in Photoshop.
Which Foreground Color Mood Is Good For Your Task?
The color mood you are working with may be RGB in default. But it’s better to understand that RGB is great for working with digital mediums such as digital screens, mobile devices, and others. It gives you a close representation of how it would look on a digital screen across different platforms.

But if you are creating images for print and magazines, you must change the color mood of Photoshop to CMYK. Go to image > Color mood in Photoshop to change the color mood. Afterward, choose the CMYK color mood from the menu. Meanwhile, the same option provides you with access to other color moods. Be sure to check it out.
Conclusion
We hope you are up and running on how to change the foreground color in Photoshop software. In the mentioned article, we have gone into detail about changing the foreground color in Photoshop.
Follow these steps, and the desired color will appear on your Photoshop foreground swatch. Most of all, make sure to make the process simple. Take time while change the foreground color, and everything will come in its place. Don’t lay down; just start working with your dream Photoshop projects and be accurate with your colors. Choose the right color to work as foreground, and everything will be fine.


