How to Depixelate an image in Photoshop
Pixelating an image means making the photo blurry. Unlike others, you also have trouble distinguishing the blurry image. The inside hack is the resolution of the pixelate image is too low and the large size individual pixels make the image hard to see. If you have such a photo, don’t worry, multiple hacks are available to help you in this arena. In the following section, we will show you “how to depixelate an image in Photoshop”.
Table of Contents
How to Depixelate a Picture in Photoshop?
Can’t identify the actual item from the image? Give up the headache and start following the process of what we say below.
- To begin with, open the Photoshop software and drag your selected image in there. Now, check where your selected image lies. If it is in its own layer, then select the layer where the image lies in the Layers window.

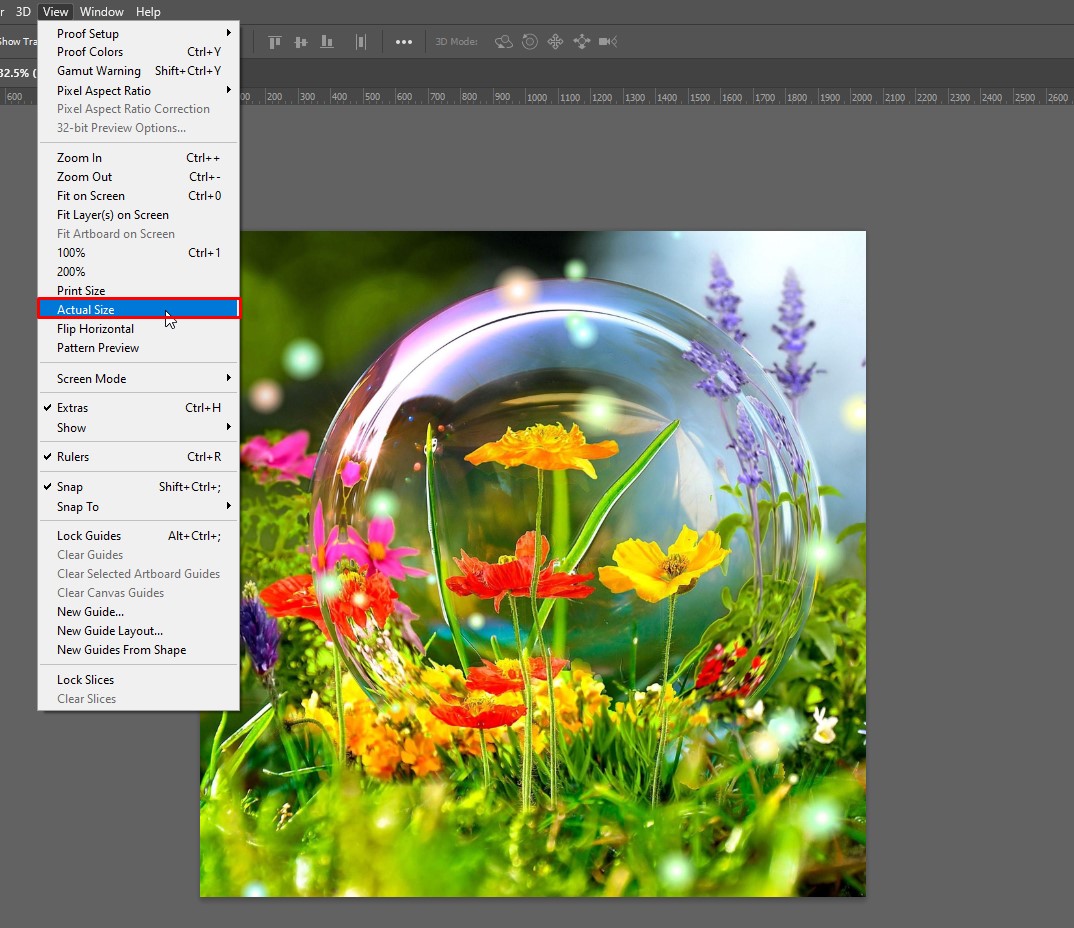
- In the second step, you need to navigate to “View” => “Actual Pixels”. Then, it will show you a clear view of the pixelation’s extent.
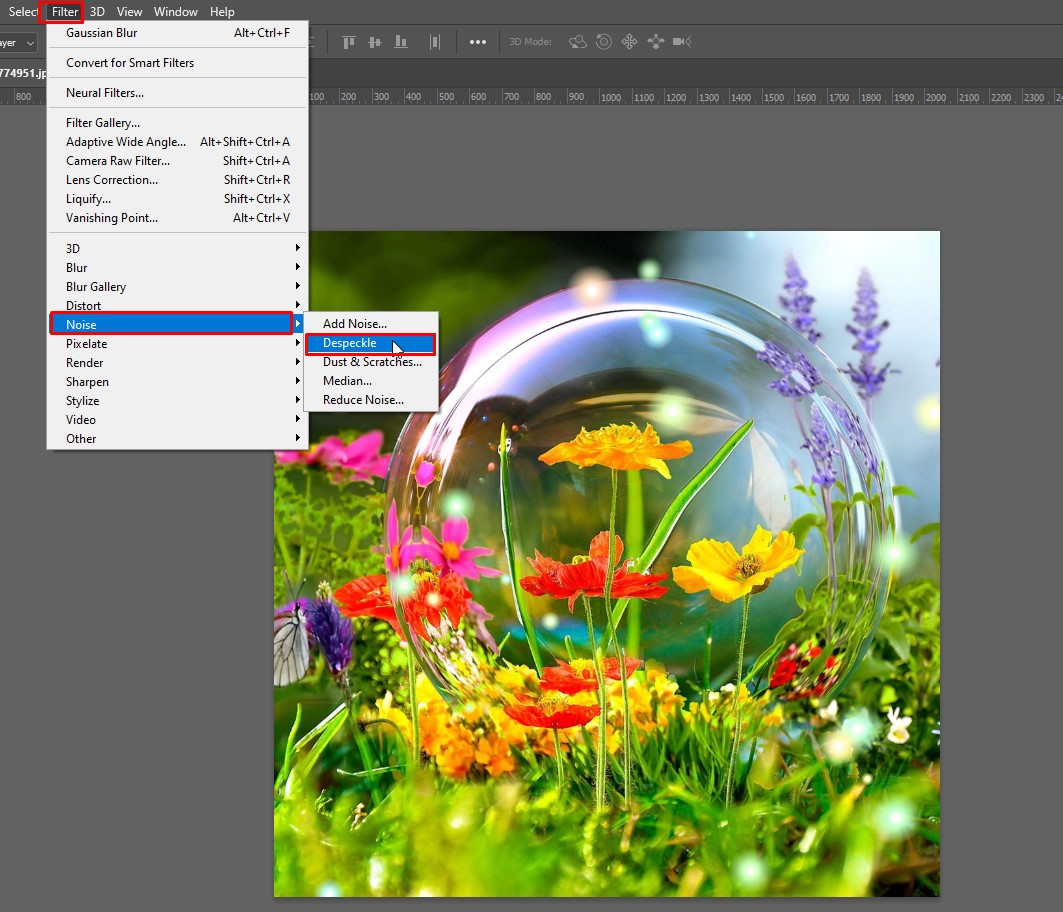
- After viewing the extent of the pixelation, now, you need to navigate to the main menu and click on the “Filter”. Now, you can see the “Noise” option, click on it and then select the “Despeckle”. Now, you can smooth out your photo’s pixels.
- Next, tap down the CTRL+F key from the keyboard a maximum of two or three times to despeckle the photo again. Note: If the despeckle occurs over four times, then your image will become blurred.

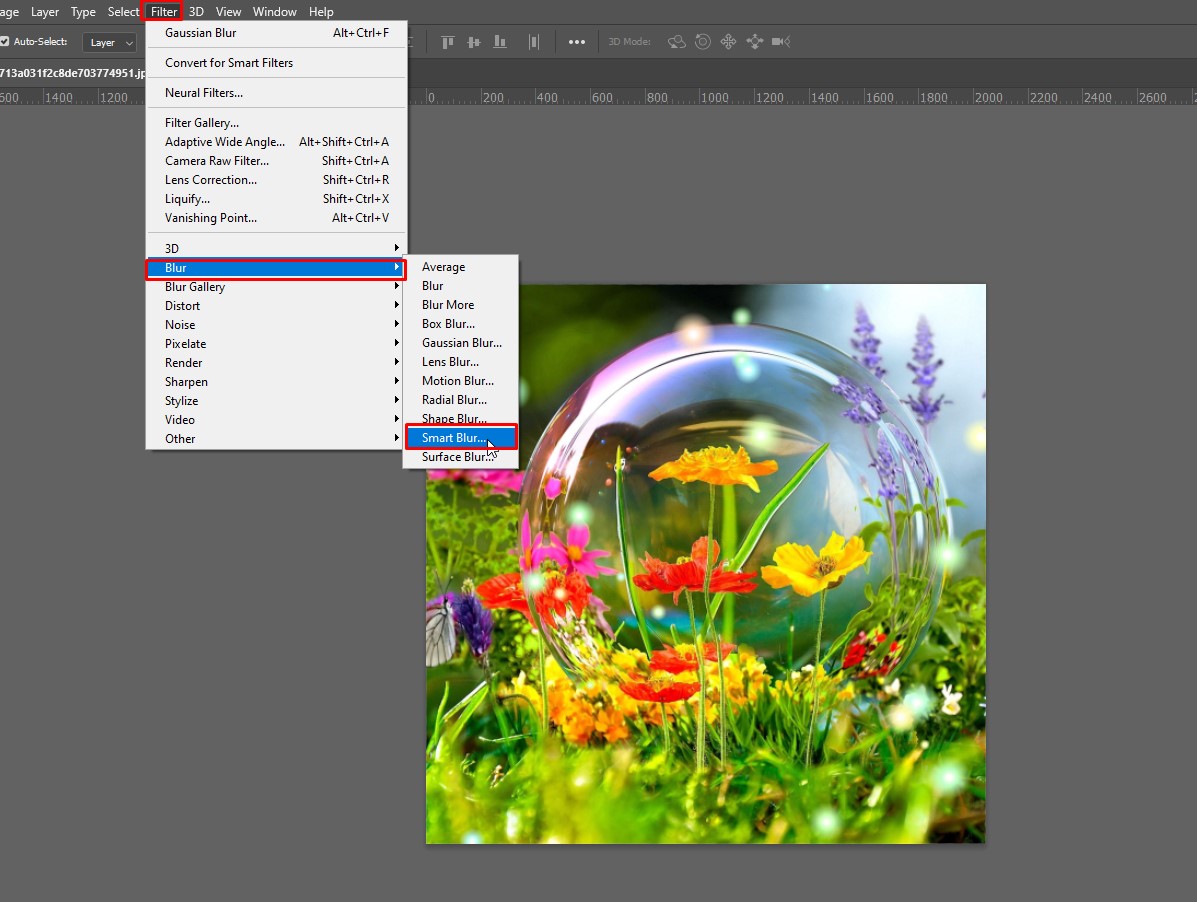
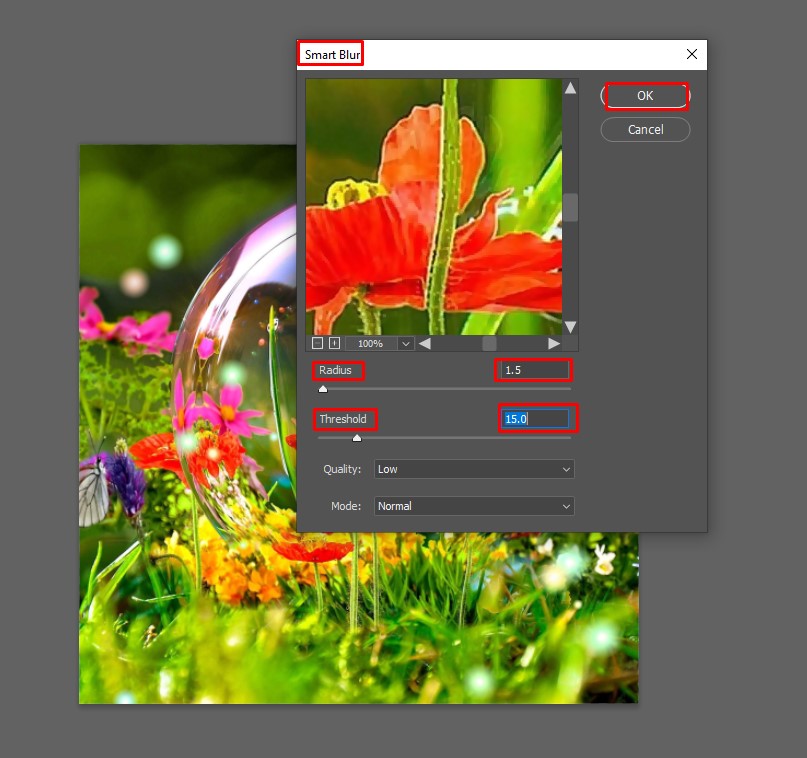
- Alternatively, you can do a Smart Blur on your selected image, which will help you keep aside pixelation. For that, you need to navigate to the Filter menu and select the option named “Smart Blur”. Now, select the radius 1.5 pixels and the threshold 15 pixels and press the “OK” button. If you want to reset the setting, then press the CTRL+Z key from the keyboard.
How to Pixelate an Image in Photoshop?
The following process will help you to pixelate an image using photoshop.
- First, you need to select and then open the image in photoshop that you want to pixelate.
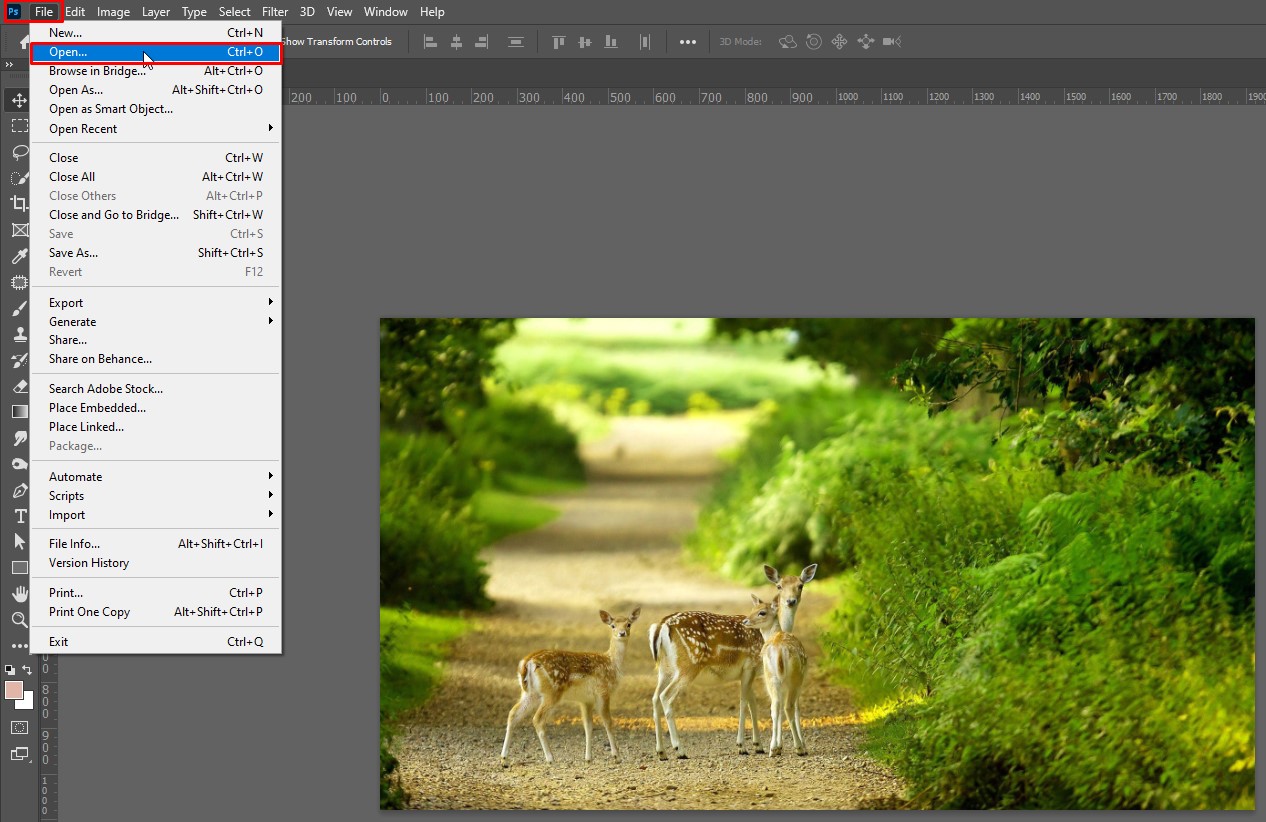
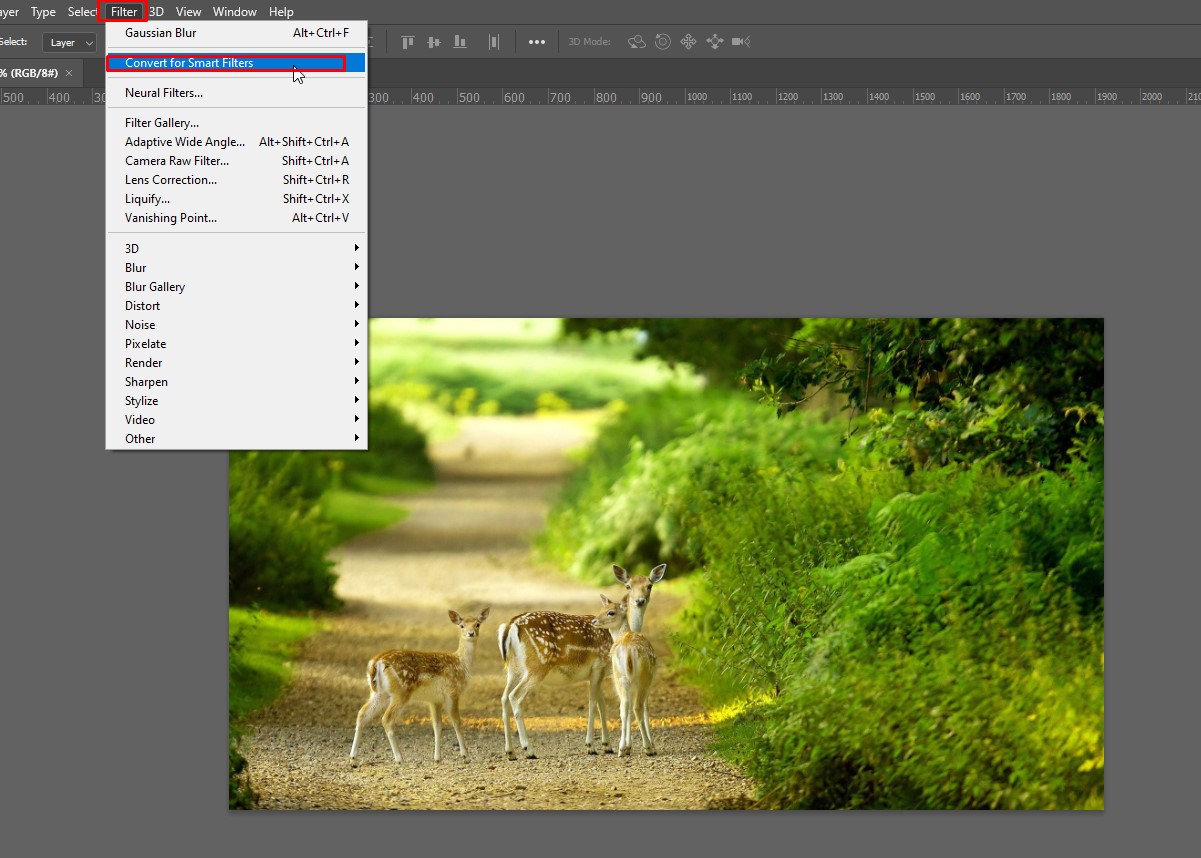
- Next, navigate to the top menu and then click on the Convert for Smart Filters. You are allowed to remove, add, hide or adjust smart filters, therefore, your edits become nondestructive. Following ways allow you to remove changes to the actual image.
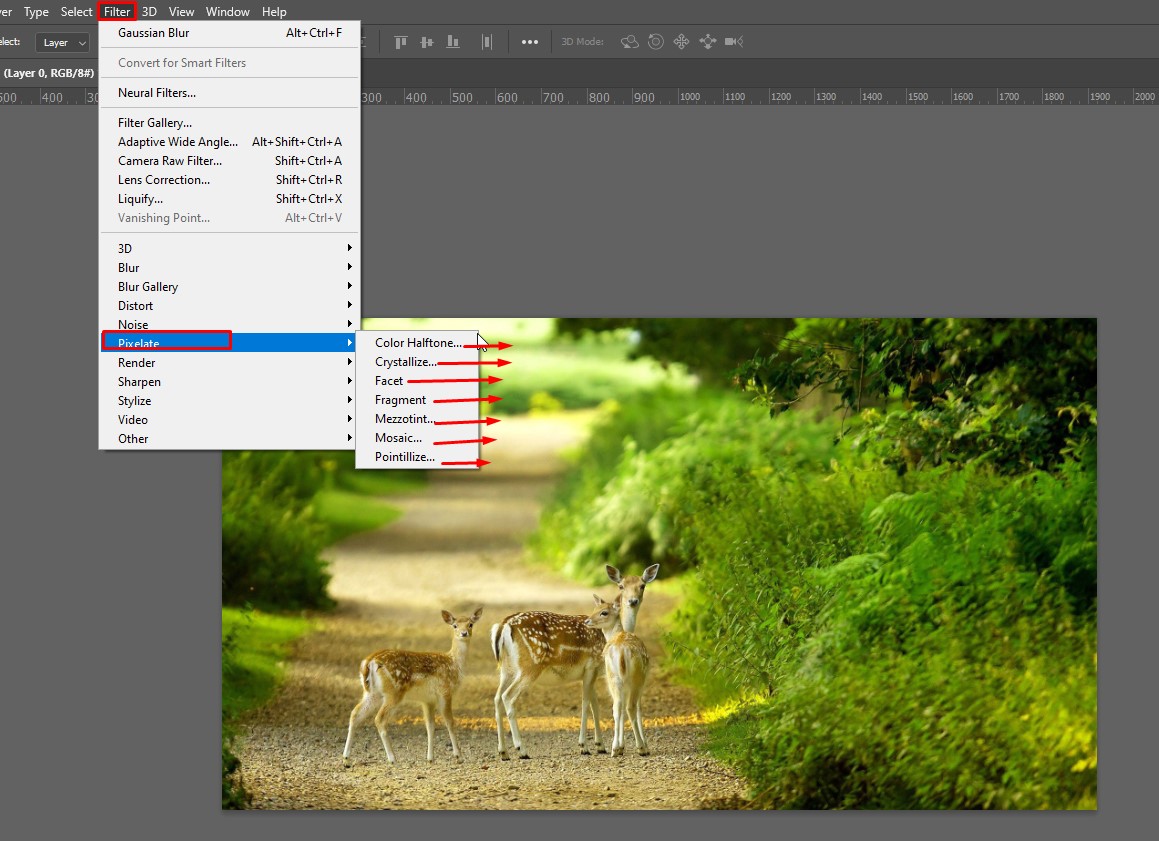
- Now, it’s time to pixelate the image. For that, you need to navigate to the top menu, then choose Filter. Then, you will find the Pixelate option, click on that to choose Mosaic.
![]()
Note: A Mosaic filter helps to break up a photo into blocks of multiple color pixels. Plus, that filter lets you set the grout width, lighten grout and tile size. Apart from the Mosaic filter, you can choose other pixelate filters such as Pointllize. Using that filter, you can turn your image into a pointillist painting.
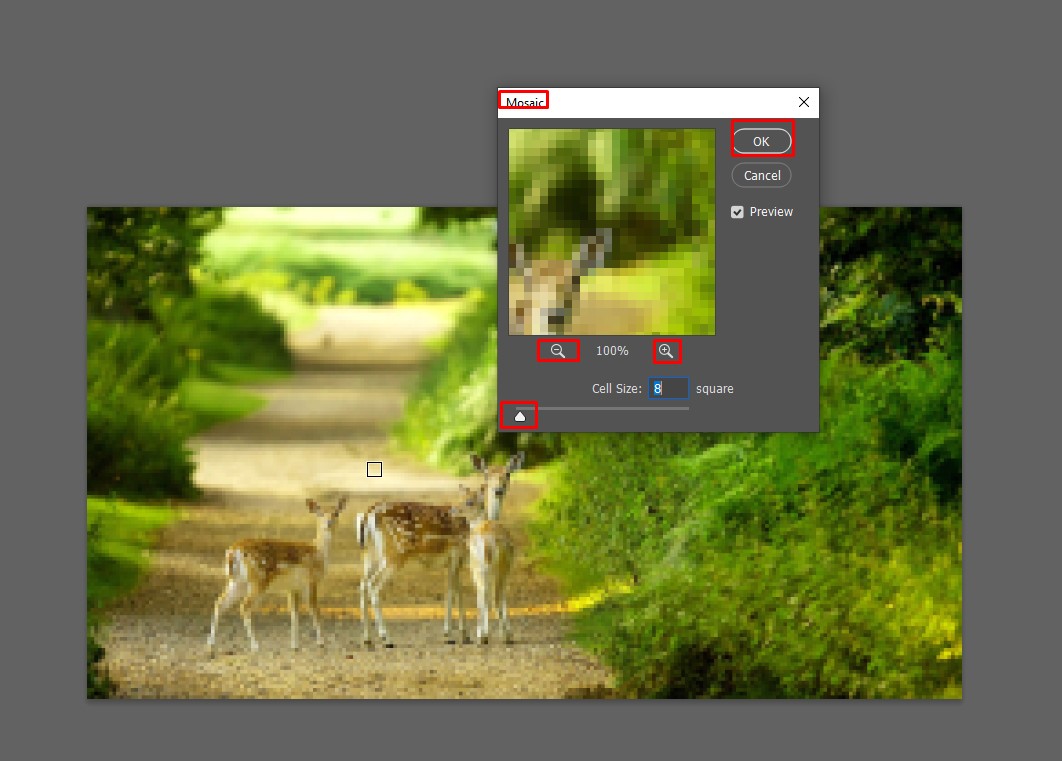
- Finally, navigate to the preview window, here you can increase the pixel size by moving the slider to the right and moving to the left to decrease. Also, the preview window lets you zoom in and out of the image to see the actual condition of the image.
How to fix Pixelated Images in Lightroom?
You will find multiple sharpening tools in Lightroom, A few brush strokes or sliders will help you enhance the photo. In the following section, we will notify you about the entire process.
- Similar to the previous two steps, you need to open the pixelated image in Lightroom. Then, move the cursor to the top right corner and click on the Edit option.
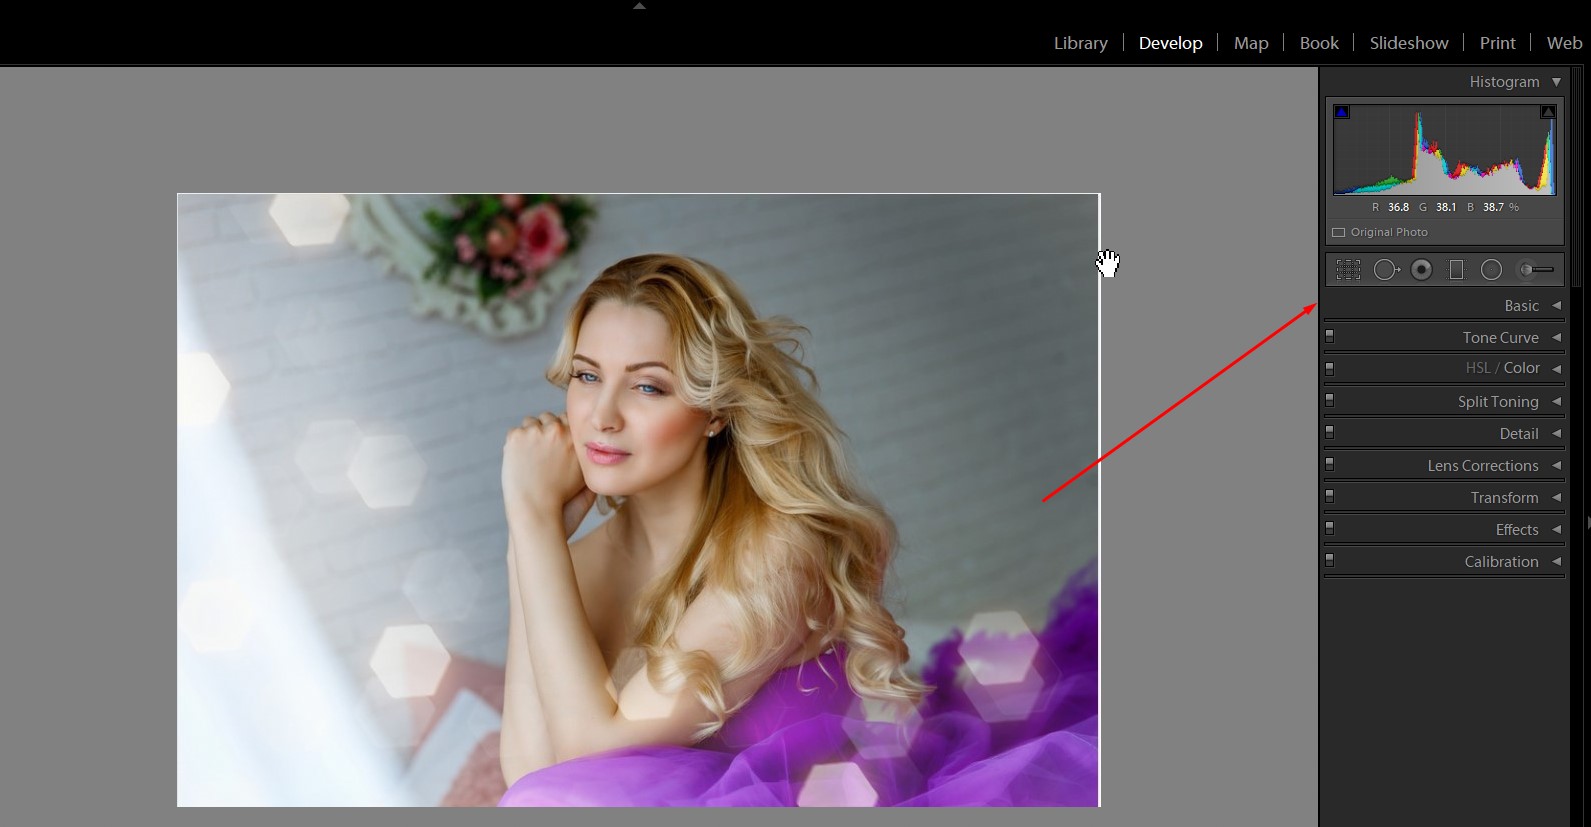
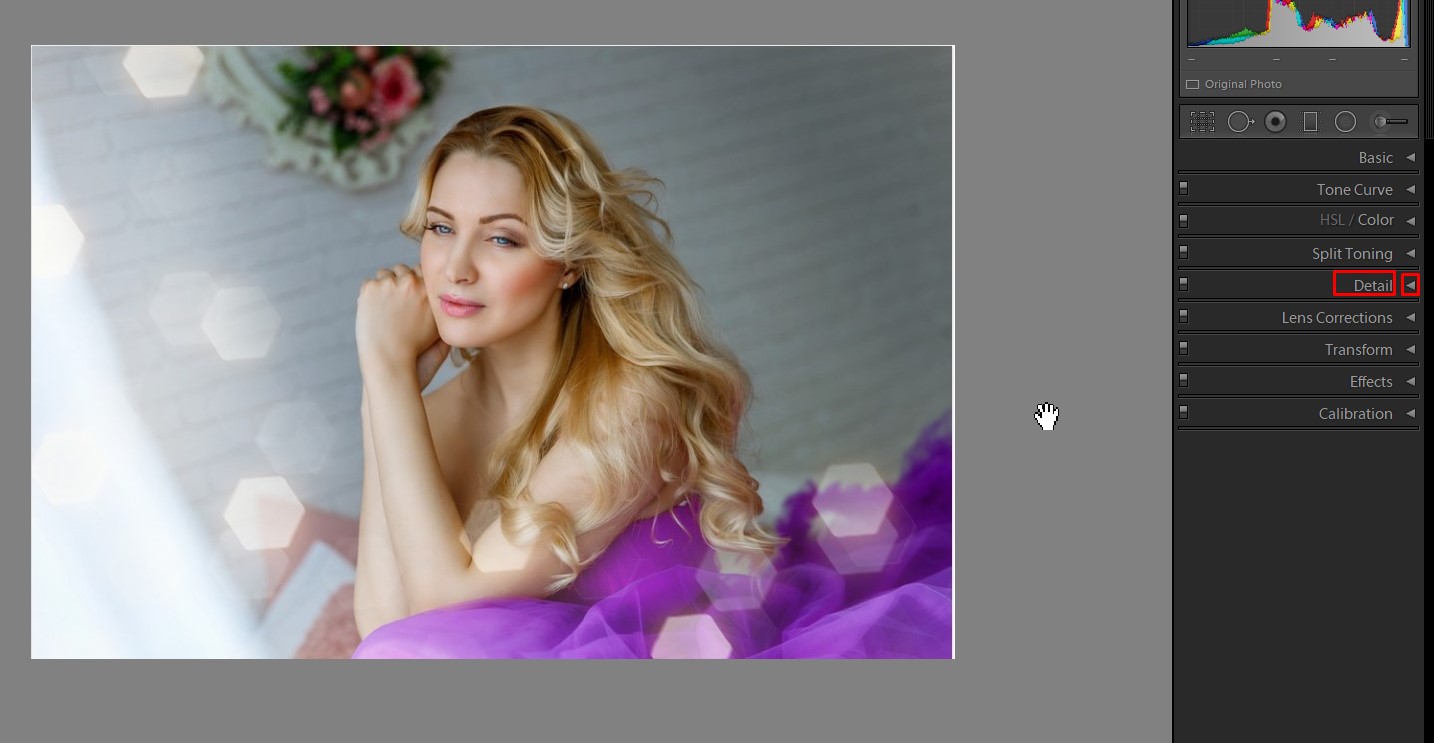
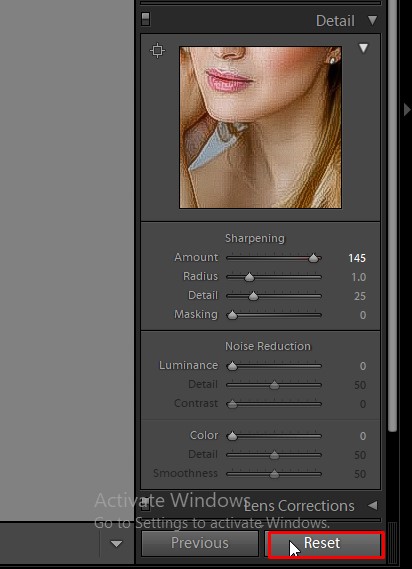
- Once you click on the Edit menu, you will see a new window open on the right side. Now, locate the DETAIL option and click on the arrow. Therefore, the DETAIL panel will open.
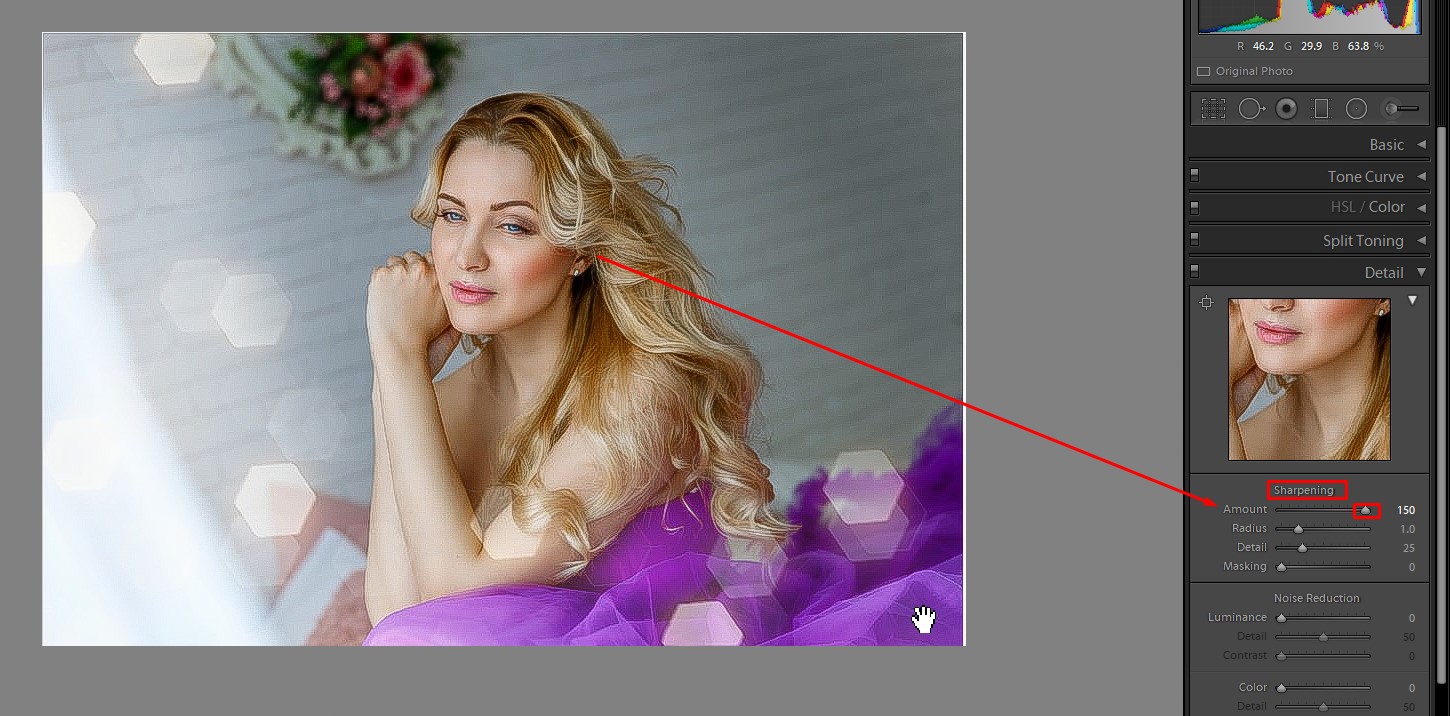
- Beneath the Details, you will find the Sharpening option. You can sharpen the image by dragging the slider to the right. If you have trouble seeing the changes, then press the Alt key and drag the slider to the left. Then, the image becomes desaturated and shows you the changes. Note: The Sharpening key creates the illusion of details and sharpness after adding contrast to edges.
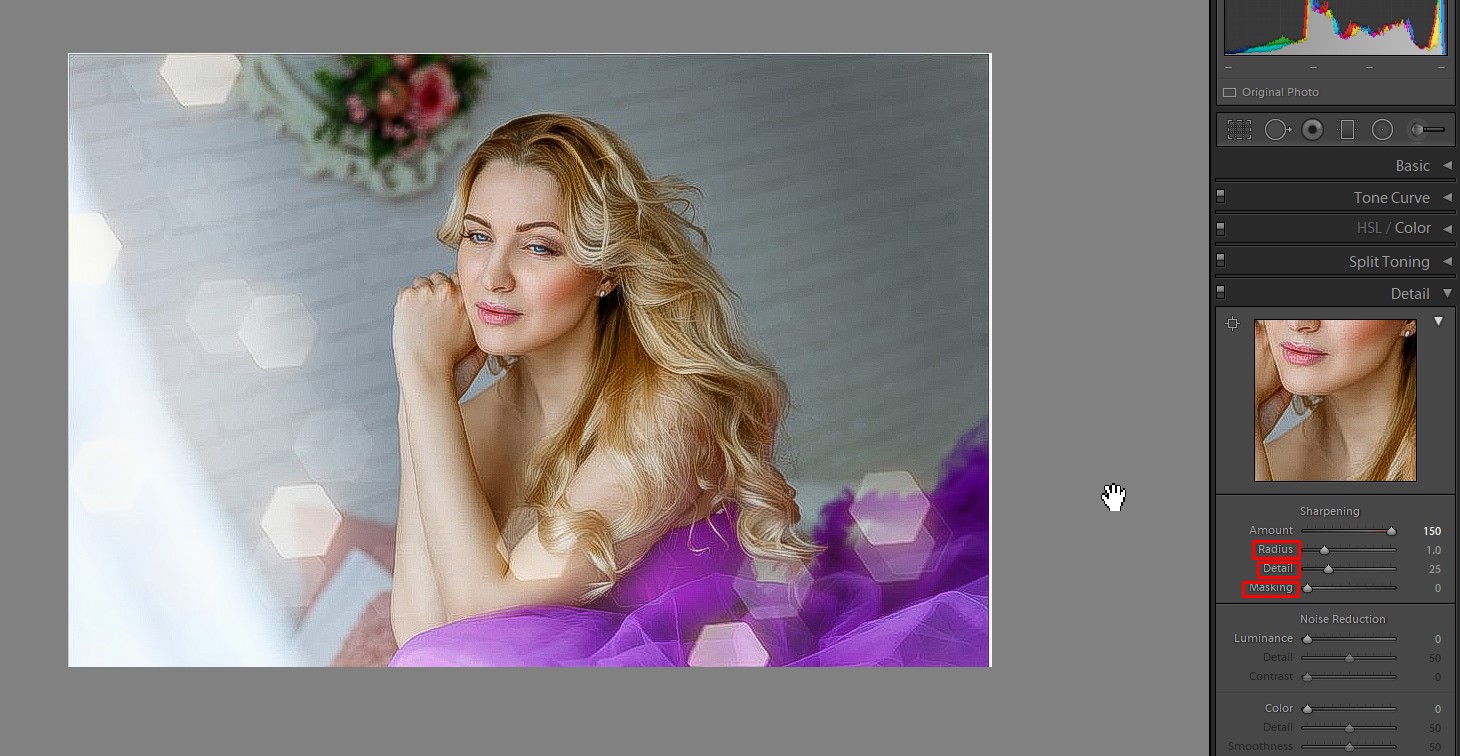
- If you want to get more control over the Sharpening option, then click on the arrow key. Now, you could see three additional keys. The first key is Radius, which lets you control the edge’s thickness. The lower value makes the edge thinner and the larger value gives you a thicker edge. The second key is the Detail slider which will help you sharpen your image’s details. The third one is called the masking slider that will help you control the effect you applied.
- If you want to go back to the previous form, you can click on the RESET DETAIL. Therefore, you can see all your changes vanish.
Conclusion
It isn’t unusual to get an inferior quality image, but you can fix that blurry image using the depixelate method. By now, above we have shown you how to depixelate an image in photoshop along with two other relevant methods. We try to make all the processes straightforward so that you can easily apply them to uplift your existing image quality.


