How to Smooth out Skin in Photoshop?
To make a personal portrait look more amazing, retouching skin by smoothing the skin tone or removing blemishes can be super effective. Photoshop offers graphic designers different tools and options to reach an incomparable quality. However, many retouchers don’t know how to smooth out skin in Photoshop properly. This tutorial will draw you through a step-by-step journey and narrate a complete guideline on how to retouch skin in Photoshop.
One disclaimer is that nothing can be more efficient for a learner than learning by practicing. So, the best would be if you take a simple image and practice everything discussed here.
Table of Contents
How to Retouch Skin in Photoshop
When it comes to retouching an image in Photoshop, the possibility is boundless. A photo editor can do almost everything imaginable with an image. He can tweak the shape of the subject, smooth the color and tone, play with the look, and even make a subject look taller or thinner. Here, we will discuss and give guidelines to accomplish a few possibilities. We will focus on smoothing, softening, changing skin color, and making someone look thinner. Let’s begin-

How to Smooth Out Skin in Photoshop
If you are wondering about how to smooth your face in Photoshop, well, wonder no more. Photoshop lets you smoothen skin in three different ways. Two of these methods are comparatively easier and more beginner savvy. The third method is for more advanced photo editors who have more control over Photoshop.
Blur Tool
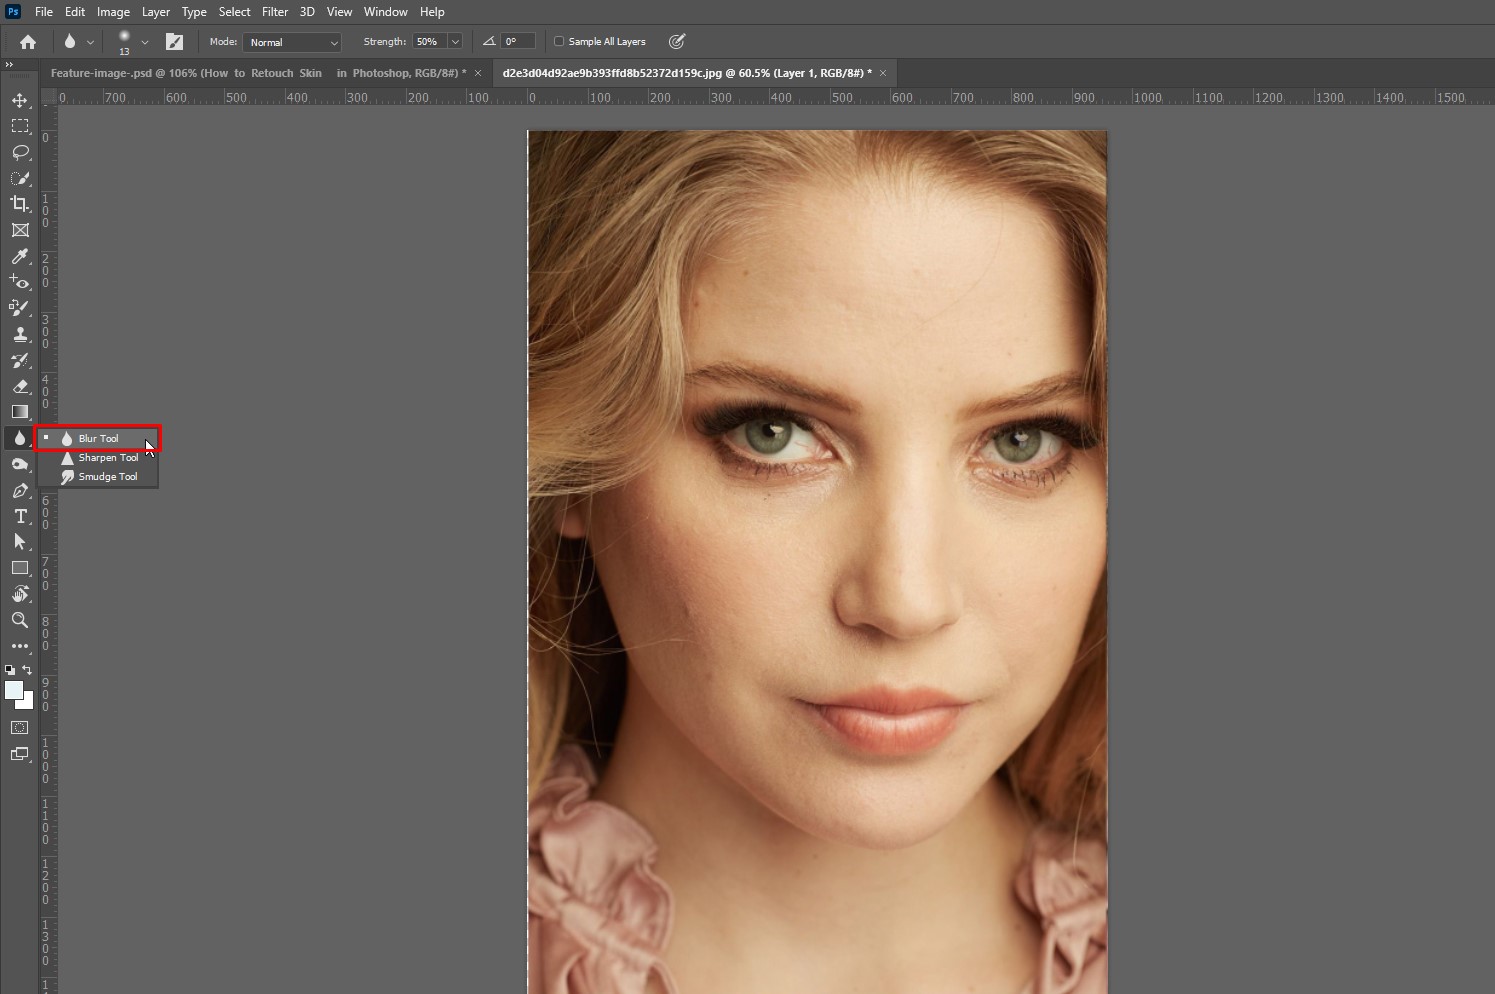
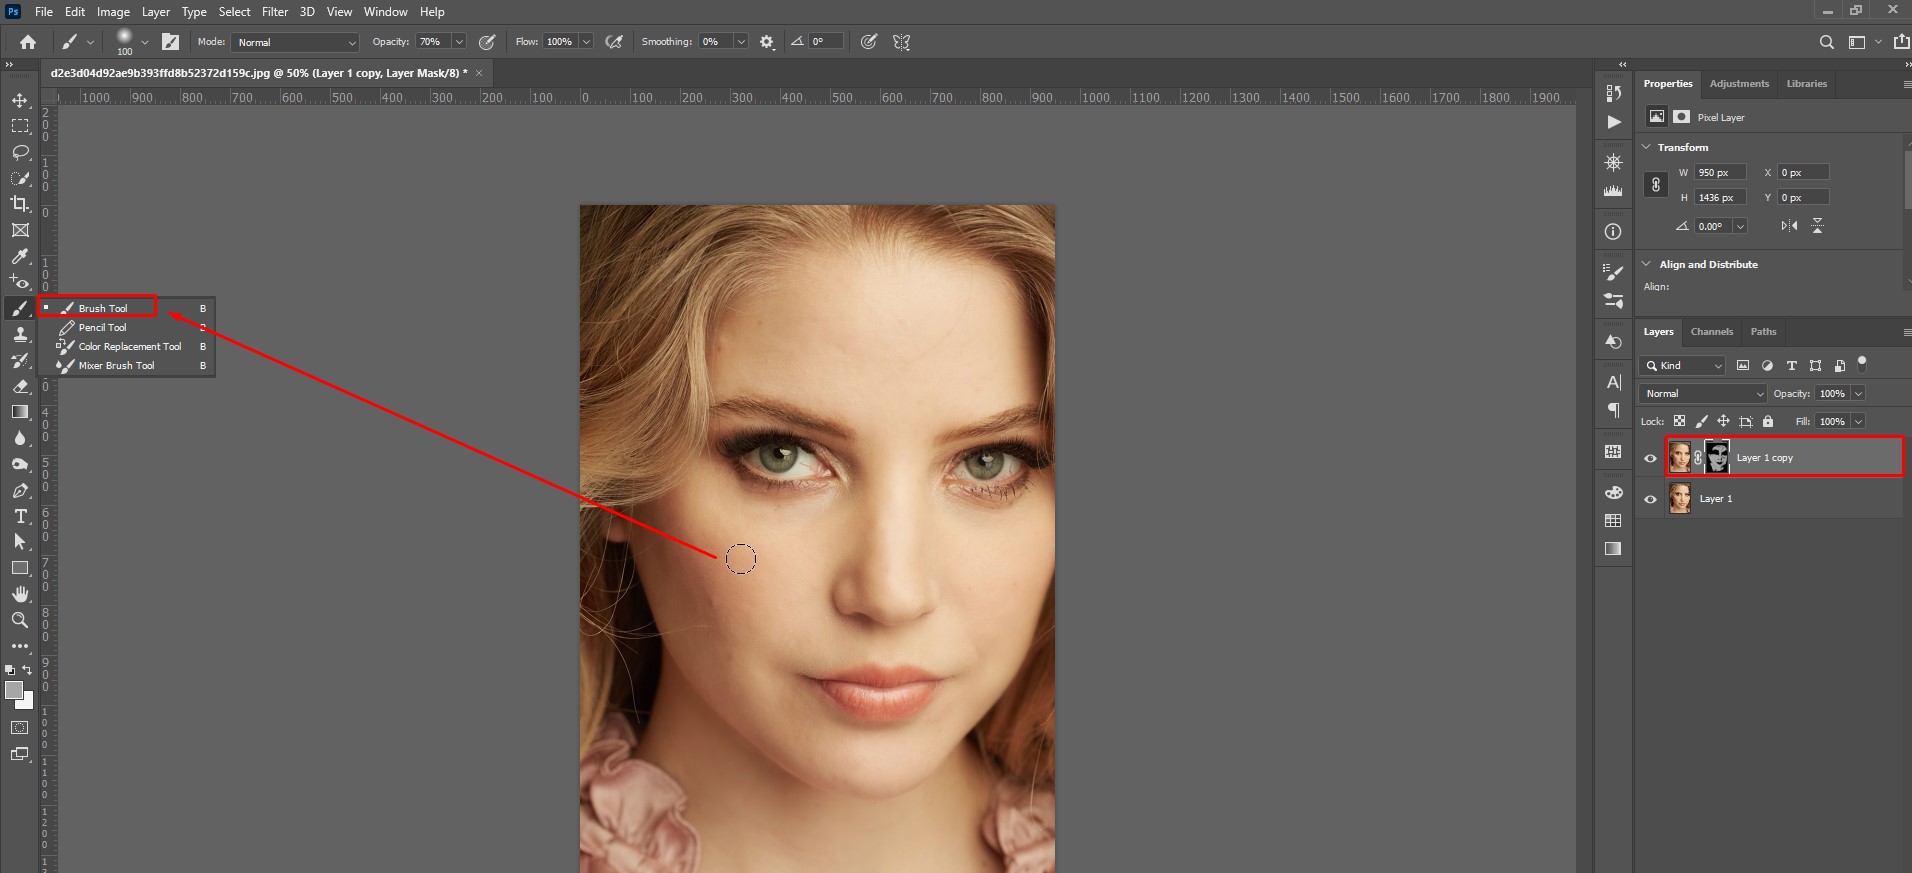
For people curious about how to retouch skin in Photoshop, starting with the Blur tool would be a good idea. Using the blur tool is the simplest method in Photoshop to smooth an image. This tool can be found in the toolbar, and it appears like a water drop. Though photo editors won’t have much control over the process, that’s why the blur tool will be suitable for less serious cases.
Create a New Layer
First, choose the layer “Blemish Removal” and copy the layer to a fresh new layer. To do that, follow this path- Layer – Duplicate Layer.
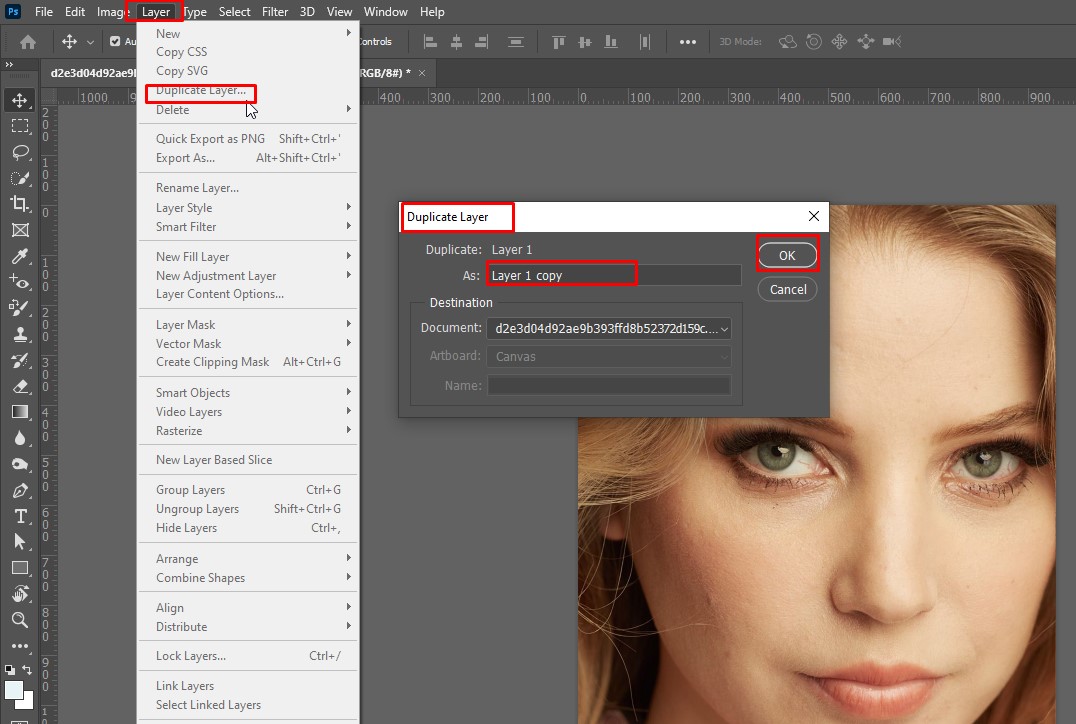
Give a suitable name to the new layer by double-clicking on it.
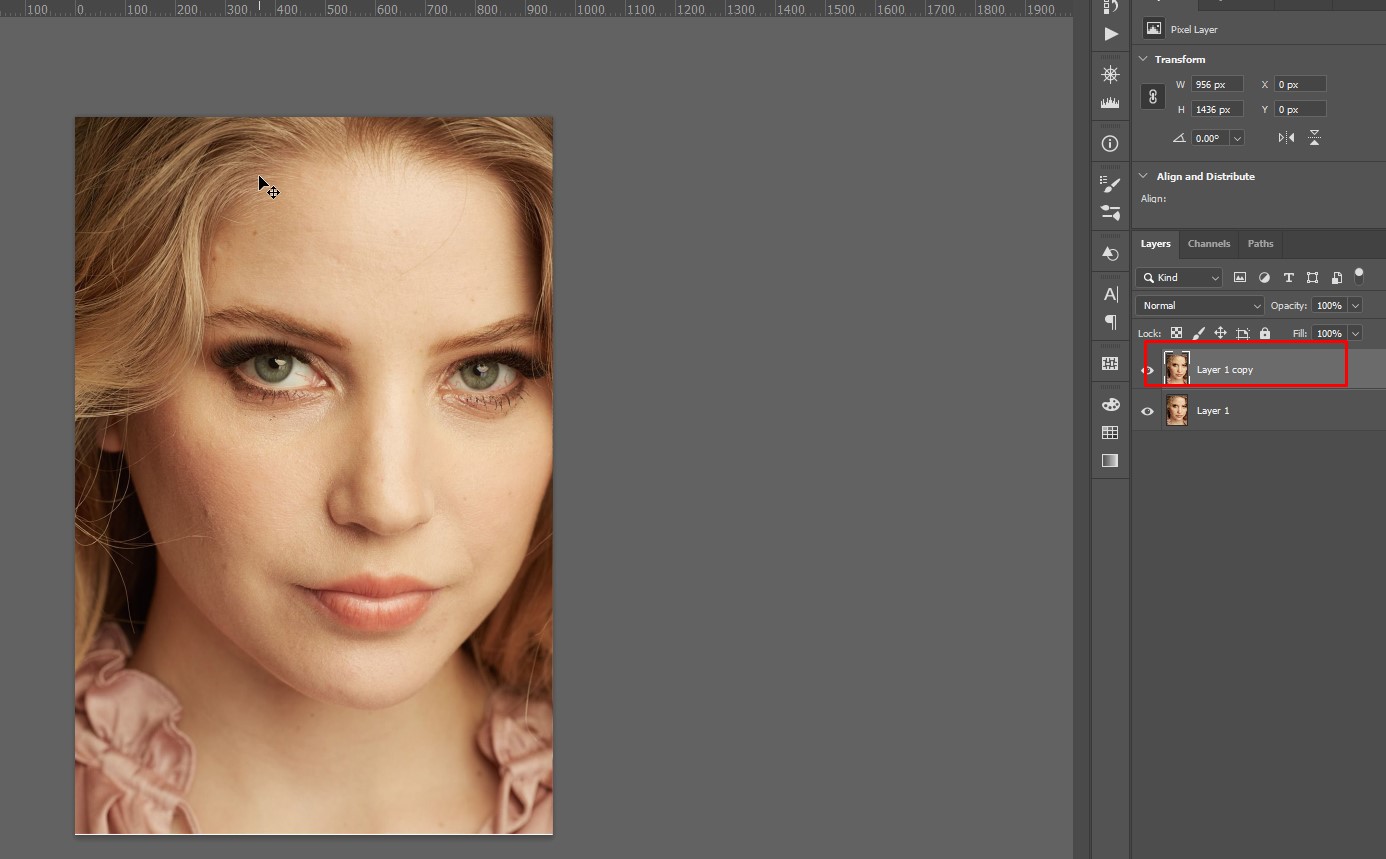
Blur the Layer
Click the Blur tool from the toolbar and set its percentage to 100%.
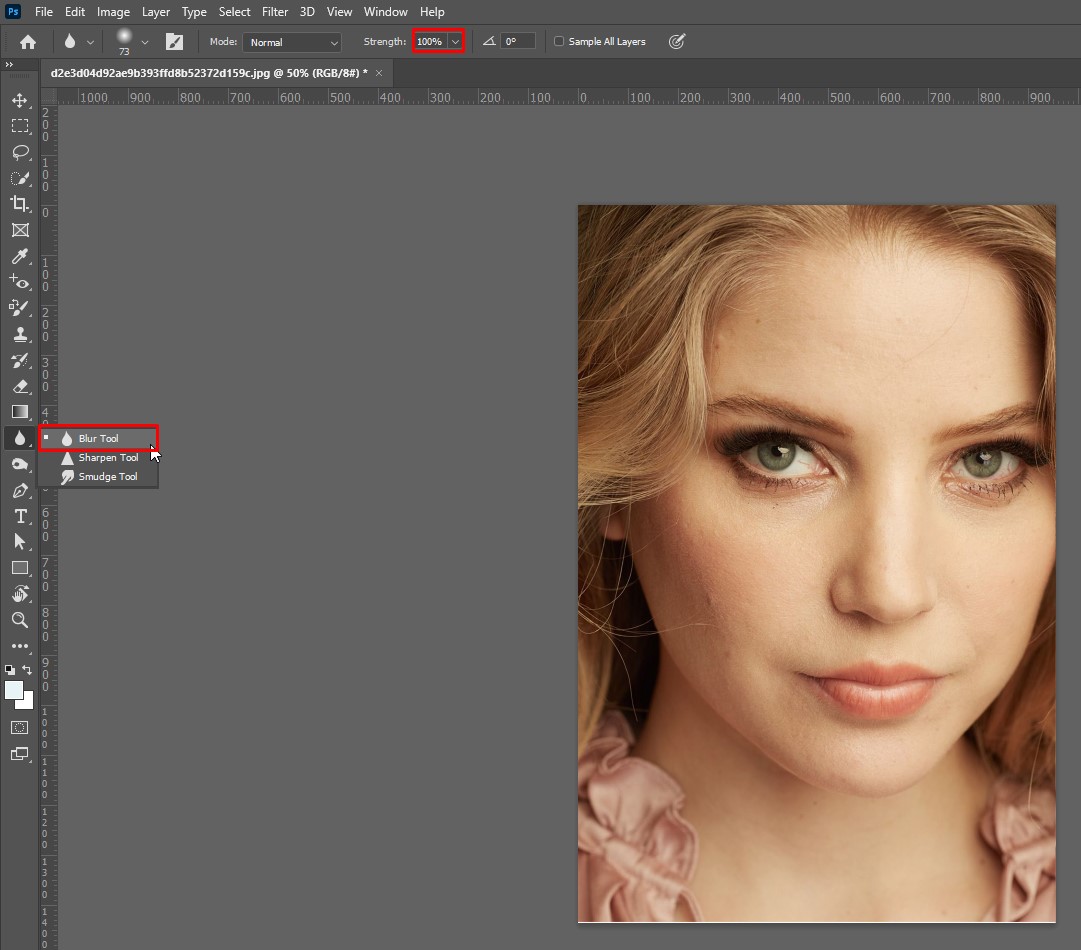
Impose it directly onto the skin of the model of your sample photo, and then paint the Blur. The Blur can only be applied to the skin. Be careful so that the eyes, lips, hair, or clothes don’t get distorted.
If the impact of the effect seems excessive, undo the Blur tool pressing Ctrl + Z and decrease the percentage. Analyze the prior and later version of the image to scale up the difference.
Filter Blur
You can use the Filter blur tool to get greater control over the softening effect. So if you are wondering how to smooth your face in Photoshop, try Filter Blur. As a skin-smoothing effect, the Surface Blur or the Gaussian Blur would be quite impressive. Gaussian Blur gives the picture a more admiring glow. As a learner, you should experiment with both types of filter blur and select the one that suits them best.
New Layer
The first step for this method is the same as that of the previous method. You have to choose the layer “Blemish Removal” and copy the layer to a fresh new layer. To do that, follow this path- Layer – Duplicate Layer. Give a suitable name to the new layer by double-clicking on it.
Blur the Layer
To blur the image with the Filter Blur, you have to go to the Filter menu and select Blur and proceed to Gaussian Blur from there.
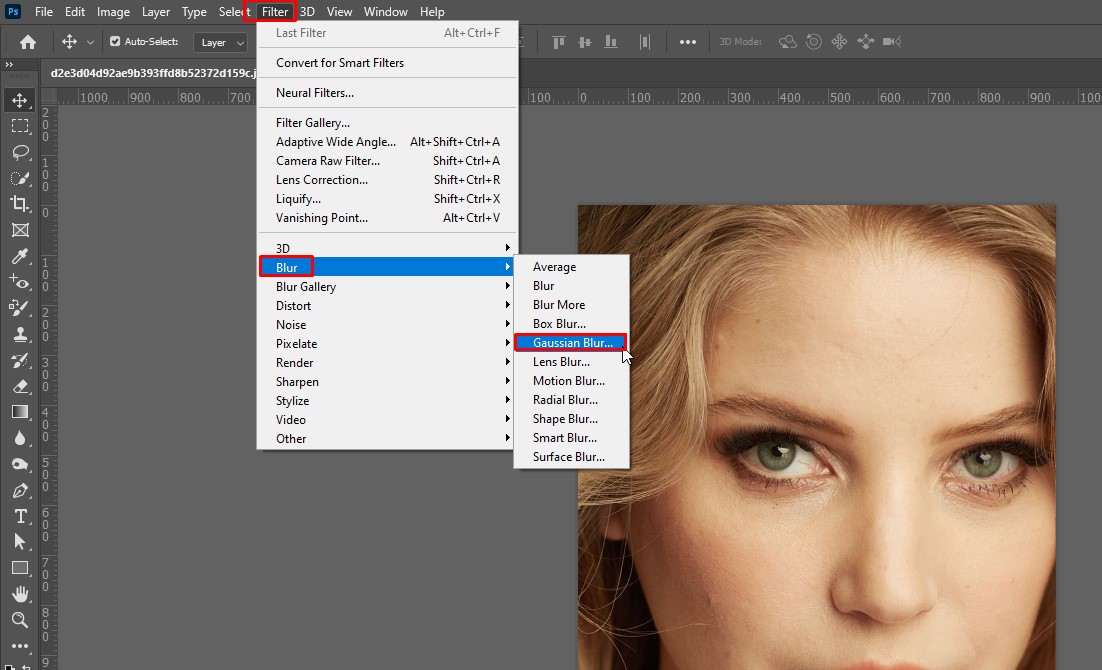
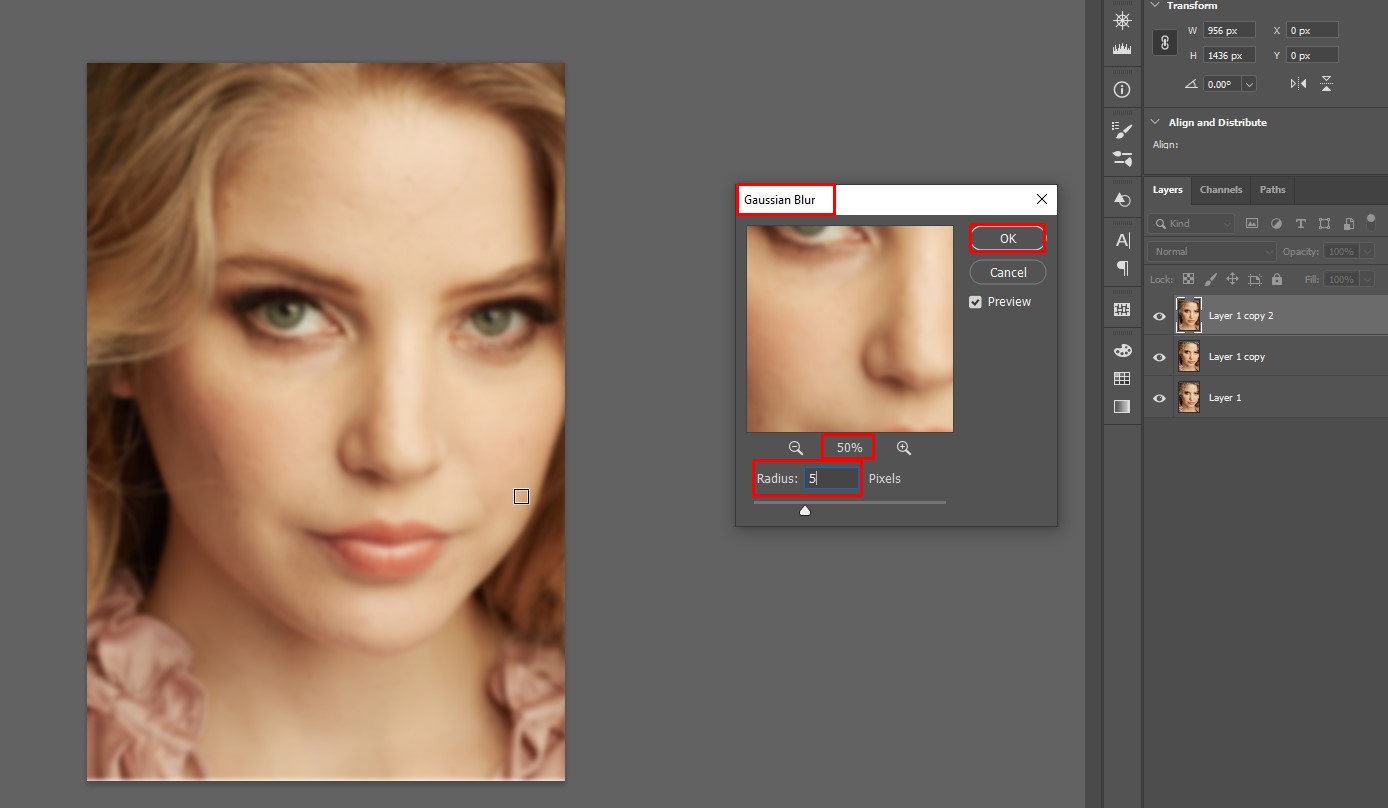
Now, you don’t have to impose too much Blur. Depending on the sample photo’s resolution, 5px to 10px of Blur should be enough. Reducing the layer’s opacity to 50% would do better. Because if excessive Blur is used, it can ruin the texture of the skin and spoil the natural tone of the photo.
Using a Surface Blur will provide a bit of a unique look. To use this effect, follow this path.
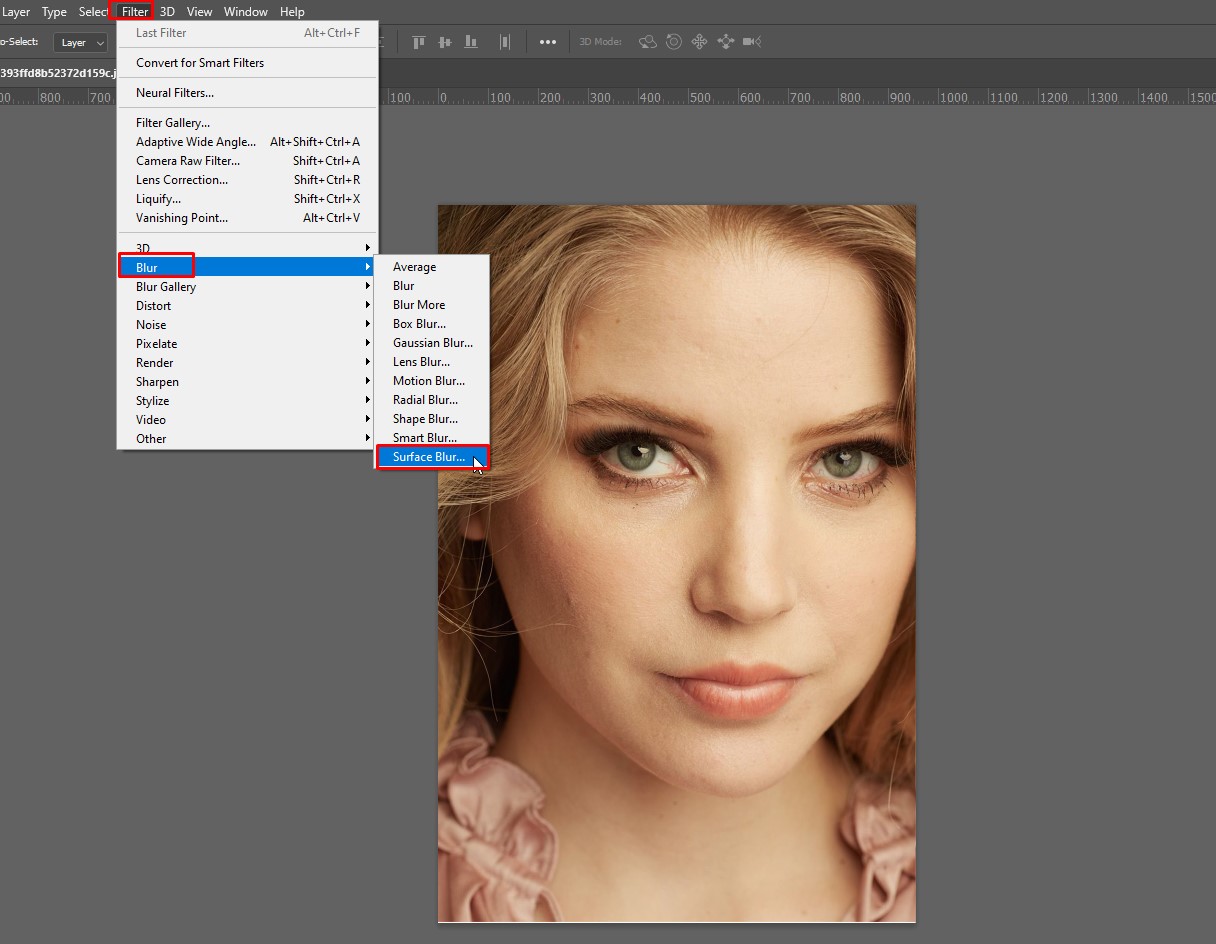
Filter – Blur – Surface Blur
This method is almost the same as using the Gaussian blur method.
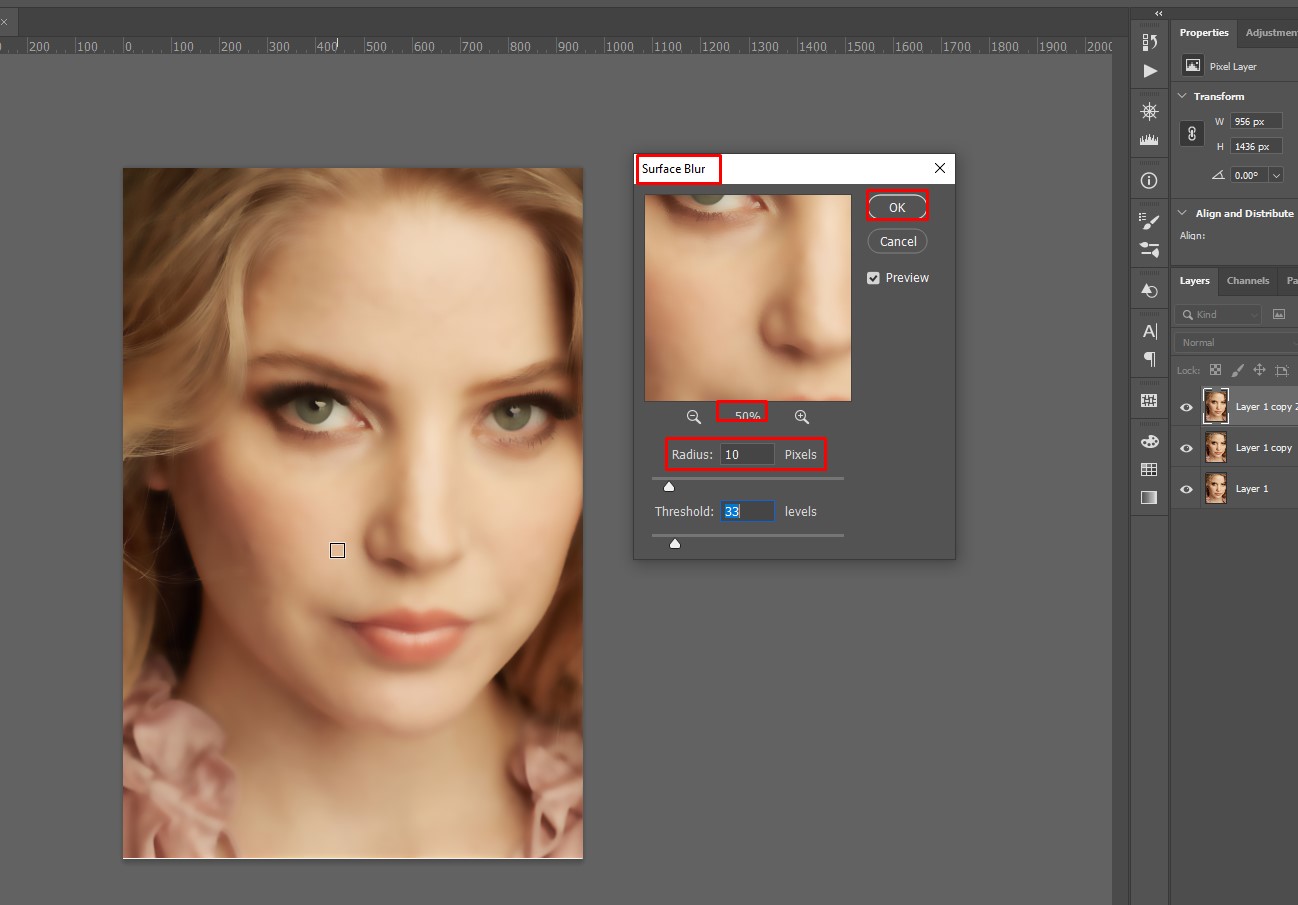
Blur the Skin
Try to avoid blurring the eyes, lips, hairs, or clothes.
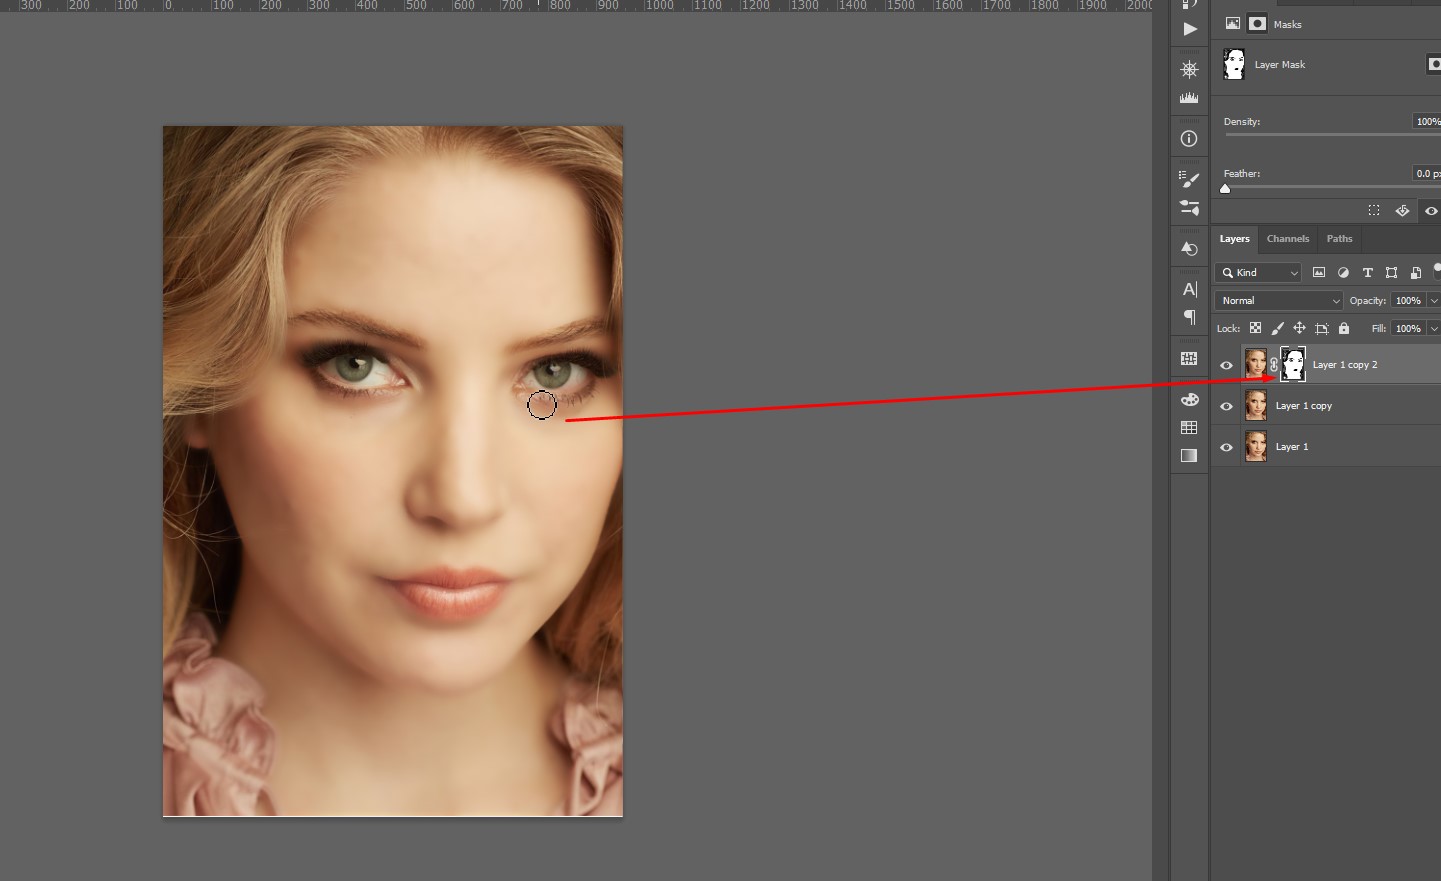
Mask off the blur option and paint it through the skin using a layer mask.
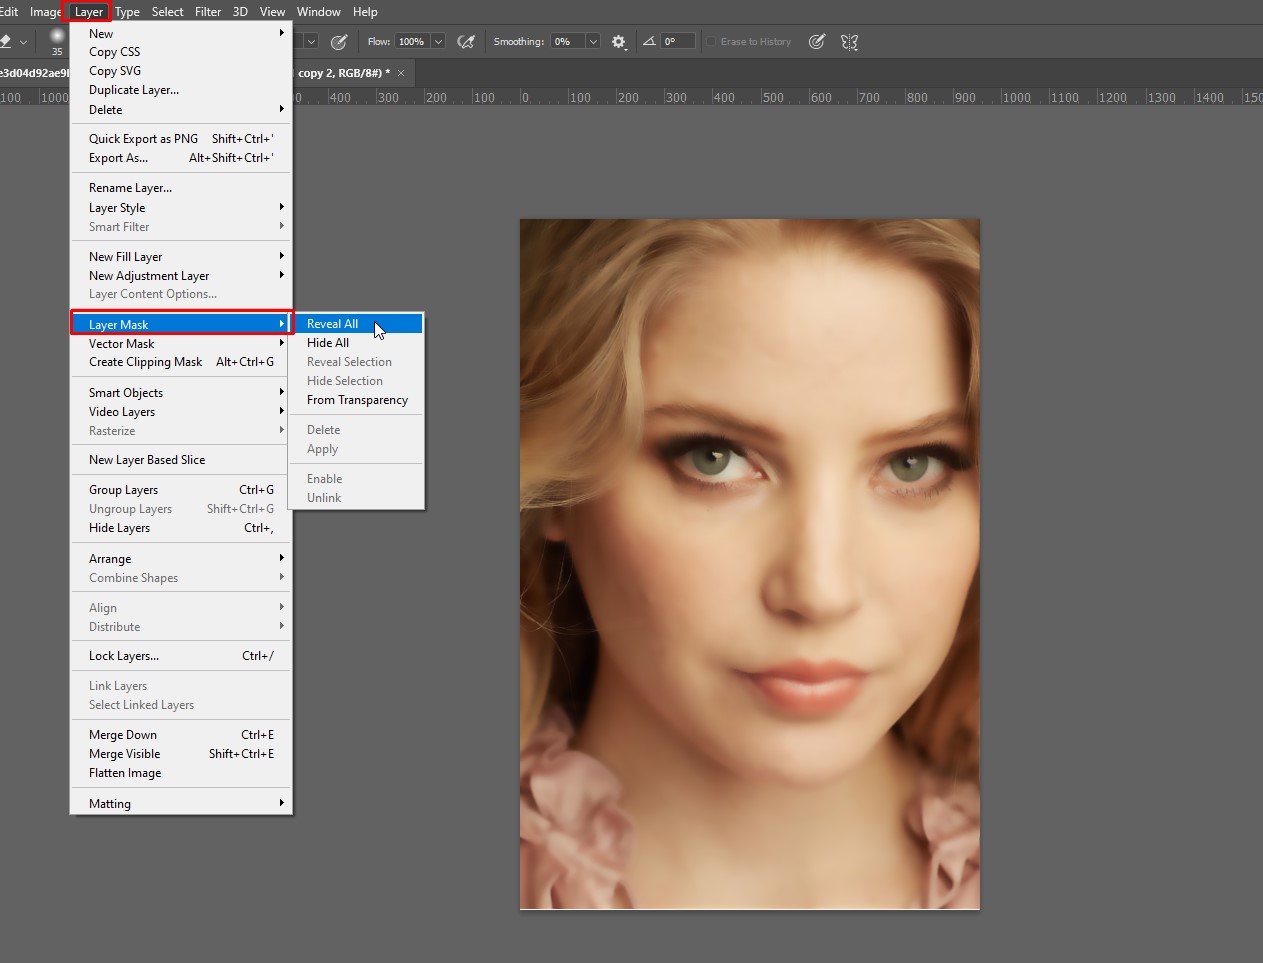
If this is the first time for you to create a layer mask, you can try clicking on the “Smooth Skin” layer. Then click the top “layer mask” underneath it. The tool resembles a rectangle enclosing a circle.
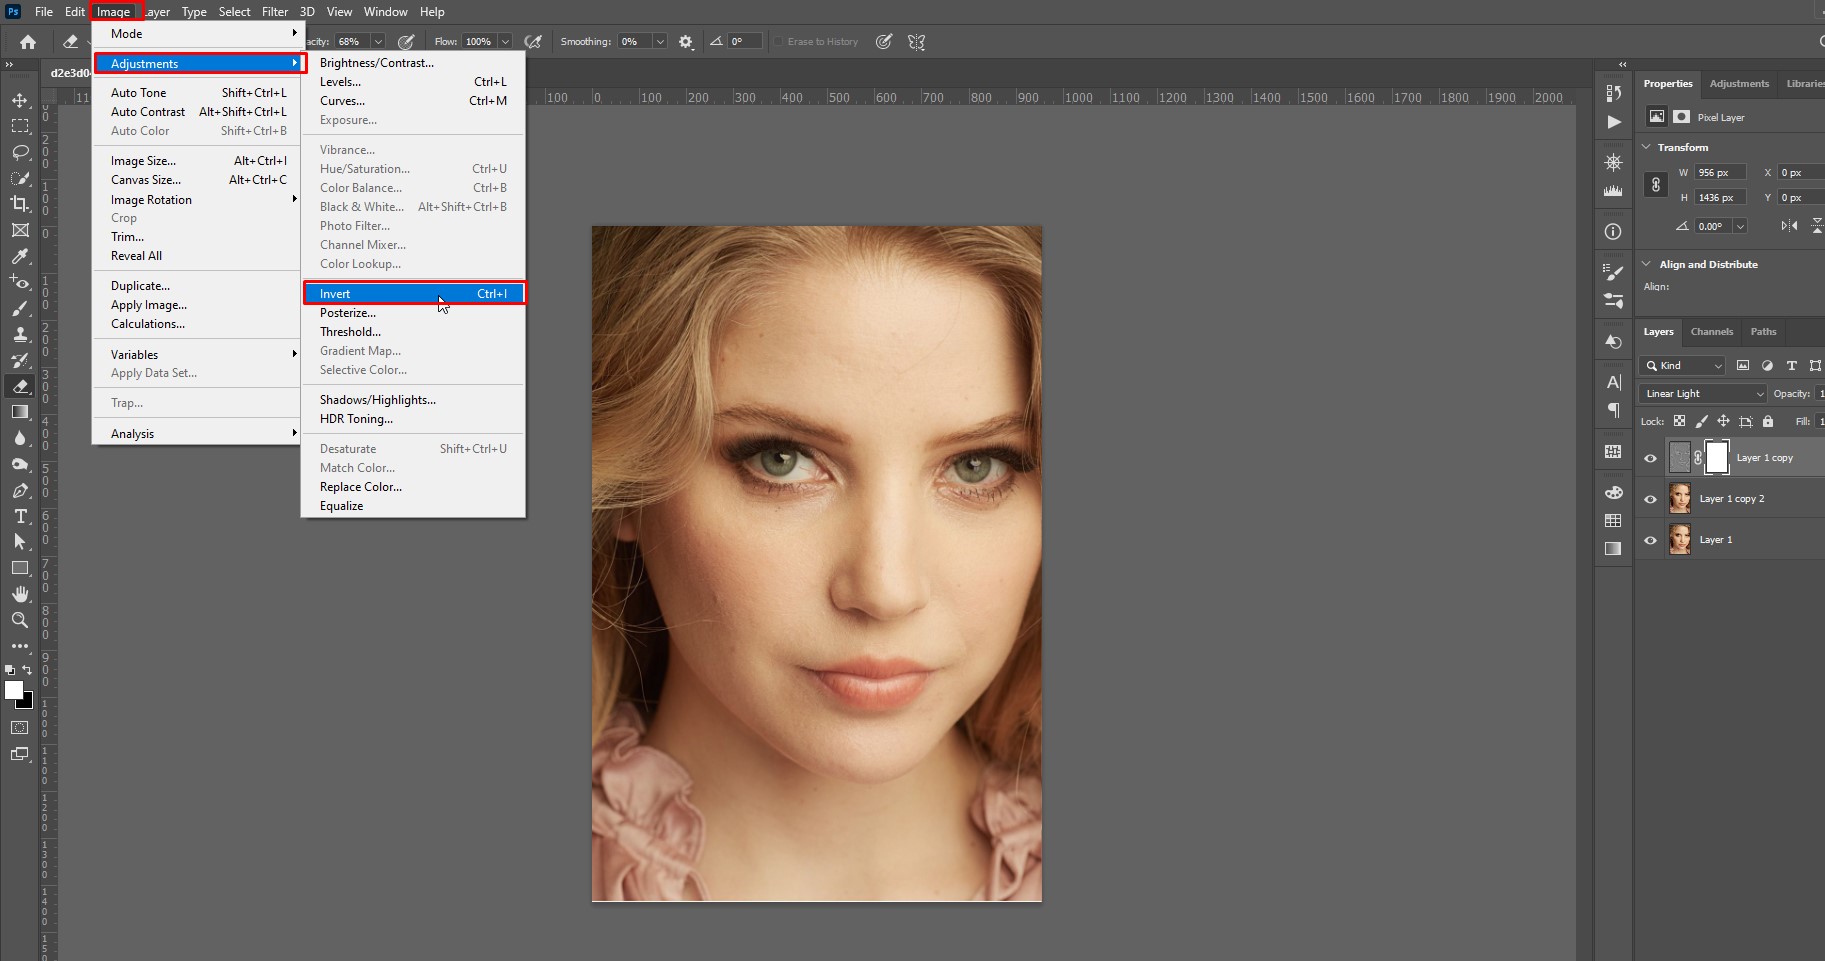
Now, choose the white bush tool and invert the image from the Image Adjustment option. It will hide the Gaussian Blur and turn the layer mask black.
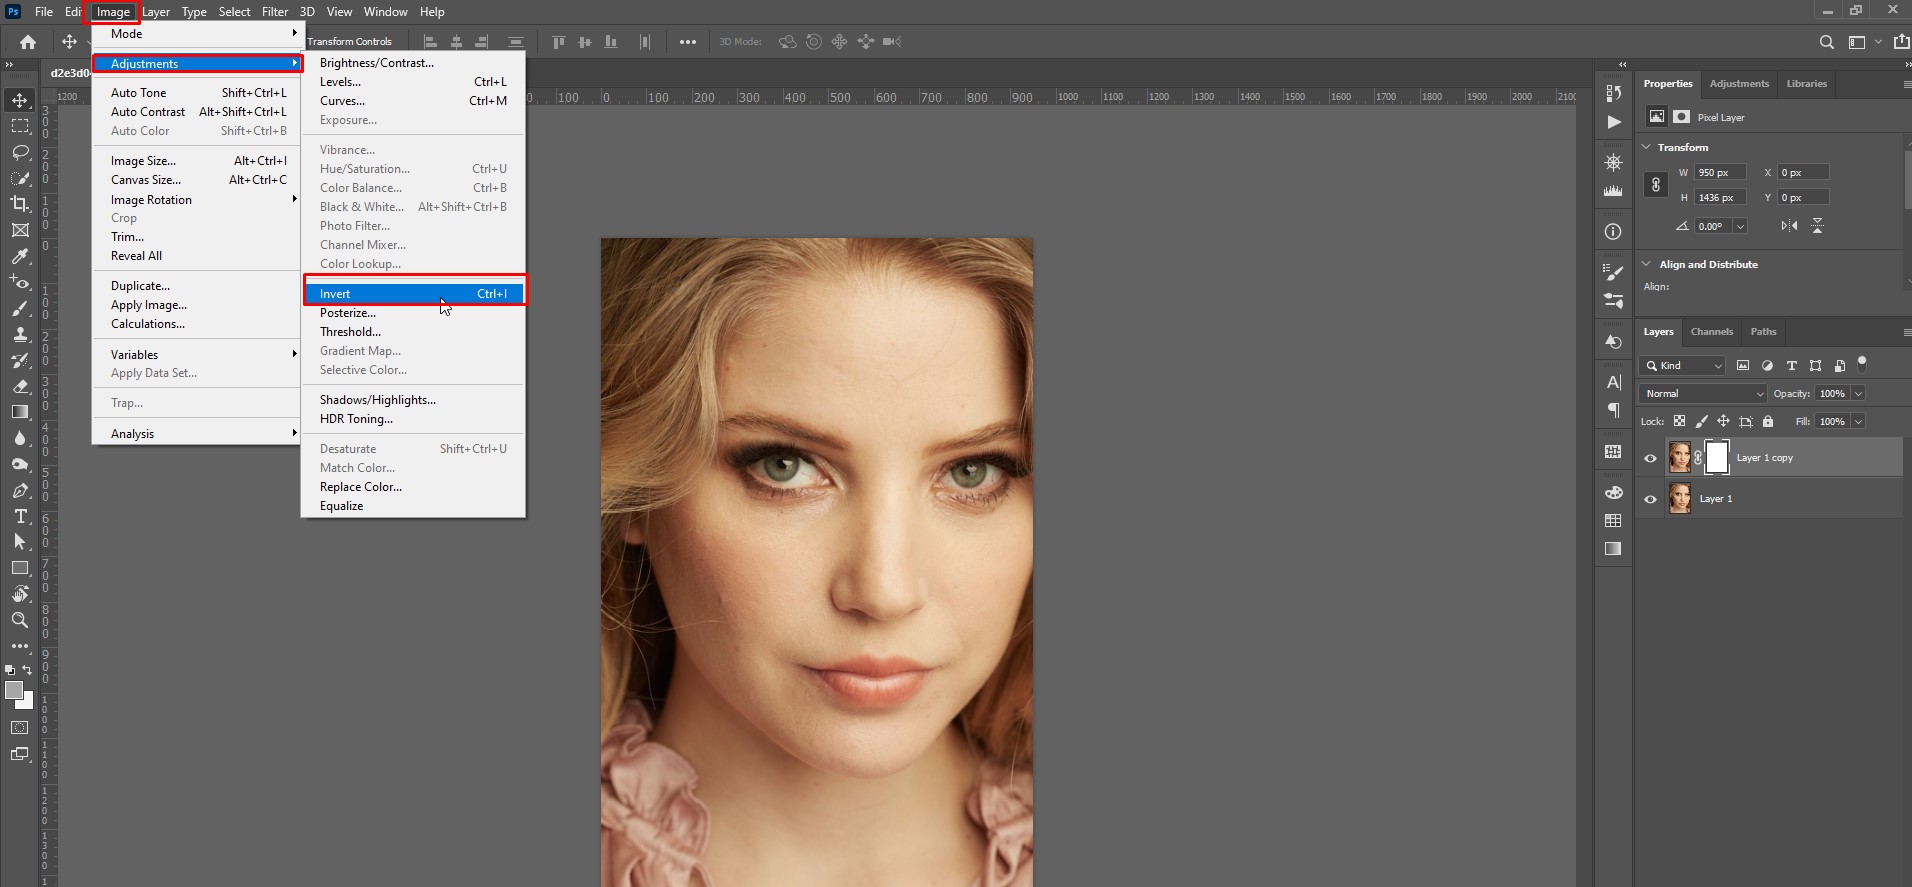
Blur the model’s skin with the white paintbrush tool. You should not overlook the neck area. You can use the black paintbrush to erase the accidental blur effect.
High Pass Filter
In Photoshop, if the High Pass filter is used with a Gaussian blur, it produces a softer effect. This method offers you the greatest control while preserving the natural texture of the real skin. The procedure is a little complicated, and the outcomes may seem odd. However, the end outcome will be flawless skin. It would be a great option for people who want to learn how to change someone’s skin color in Photoshop.
Create a Fresh Layer and Use High Pass Filter
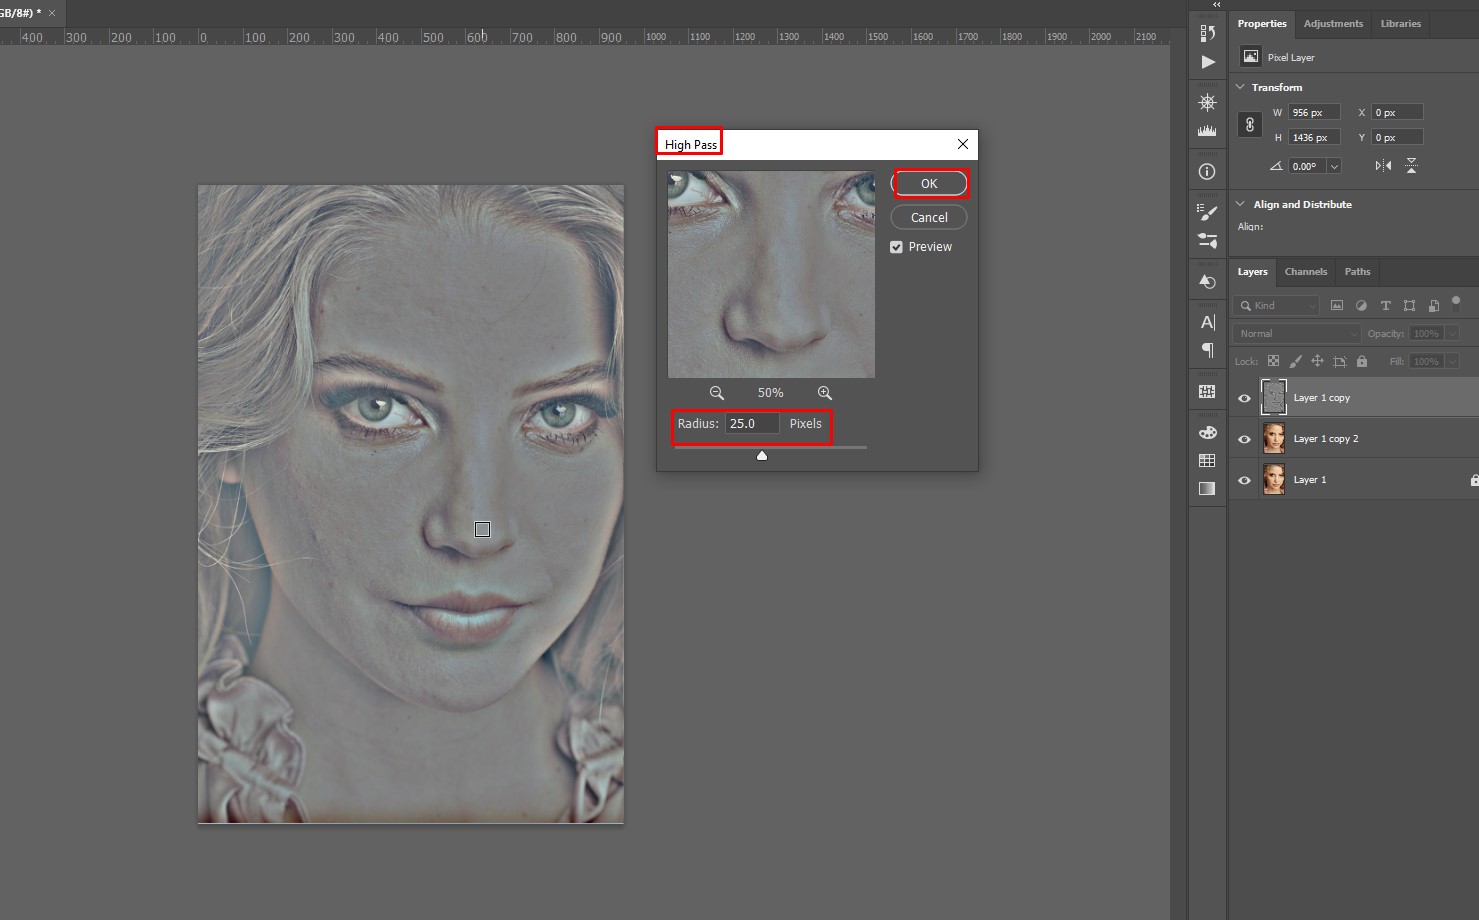
The first step is still the same. You have to create a new fresh layer. Then apply a High Pass filter to the picture. To do this, go to Filter, then choose Other, and then High Pass. This filter is used to detect edges and also details. It is often used to sharpen somewhat fuzzy pictures. Plan to reverse the effect later so that instead of impacting the edges, it focuses on the flat surface of the skin.
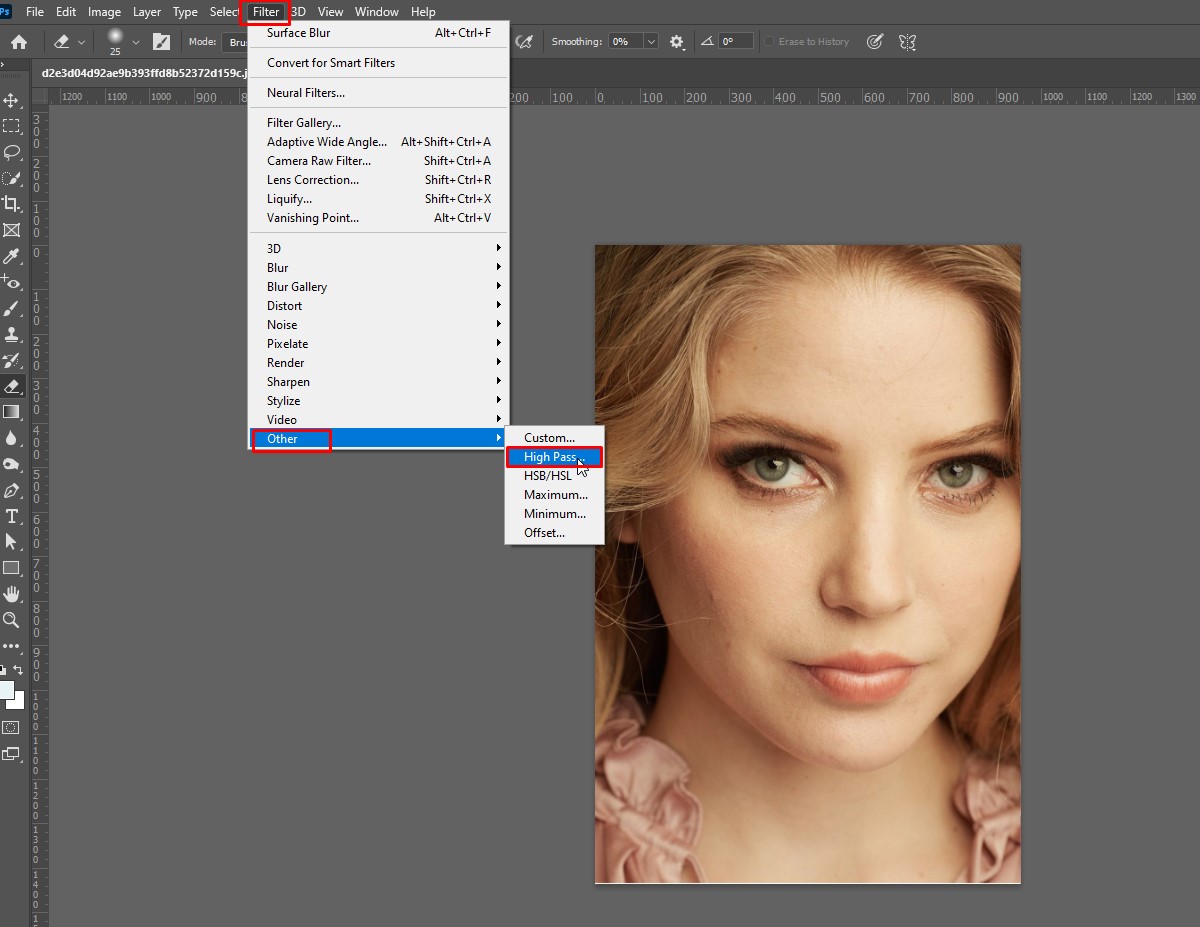
Keeping the radius between 20px to 25px would be the best.
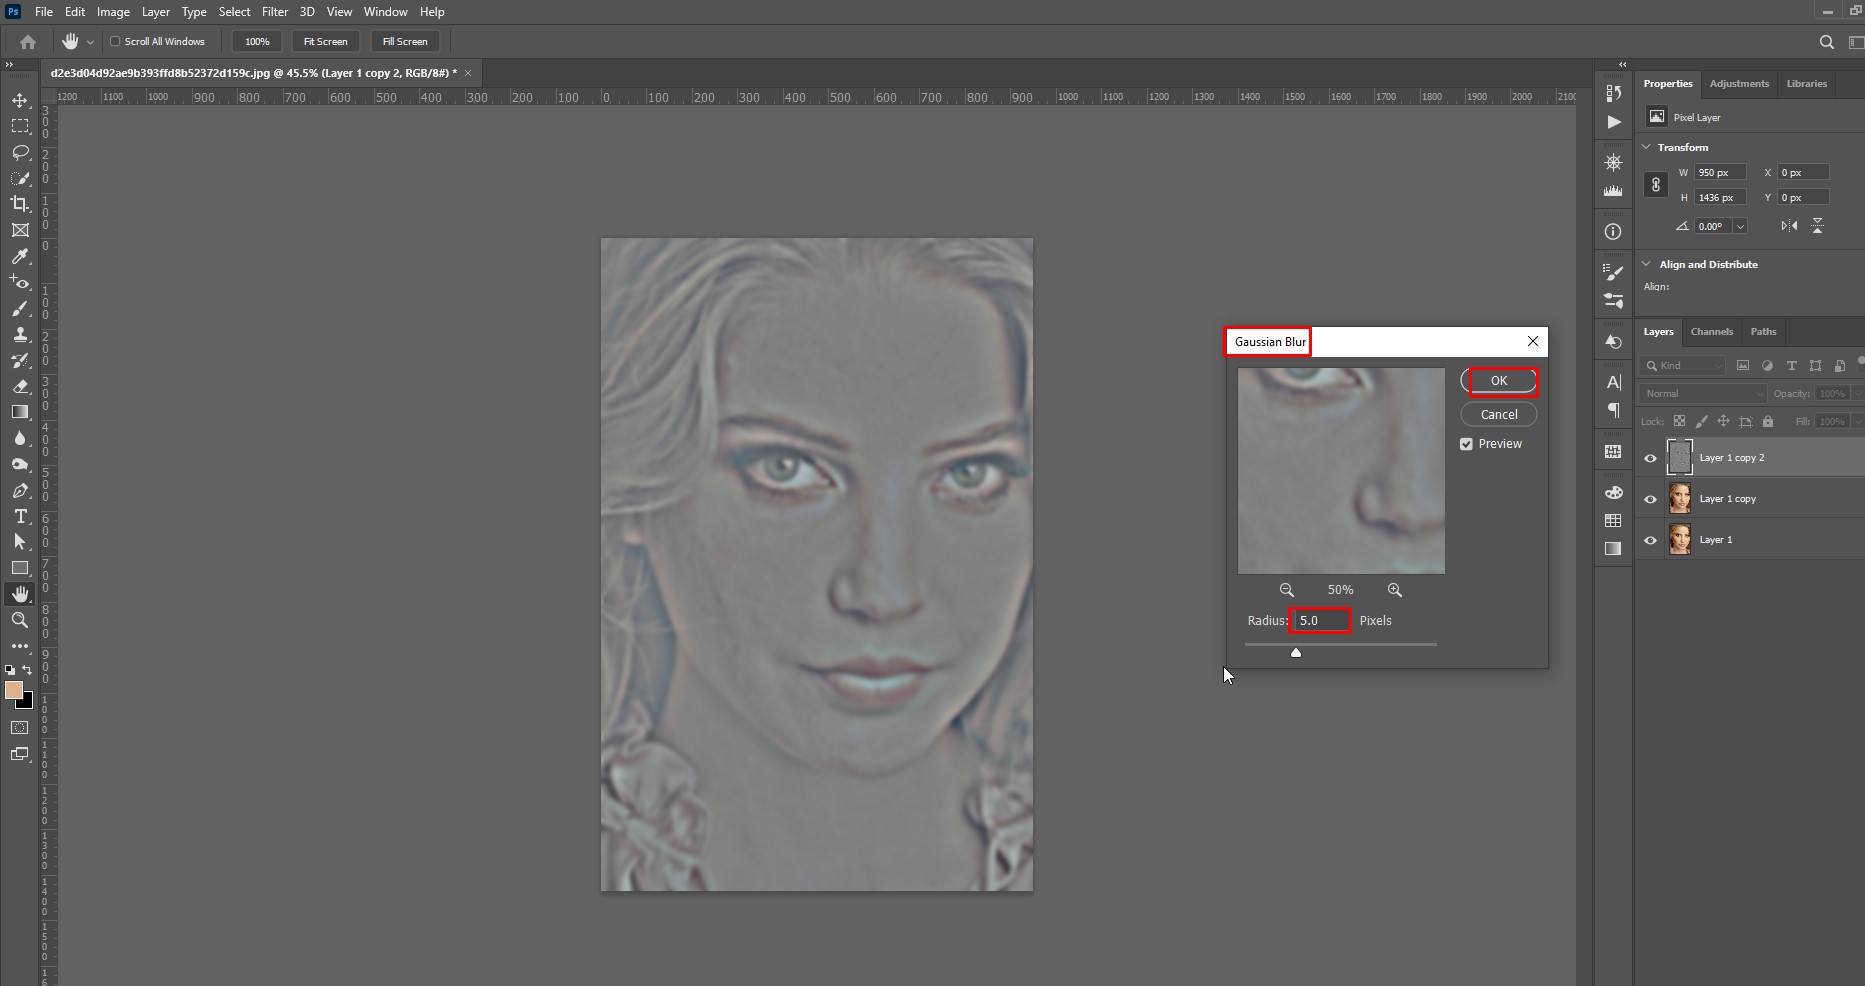
Add Blur and Invert
Go to Filter, then to Blur, and select the Gaussian Blur. Add the blur around 5px to 10px.
Now, select the High Pass Layer and invert its effect by the Image Adjustment option.
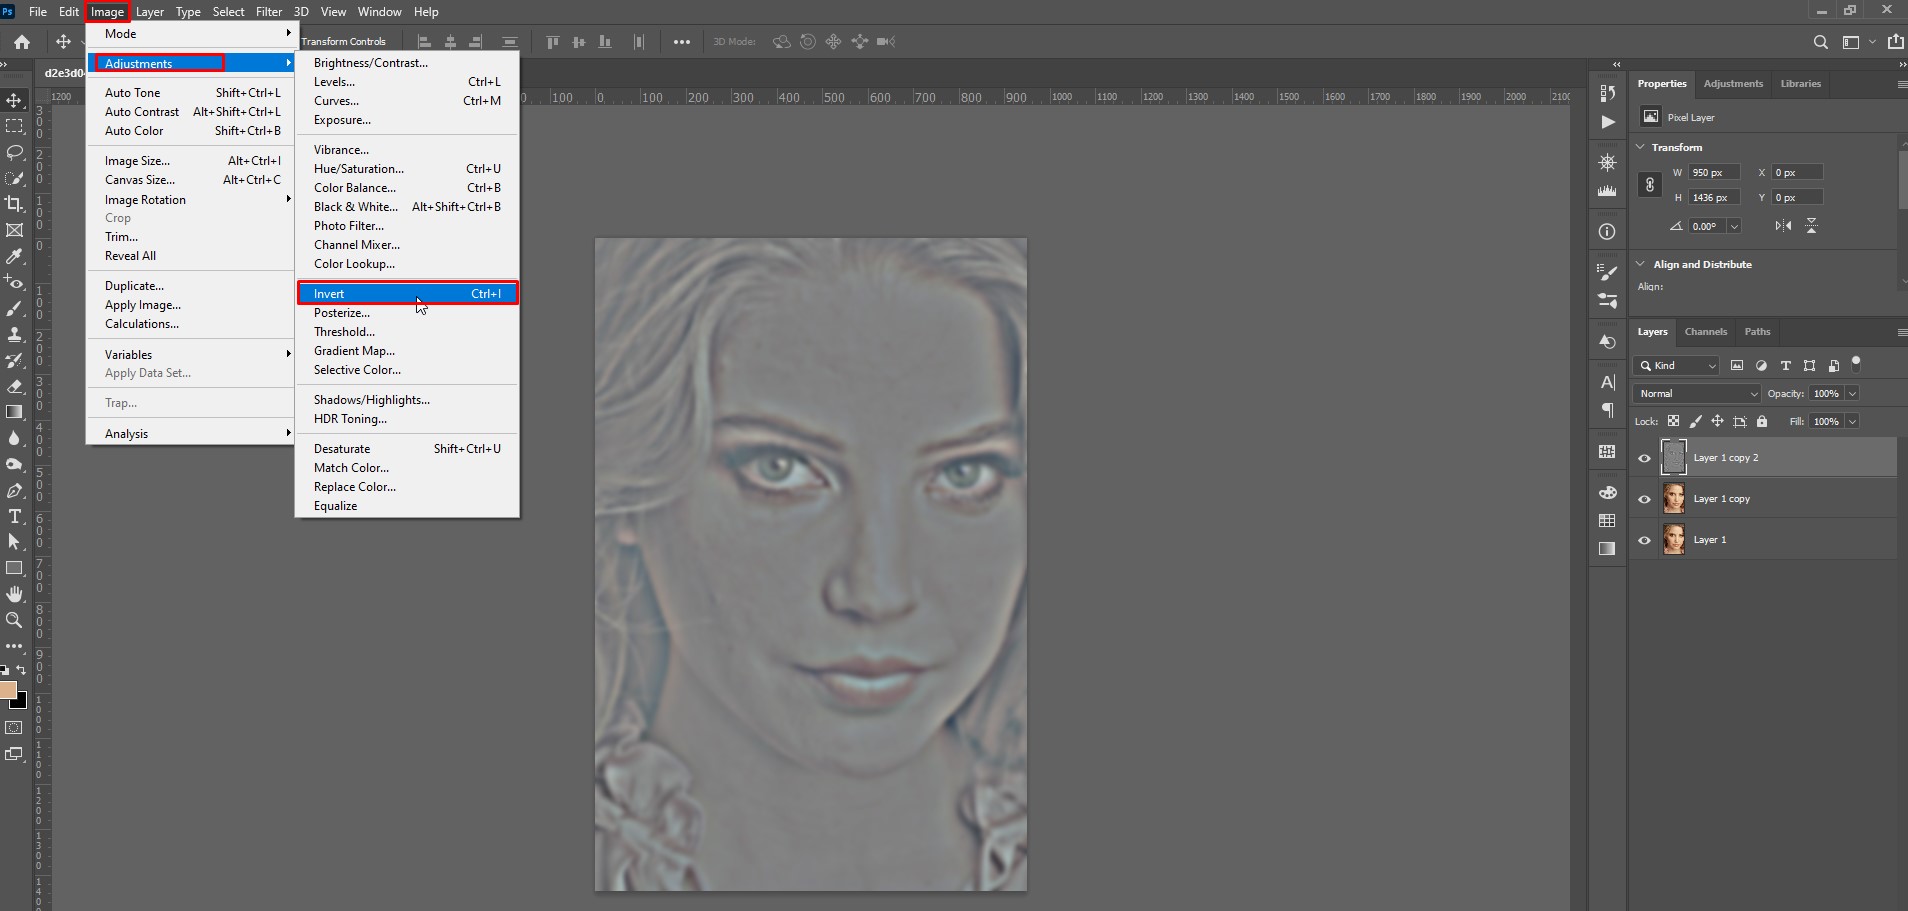
Tweak the Blending Option
Open the “Blending Option” dialog box. You should right-click the layer and choose Blending Options. You can also follow the path Layer – Layer Style – Blending Options.
- First, switch the blend mode to the Linear Light.
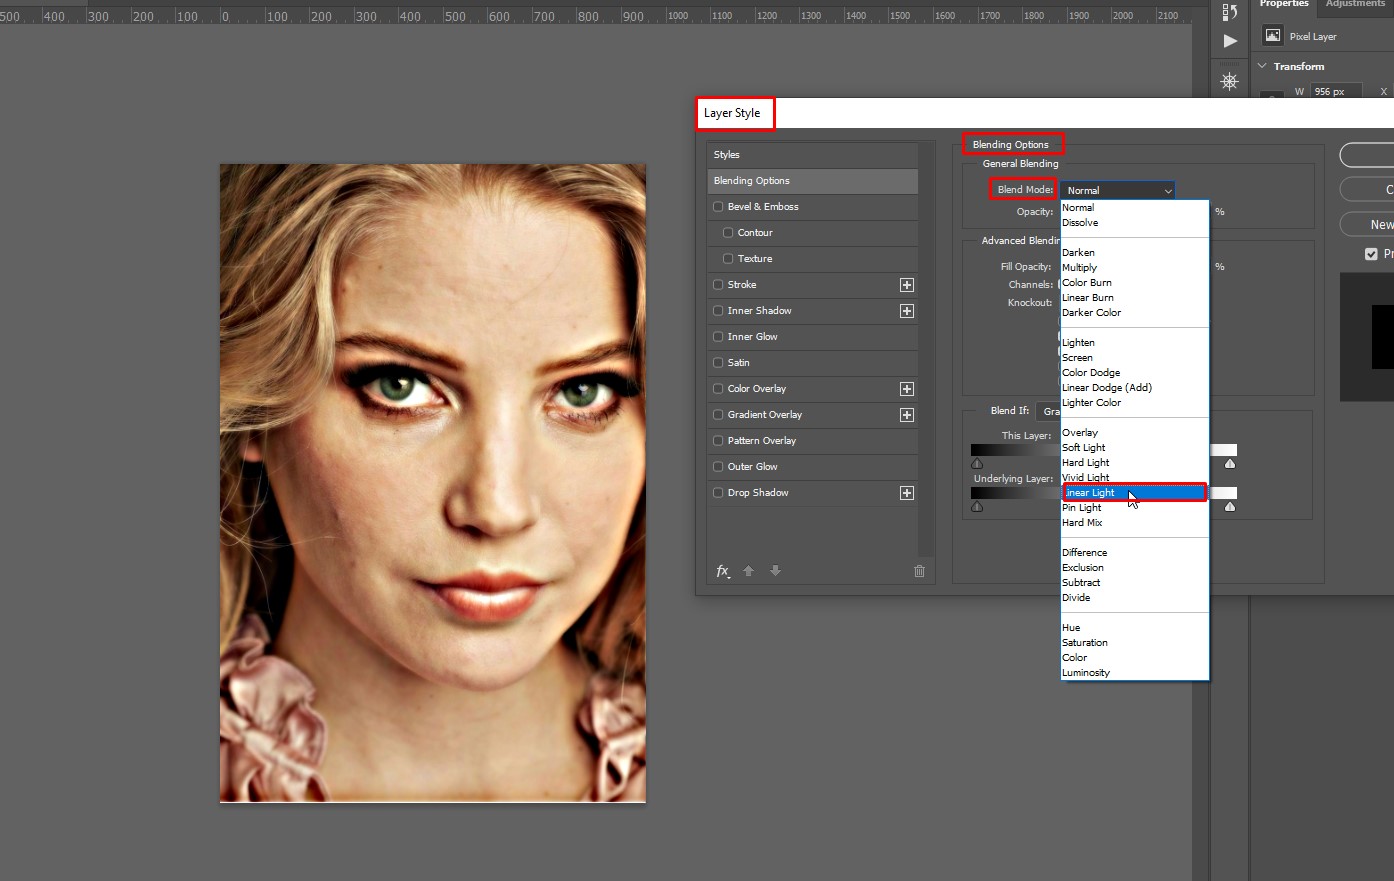
- Now move down to the panel’s sliders at the bottom. These are known as the “Blend if” sliders. Choose the slider named “This Layer.”
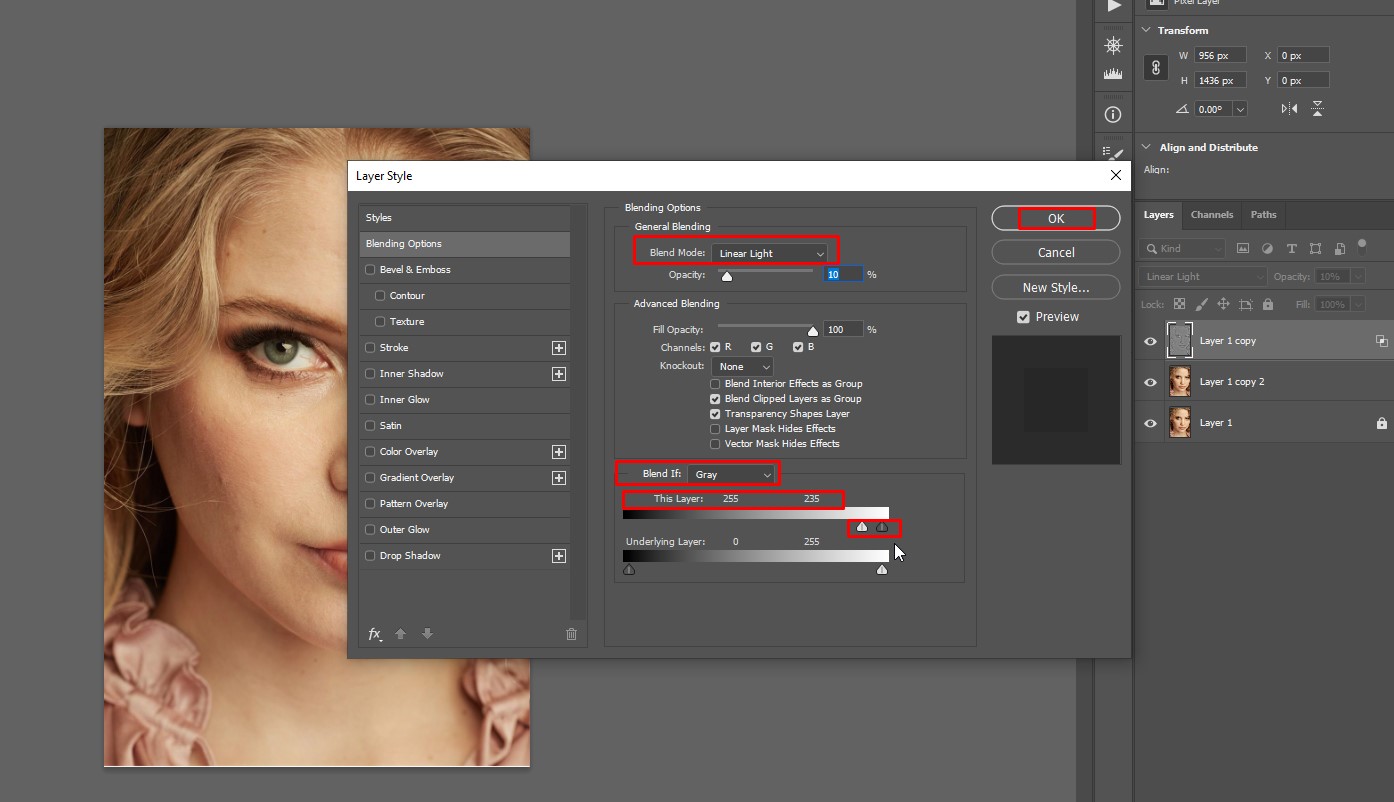
The slider has a dark triangle on its left and a bright triangle on its right end. Shift the bright one to the left and the dark one to the right. Change them until the number on the left changes to around 0/235 and the right number changes to around 10/255.
Apply the Blur
At last, use a layer mask to hide the Blur and brush it over the skin.
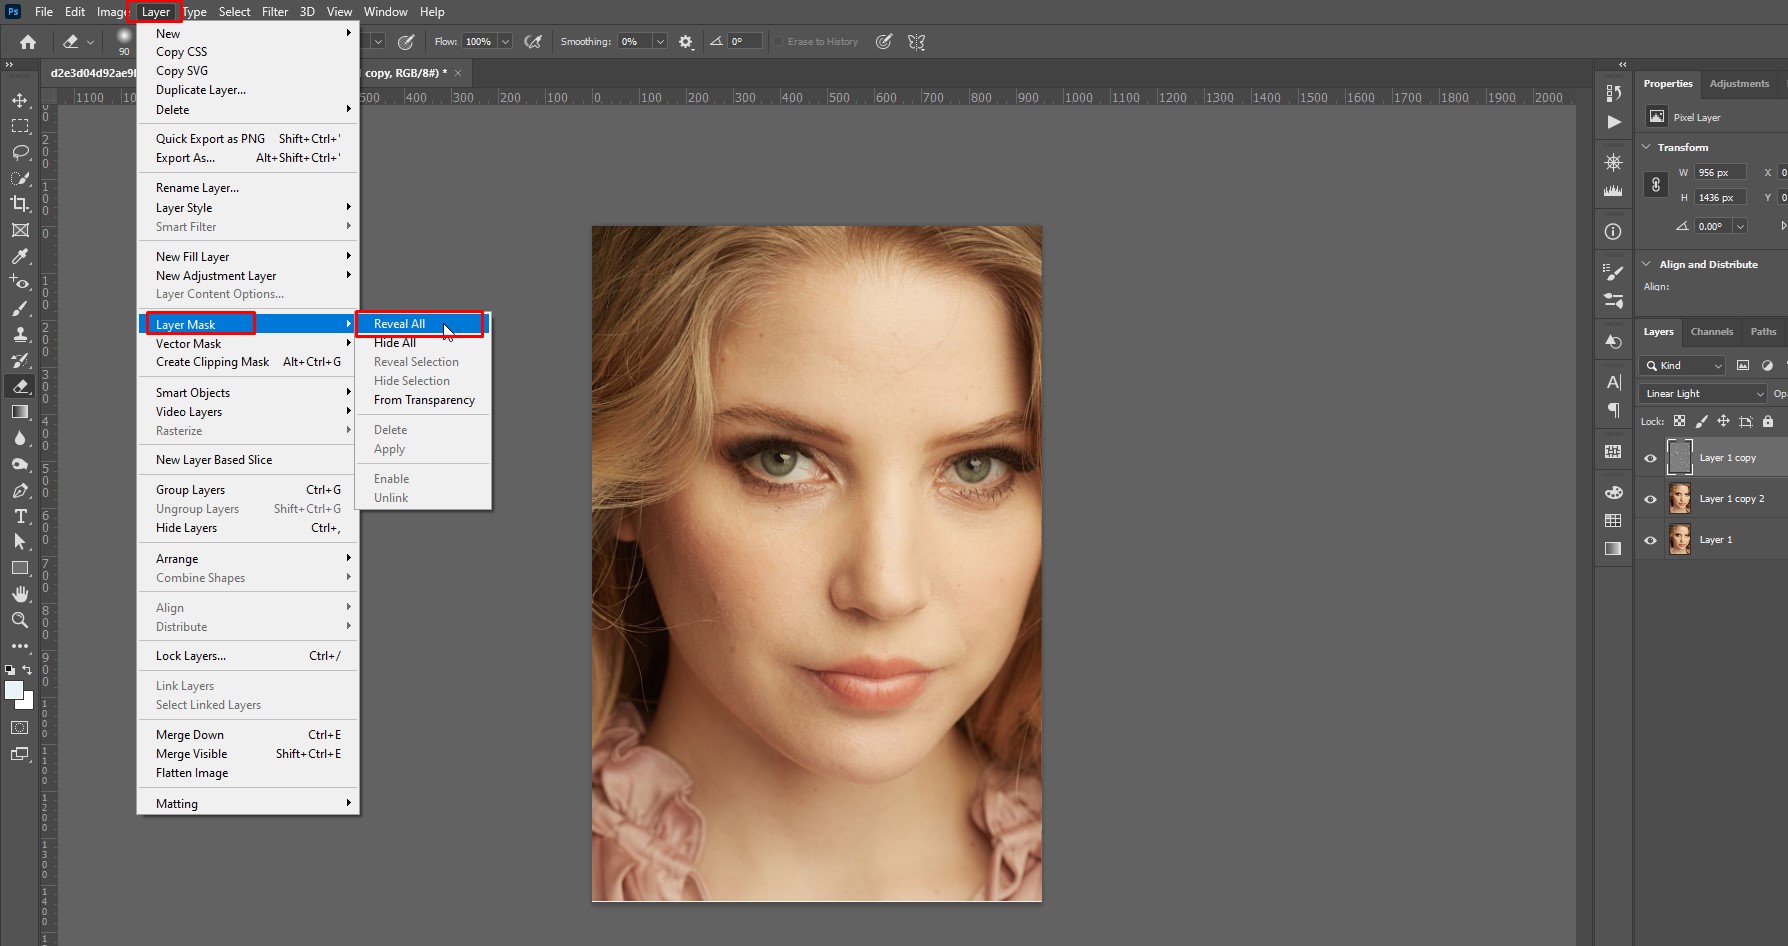
Don’t forget to use an inverted layer mask before starting brushing.
The High Pass Filter comes with comprehensive control and lets editors play with it. It would be a perfect solution to the question “how to make someone look thinner in Photoshop.” Yes, applying accordingly, you can make people look thinner with this tool.
How to Change Someone’s Skin Color in Photoshop
Adjusting skin color or tone is not a big deal to do in Photoshop. You can get literally any color or any shade of colors on someone’s picture. You can do it by following these basic steps-
Step 1 – Choose the Skin
- Go to the top menu bar of the Photoshop window and click Select
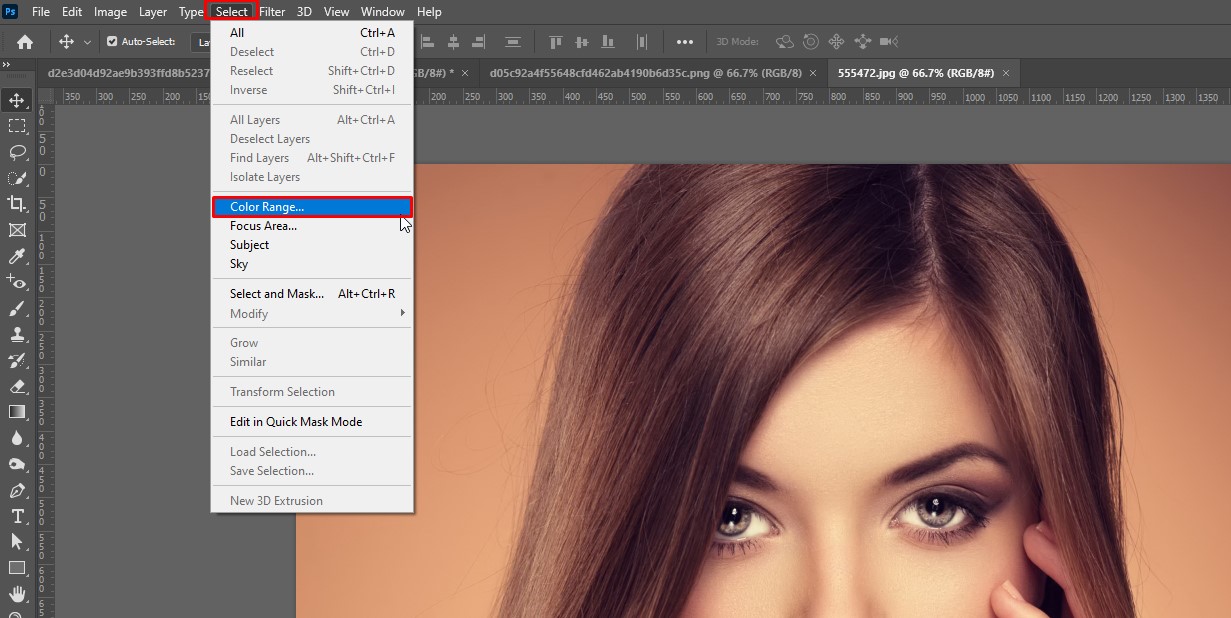
- Go to Color Range from there
- Select Skin Tones. Then turn on the option Detect Faces
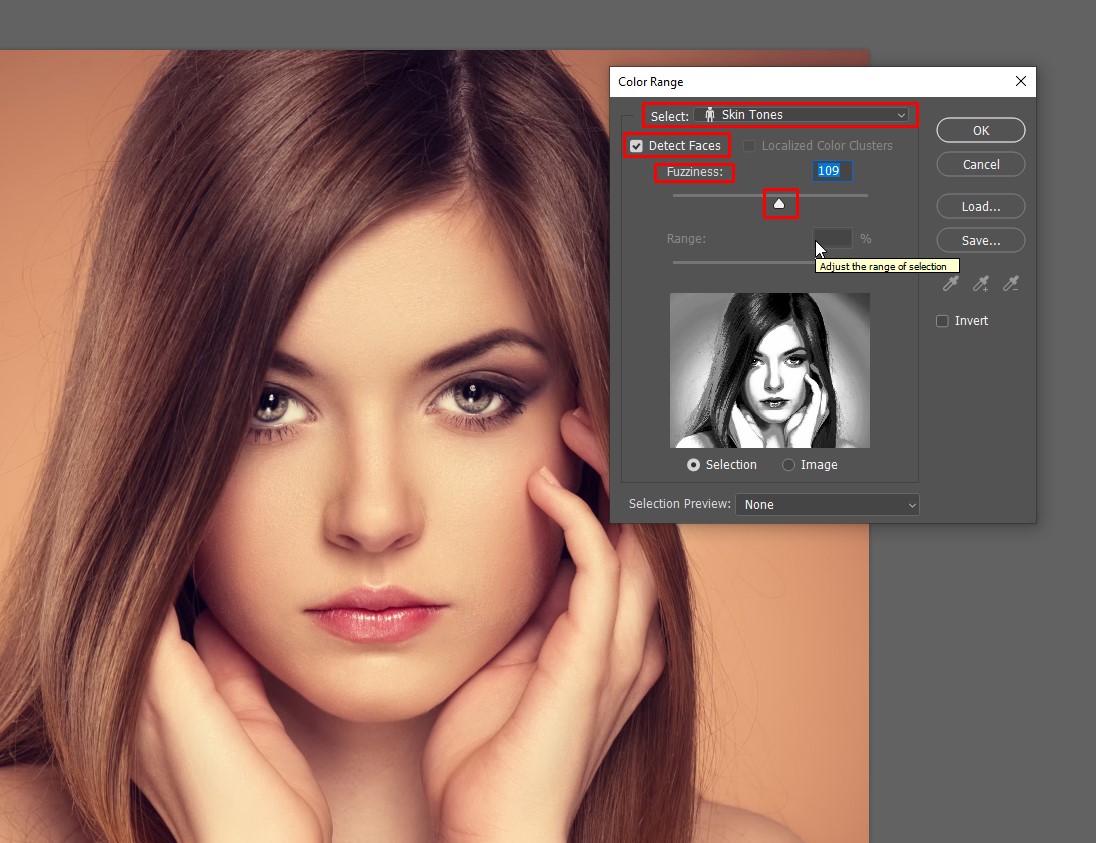
To improve the selection, move the slider associated with Fuzziness to its left or right. In the preview window, the preview can be seen. The white color represents the region that will be selected, while the black color represents the sections that will not be.
Step 2 – Adjust the Skin Color
- Go to Window and select layers to open the layer panel
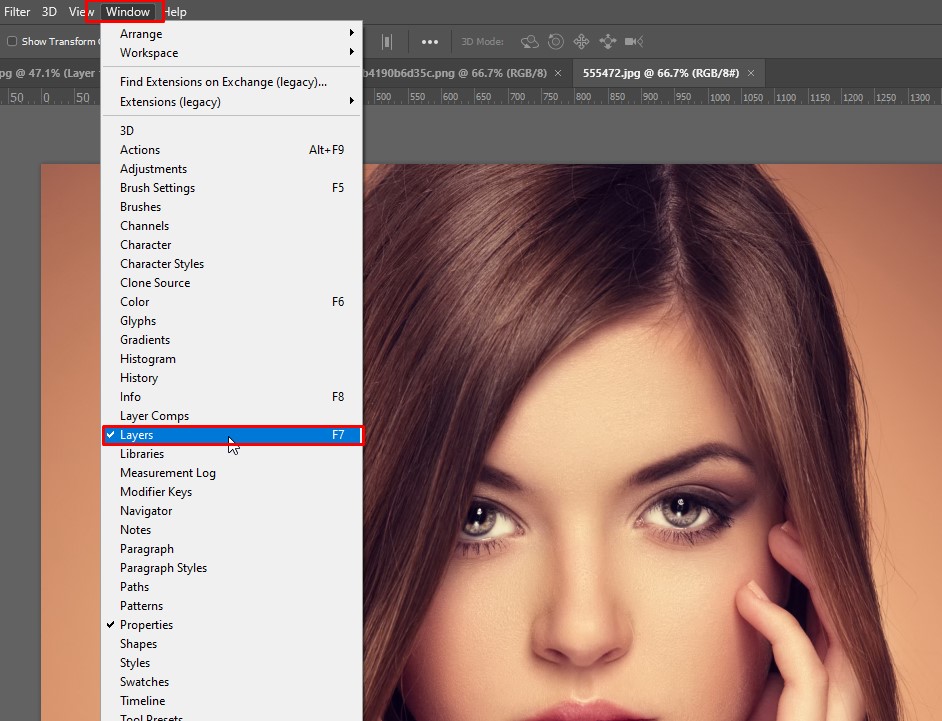
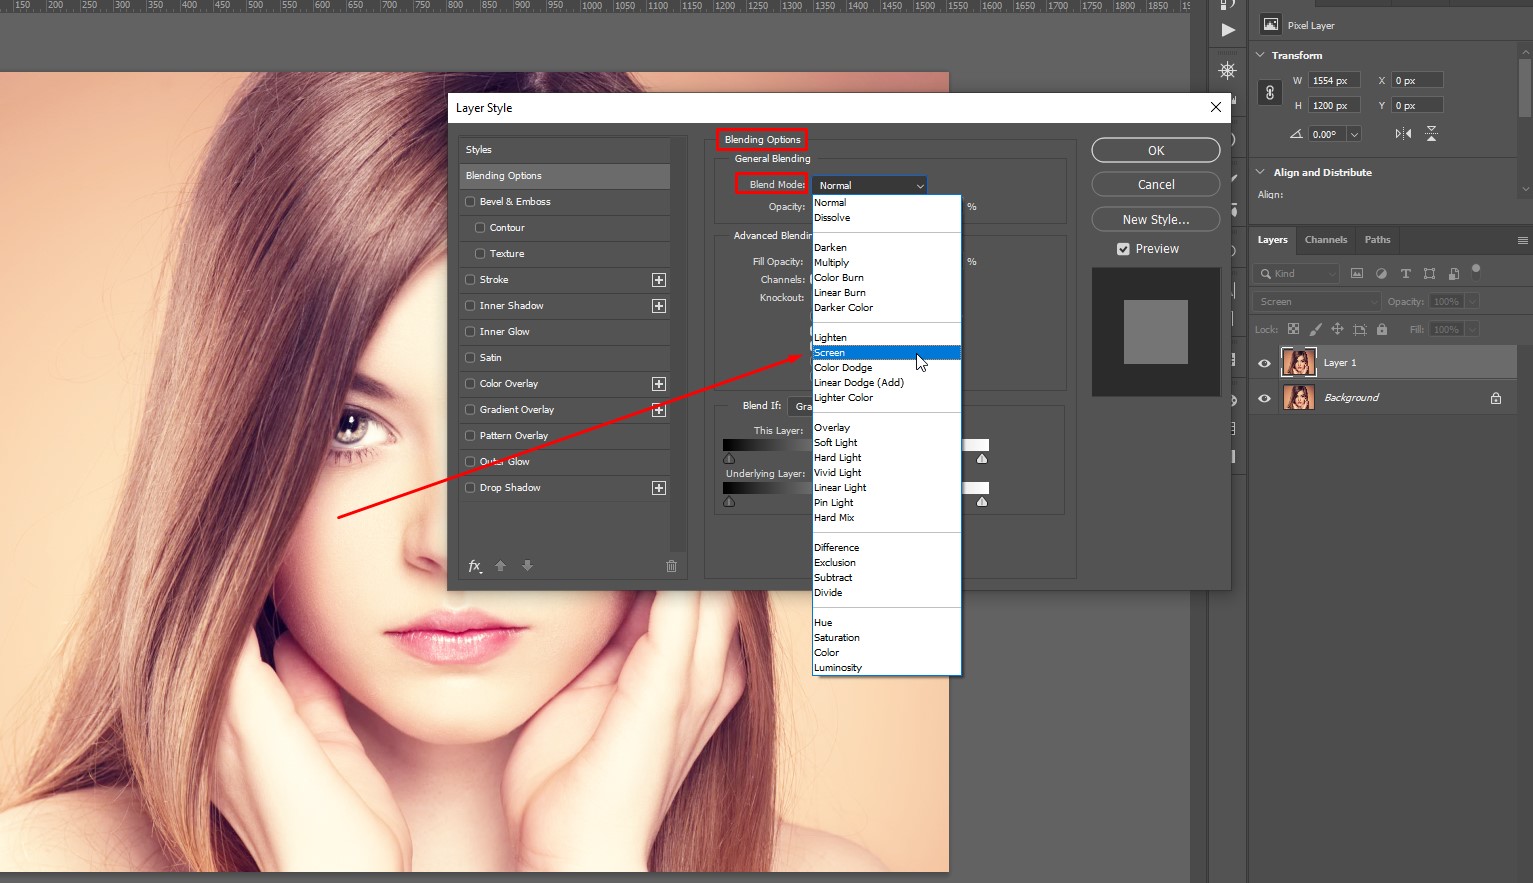
- Create a fresh layer and switch the blend mode to color
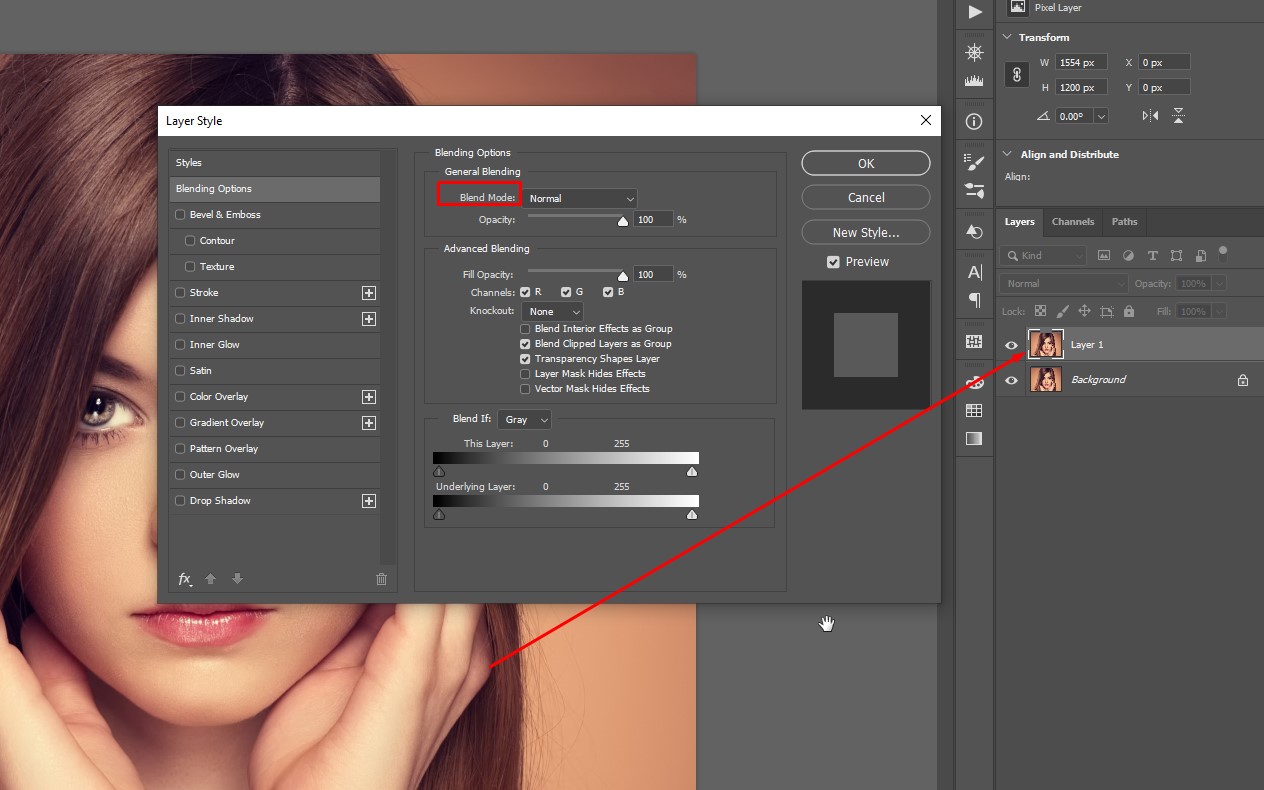
-
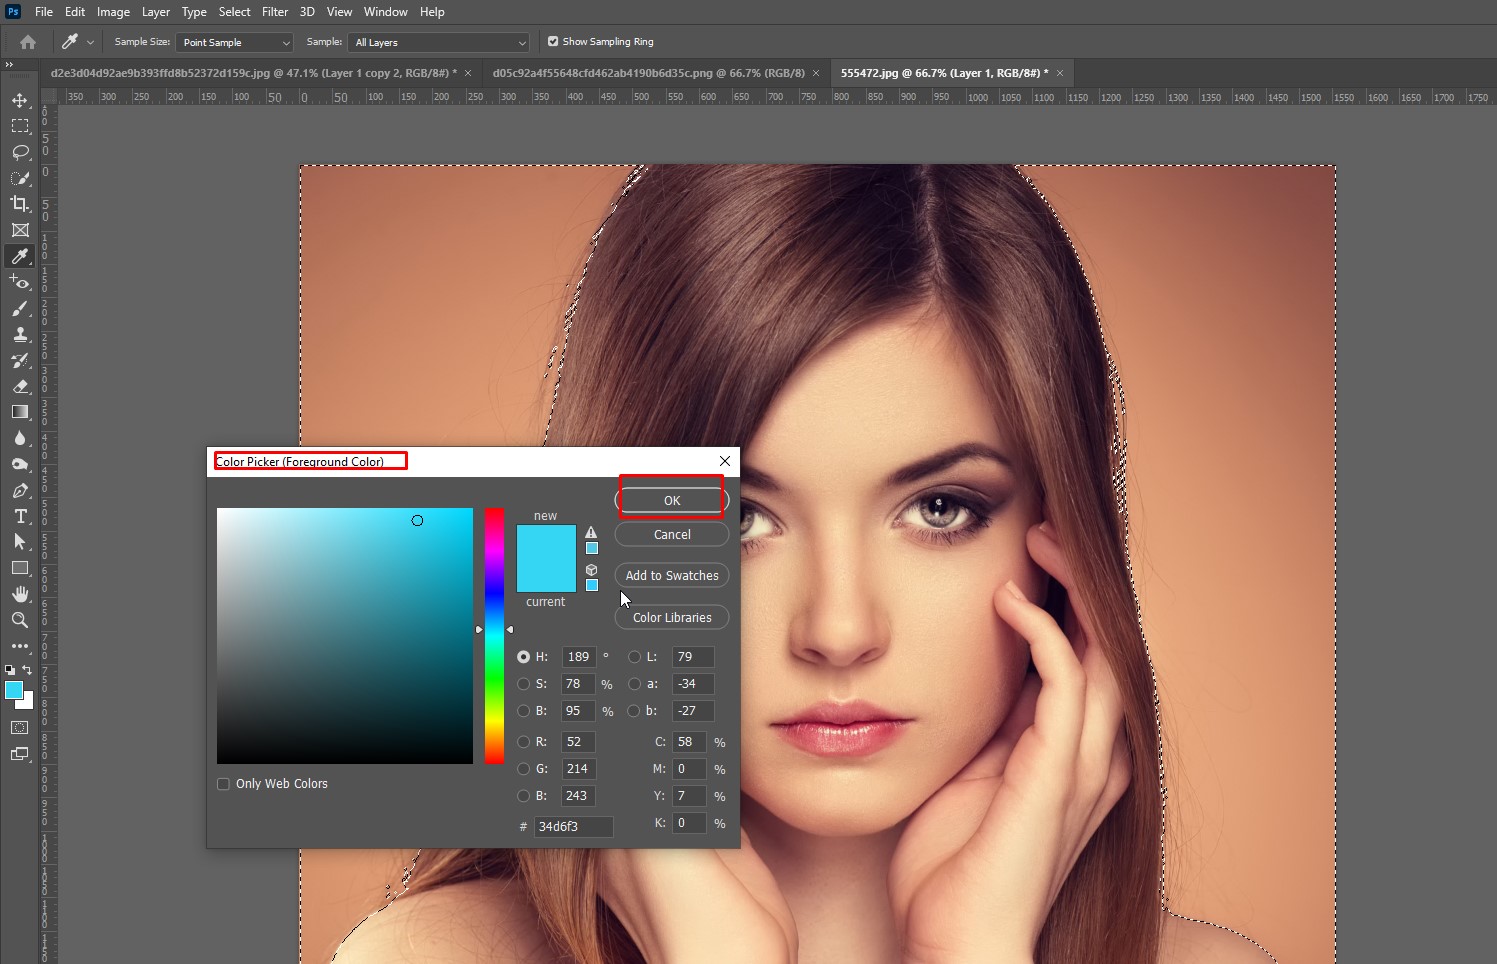
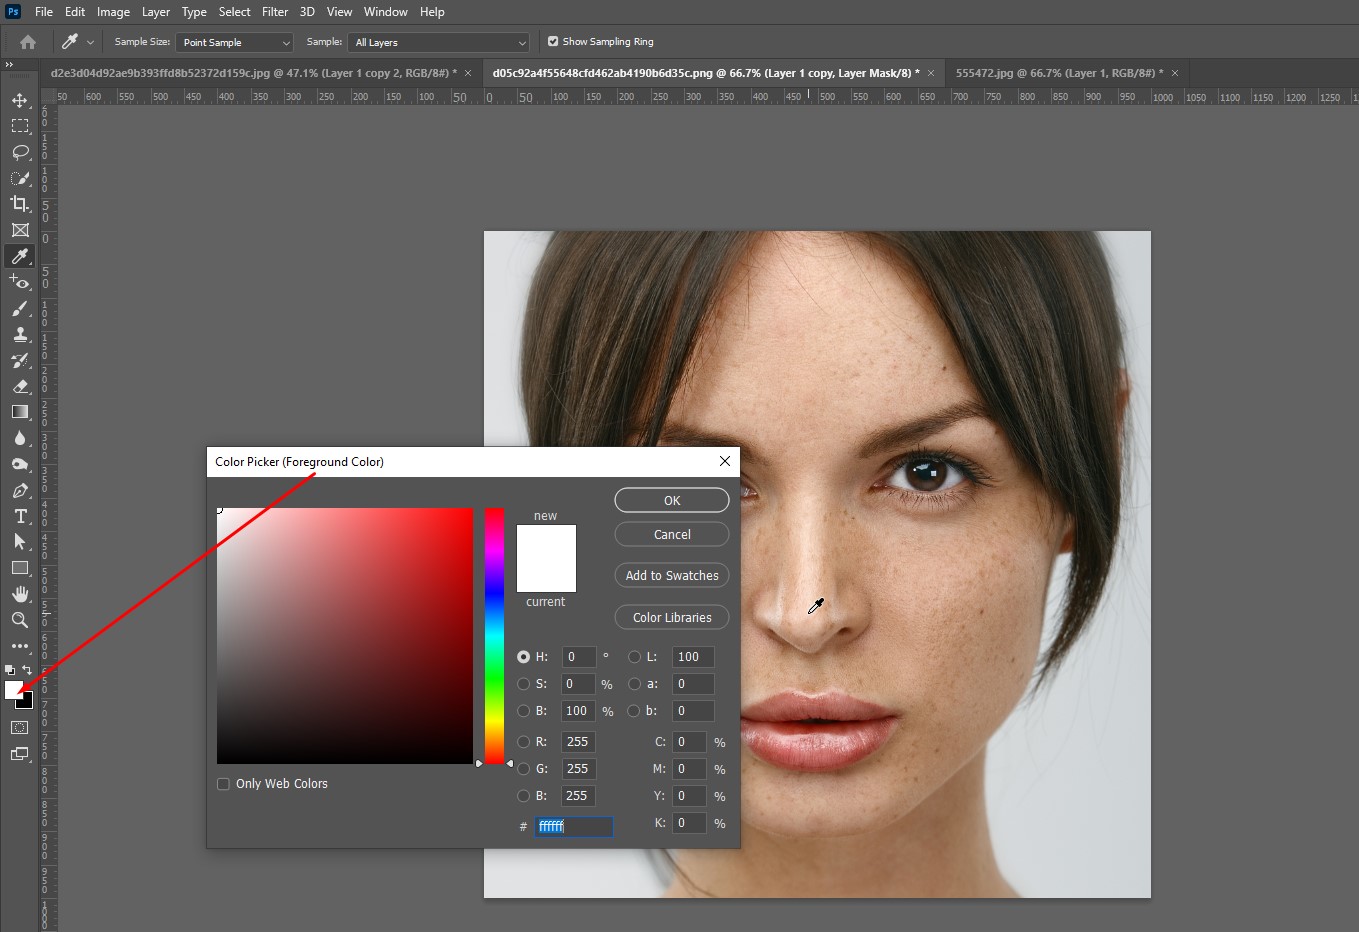
Choose a nice skin color or select a color that you want to get on the image
When you select a color, it will turn into your foreground color.
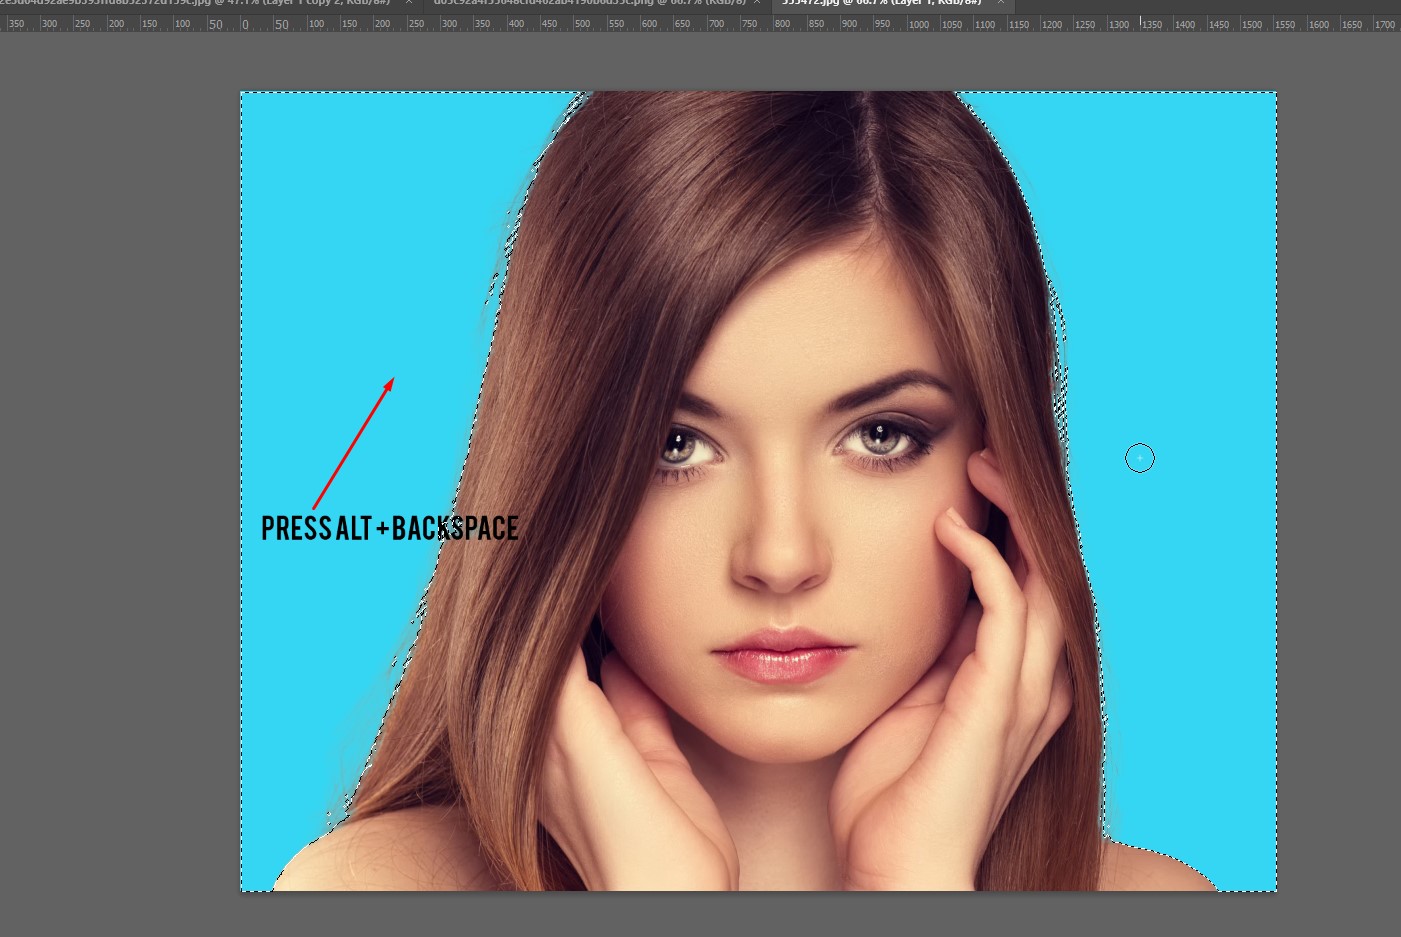
You have to fill the selected area with this foreground color. You can press Alt + Backspace on windows or Opt + Delete on Mac. To deselect the selection press Ctrl + D or Cmd + D.
Check out the video for the more clear concept-
Video source: PiXimperfect
Step 3 – Final Finishing
You can remove any unwanted skin color with the Layer mask. First,
- Go to the layer panel and select the layer mask
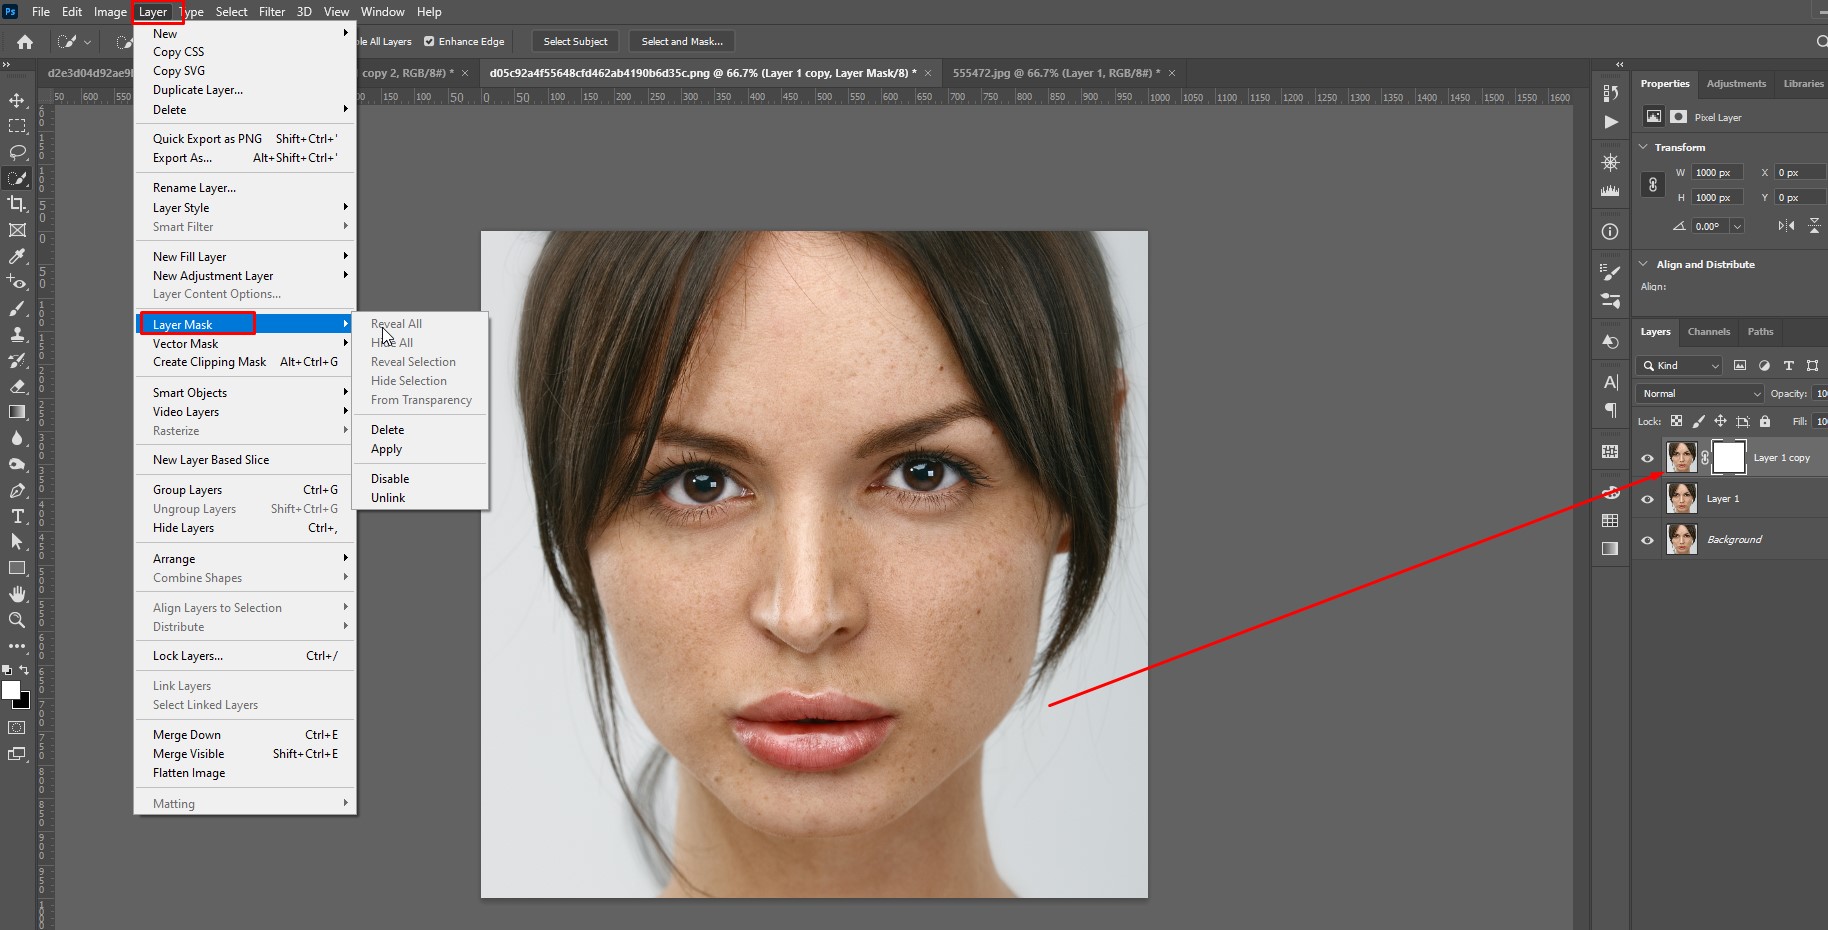
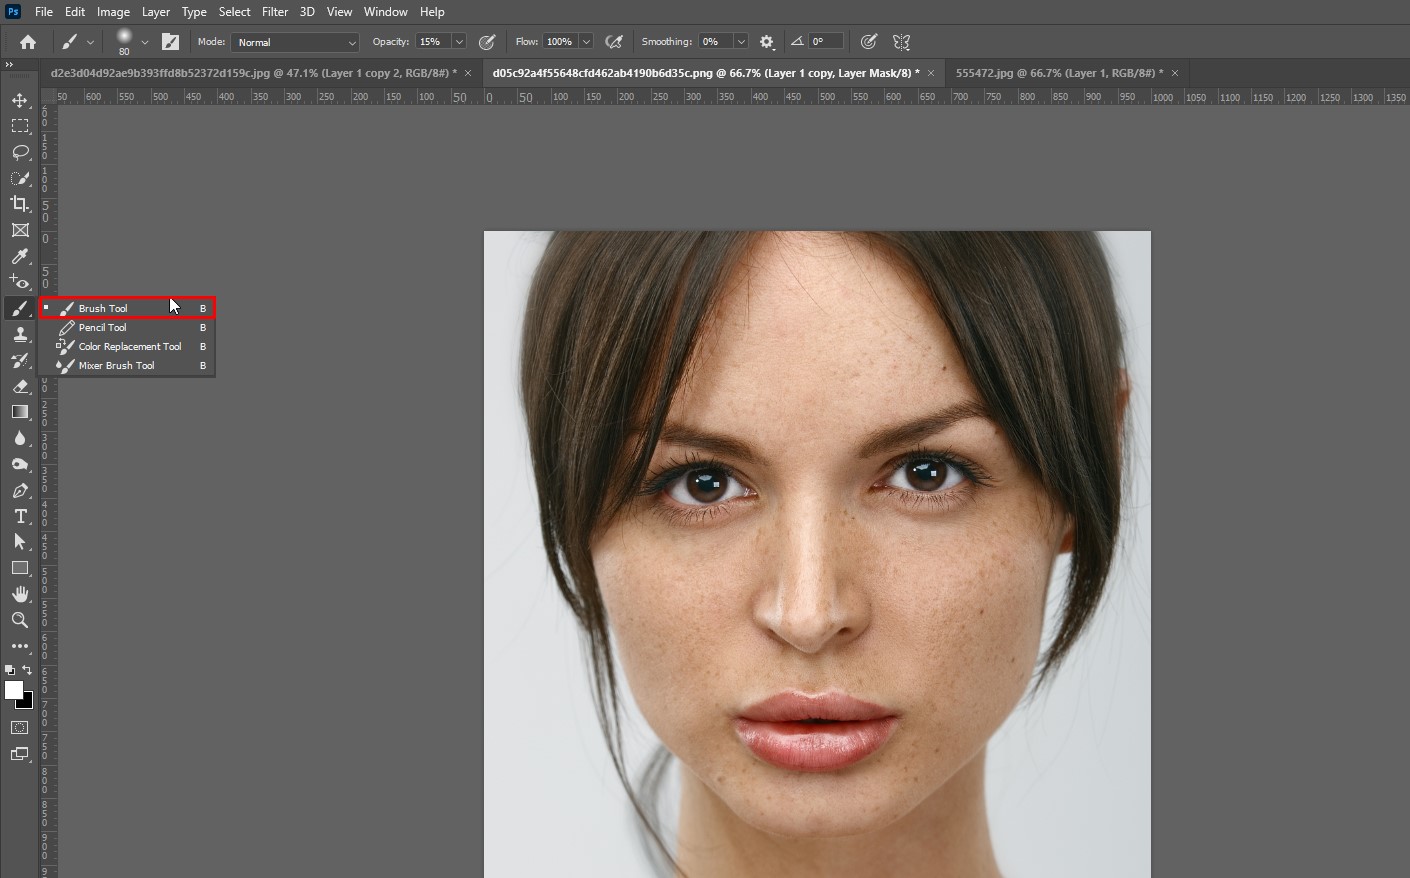
- Select the brush tool from the toolbar
- Bring back the foreground color
- Brush the area you want to change the skin color from
- Set the opacity of the layer around 50% to 70%
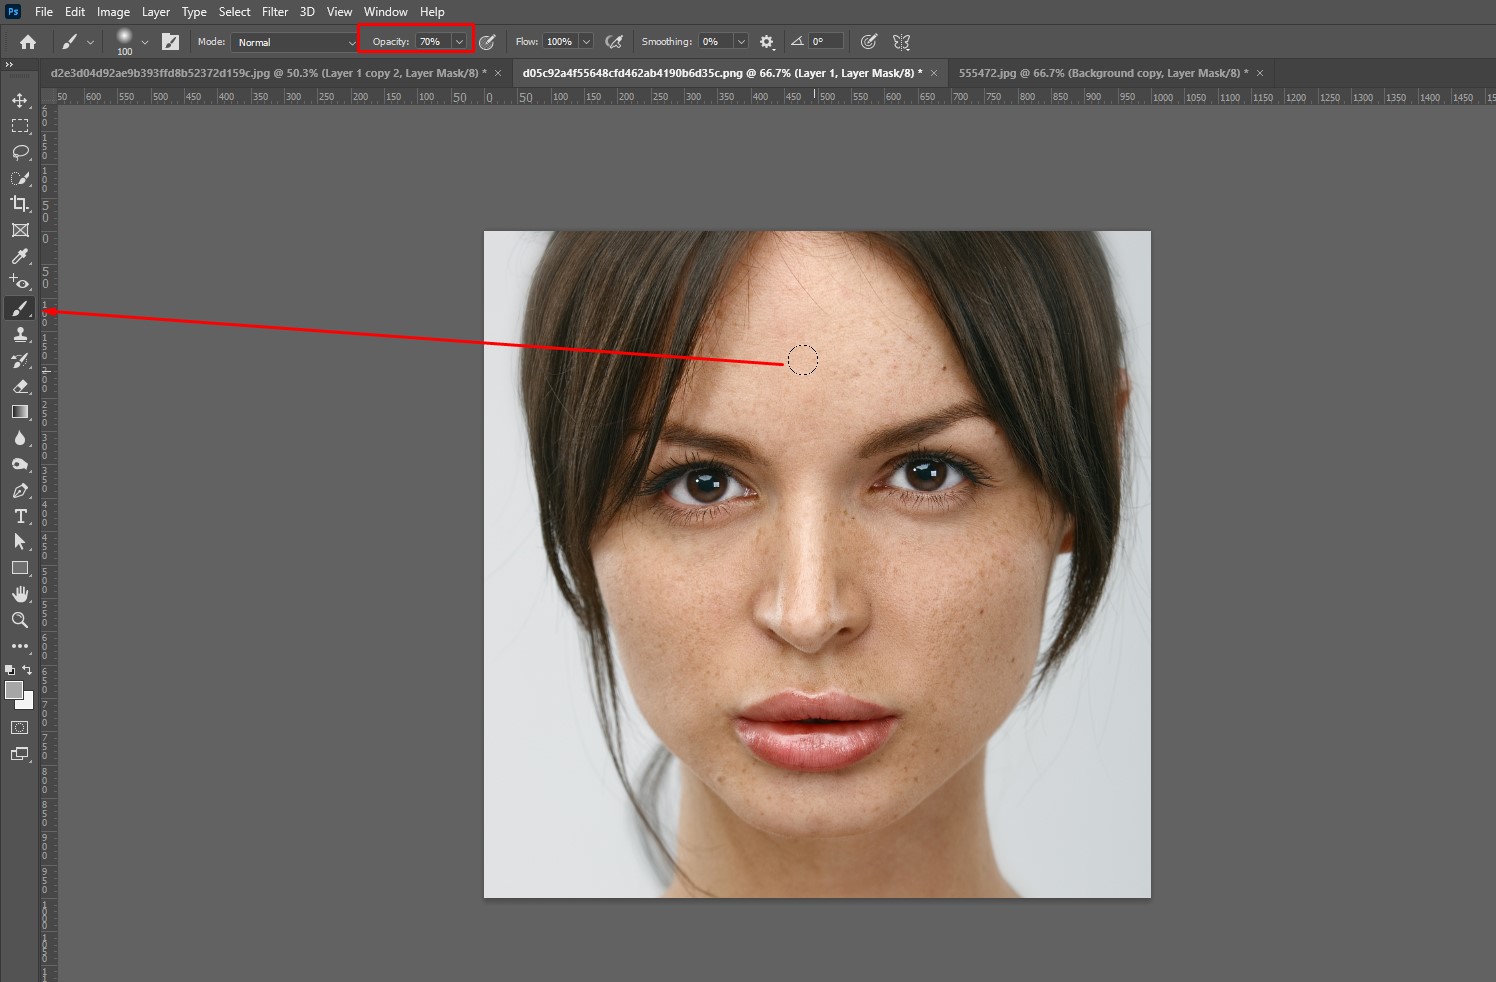
This will do. You will see your image having your selected color.
How to Make Someone Look Thinner in Photoshop
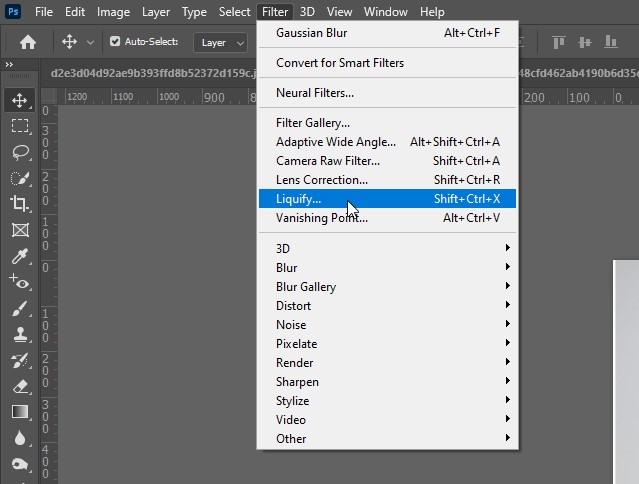
For years, magazines and newspapers have been touching up pictures of models and fashion icons, making them seem slimmer and more beautiful than they are. Prior to photo editing software, editors altered these photographs by physically merging portions of several photographs or doctoring photographs with mediums like paint, ink, or airbrushing. Today, tools like Photoshop’s “Liquify” has simplified the picture editing procedure. You can easily make a person look thinner in Photoshop using the liquify tool.
Conclusion
In Photoshop, there are actually many methods given to a photo editor to how smooth out skin in photoshop. Among them, only three methods for smoothing skin and removing imperfections from a person’s face have been narrated here.
The Blur tool is the easiest method to smooth and soften the skin in photoshop. However, it is a basic effect with little flexibility for the photographer. So the addition of Gaussian and Surface blur provides more control. The use of a High Pass filter, as well as Blur, improves the natural appearance by preserving the skin’s texture.


